
A portrait can be technically clean and still look flat, even though wrinkles, muscles and highlights are actually present. This is exactly where Dodge and Burn comes in. You paint with light and shadow directly into your image without changing the base colors. In this tutorial, I'll show you how to work on a gray layer, control brightness and depth selectively on the person, and thereby make the entire subject look more three-dimensional. The technique comes from a poster in the style of Tomb Raider, where this fine-tuning makes the difference.
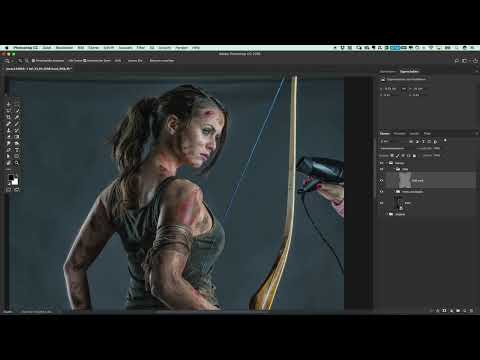
The video is only loaded from YouTube when you play it – data (including your IP address) is then transmitted to YouTube/Google. More in the privacy policy
Key Takeaways
Key Takeaways
- Work on a layer with the blend mode Soft Light and 50% gray. This way, every adjustment remains editable later.
- White lightens, black darkens. With the X key, you can quickly switch between the two colors.
- A low opacity of about 3% and several gentle passes are more effective than individual strong strokes.
- Place lights and shadows directly one after the other, and clear contrasts will emerge.
- Don't overdo it. Too much editing quickly looks unnatural and can blow out the skin.
Step-by-Step Guide
Step 1: Organize the Layers Panel
Before you get started, sort your layers. Name the existing groups, for example, "Form" and "Details," and create a new group next to them called "DnB" for Dodge and Burn. This seems like a minor matter, but it saves you a lot of time later, because numerous layers are quickly created in this phase. If necessary, briefly hide distracting panels so that you have more room in the palette.

Step 2: Create the Gray Layer
Hold down the Alt key while clicking the icon for a new layer at the bottom of the Layers panel. A dialog opens in which you can name the layer right away. I called it "DnB hard" because we are working with hard contrasts here. Set the blend mode to Soft Light and fill the layer with 50% gray. With this combination, the image initially remains unchanged, because neutral gray has no effect in this blend mode. Everything you now paint with white or black appears as light or shadow, while the original colors are preserved.

Step 3: Set Brush and Opacity
Choose a soft brush so that the transitions stay smooth. You adjust the size to the area you are working on. For the shoulder area, I used around 73 pixels in the video. I set the opacity to 3%. That sounds very low, but it's intentional: each stroke applies only a little, and you build up the desired brightness step by step. This way, you retain full control over the gradation.

Step 4: Emphasize Existing Highlights
Start with the highlights that the photo already shows. On the shoulder, it is often enough to go over the area two to three times until it becomes noticeably brighter. Check the result after each pass and stop in time. A practical tip: if the effect is already strong enough, leave it. A few clean strokes almost always look more natural than many layered on top of each other.

Step 5: Darken Right After Lightening
Highlights stand out especially well when you combine them immediately with shadows. Paint the light, then switch to black and slightly darken the area around the highlight. The white then appears brighter and the subject gains intensity. You can see this effect clearly in the video in the direct before-and-after comparison. The same principle applies to the shape of the body: darken one side slightly and brighten the other a little, and the body looks rounder.
Step 6: Switch Quickly Between White and Black
Instead of constantly changing the color in the color picker, press the X key. This toggles back and forth between white and black. White is used for lightening, black for darkening. The layer remains editable at all times. An advantage over the Dodge and Burn tools: those tools work directly on the pixels, whereas on the gray layer you can undo corrections without loss of quality. If you want to see what you have done so far, hold down the Alt key and click the eye icon of the layer.

Step 7: Working out muscles and tension
Add more highlights to the muscle areas on the arms. You can further emphasize the muscle strands by slightly darkening the areas directly next to them. Make sure to keep the adjustments subtle. The difference between a lightly edited arm and an exaggerated one is often just a small movement of the brush. This is exactly where you can see how strongly even a few strokes influence the tension in the image.

Step 8: Avoiding burning out the skin
If you go over the same spot several times with a high opacity, around 90%, the skin burns out. This usually looks unattractive, but in rare cases it can work as a deliberate burn mark, as I briefly demonstrate in the video. For this subject with many details, I refrain from doing so. If you want to try out the effect, choose an area with midtones, because the effect fits best there. Burning out bright areas, on the other hand, immediately looks overdone.

Step 9: Shaping the face, eyebrows and cheeks
In the face, you work especially carefully. Lightly brush along the eyebrows and darken them so they don't look too prominent. You can emphasize the cheeks with a subtle highlight to give the shape more depth. Make sure not to place too many highlights, because the photo already naturally contains many specular highlights. Otherwise, the portrait quickly looks unrealistic.

Step 10: Breaking up hair with highlights
Dark hair often loses all structure. Therefore, carefully add highlights to individual strands so that details become visible. With very deep black, it is often enough to brighten only slightly so that the hair no longer looks like a flat surface. Compare before and after to see whether you have found the right middle ground.

Step 11: Practical tip for photography
If you slightly dampen the hair or use hairspray while photographing, a natural shine is created. This often looks more realistic than any shine painted in afterwards, because it matches the lighting situation of the scene. Water on the skin or the hair would also have had the most coherent effect here. You should plan this idea in at the shoot, because in post-processing a photo without shine can only be corrected convincingly to a limited extent.

Step 12: Rounding off the body shape and checking the finer details
You can shape the buttocks and legs a bit more with soft shadows and highlights. Often a small adjustment is enough, because the shape is already right. On the back, you can additionally brighten subtly so that the body looks rounder. Wrinkles can also be emphasized if they suit the subject. In this case, I refrain from doing so, since the scene will still need a lot of attention later.

Step 13: Checking the result and adjusting softness
Finally, take a look at the overall impression. Turn the layer on and off to compare before and after. The work may be visible, but it should not look overloaded. If you want a softer look, set the layer's blend mode to Soft Light. Then the transitions look gentler. Whether hard or soft is a matter of taste. What matters is that the result fits your image idea.


Summary ??? Dodge and Burn on the Portrait: Painting Light for Sculpted Contours
With a gray layer in Overlay mode, you can precisely control light and shadow without destroying the original image. Work with a soft brush, low opacity and several careful passes. Place highlights deliberately and darken the surroundings directly afterwards so that contrasts emerge. Keep it subtle, because too much editing quickly looks artificial. The fine work on muscles, face and hair makes the subject more three-dimensional overall.
FAQ
Why do you work with a gray layer instead of the Dodge tool?The gray layer remains editable, you can undo corrections at any time, and the original image stays untouched.
Which opacity is suitable for the brush?In the video, I use about 3%. This way you build up light and shadow slowly and keep control over the gradation.
What do I do if the skin gets blown out?Go over the same spot less often and reduce the opacity. Blown-out skin is usually caused by too many passes.
When should I set the blend mode to Soft Light?When you want a gentler, softer look. Whether hard or soft contrasts fit better depends on your image style.
How do I check my changes?Hold down the Alt key and click on the eye icon of the layer. Then you will see only the Dodge-and-Burn layer.


