
Imagine you are looking at a jagged, rocky landscape from which water sprays and above which dark clouds gather. In this tutorial, you build exactly this kind of stage step by step from other people's landscape shots. The guide is aimed at anyone who needs a cinematic background for a poster or a photo composite.
The video is only loaded from YouTube when you play it – data (including your IP address) is then transmitted to YouTube/Google. More in the privacy policy
Key Takeaways
- Landscape photos can be combined into a believable scene using simple selections and Smart Objects.
- The horizon doesn't have to sit perfectly, as long as the perspective looks coherent overall.
- Smart Objects allow you to modify elements later without loss of quality.
- Layer masks and soft transitions reliably hide the edges of the composite.
- Fog layers and the "Difference" blending mode create depth and a rough atmosphere with little effort.
Step 1: Preparing the Background
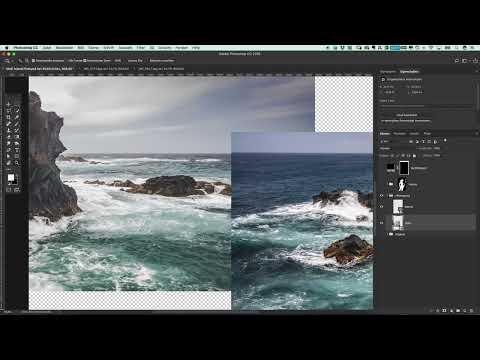
First, you need suitable source material. In this example, the landscape shots come from a photographer friend who contributes subjects from Ireland. Open the images in Photoshop and select the area that will later show the stones and the water. Copy it with Command+C (Mac) or Ctrl+C (Windows) and paste it into your poster file with Command+V or Ctrl+V.

Make sure you select not just a pretty subject, but also areas with enough structure. Smooth surfaces quickly look artificial later on.

Step 2: Setting the Horizon with a Guide
Before you fine-tune the subject, you define the position of the horizon. To do this, drag a horizontal guide out from the ruler. It serves as a reference and helps you align the composite consistently later. The subject doesn't have to fit the perspective perfectly at this point. What matters is that the line works as an orientation aid.

Step 3: Converting the Subject into a Smart Object
So that you can still distort the subject later without losing image quality, you convert the layer into a Smart Object. To do this, right-click the layer and choose the option "Convert to Smart Object". You can then move the image content up or down, rotate it, or distort it via "Transform". You can undo a step at any time if you don't like a distortion.

Adjust the horizon so that it roughly matches the line from the previous step. A small offset is no big deal, because the stones can be concealed later anyway through distortion and overlaying.
Step 4: Inserting Stones and Water as the Foreground
Now comes the part that gives the poster its drama. On the source image on the right, select the area with the stones and the water, including part of the horizon. Copy the selection and paste it into your main file. Here too, a Smart Object is recommended so that you can freely adjust the size.

Then reduce the size of the element significantly and position it so that it works as a foreground. You don't have to hit every stone perfectly. Often it is enough if the arrangement looks natural and the viewer's gaze is drawn into the depth.

Step 5: Determining the Image Crop Without Unnecessarily Burdening the File
The image crop is the next important point. Instead of using the Crop tool, you draw a frame around your subject with the Rectangular Marquee tool. Then fill a layer with a solid black color and invert its mask with Command+I or Ctrl+I. As a result, nothing is visible at first, but you can move and scale the mask via "Transform" with Command+T or Ctrl+T. Hold down the Shift key while scaling to maintain the proportions.

This approach has one advantage: you see the crop without deleting pixels. Only at the end, once the image section is final, do you crop the document. This keeps your file flexible, and Photoshop doesn't have to unnecessarily recalculate a lot of data with every correction step.

Step 6: Finalize the crop and place the stones deliberately
Now move the subject so that there is still some space at the top for the head and figure, and the stones are clearly visible at the bottom. Sometimes it's worth changing the crop slightly in order to subtly push the stones on the right and left into the image. The alignment determines how strongly the water comes across in the poster.
Make sure the stones don't look too intrusive. If they are distracting, you can hide them selectively. To do this, select the affected areas with the Quick Selection tool. Make sure that the "Sample All Layers" option is active in the options so that the selection takes the entire image structure into account.

Step 7: Make transitions soft with layer masks
Hard edges between two photos give away any composite. So create a layer mask and work with a soft brush in black or white. Black hides, white reveals. With a low brush opacity, you achieve smooth transitions that blend inconspicuously into the scene.

You repeat this step at the places where water and background meet. You don't have to close every transition perfectly. Later, additional elements often come on top that cover the seams.
Step 8: Set a neutral background as a base
A solid-colored, light background serves as a reference so that you can better judge the brightness and contrast of your composite. You build the poster on this base surface and later place all other elements on top of it. It also lets you check how far down the water should extend and where a wave shape might later sit.

If needed, enlarge the area you want to use. To do this, you can draw a selection over the stones, copy it to a new layer with Command+J, and then distort it. Distorting downward gives the water additional depth.

Step 9: Group layers and smooth edges
To keep an overview, you group all the stone and water layers and give the group a clear name, such as "Stones and Water". Then you apply a soft edge over the transition so that the spot no longer looks so harsh. The sky doesn't have to disappear completely. What matters is that the transition appears softer overall.

Step 10: Add fog as a layer for more depth
A fog layer gives the scene atmosphere and depth. First, select a stone in the foreground with the Quick Selection tool. Then create a new color fill layer, invert it, and place it in a new group that you call "Fog". Add a layer mask to the group and draw a light gradient with the Gradient tool. This way the fog disappears in the right places, and the depth arises all by itself.

Briefly show the figure in between to check whether the effect fits the scene. The fog should support the mood without covering the main figure.

Step 11: Insert a sky and work with blending modes
For a rough mood, you need a suitable sky. Place your sky photo over the scene and rotate and scale it until the clouds are where you want them. The goal is for the smoke to be visible more on the left side.

Instead of laboriously cutting out the subject, you can work with blend modes. Try out the different options, such as "Darken," "Overlay," "Soft Light," or "Hard Light." The "Difference" mode is especially helpful. It inverts the brightness values because the clouds are predominantly gray and contain only a few white areas. This creates a striking structure with dark cloud shapes that blends well into the scene.

You don't need to cleanly cut out the lower area of the sky. Place the layer as a clipping mask on the fog group. Then reduce the fill until the clouds only sit in the background. Finally, you can fine-tune the position by moving, scaling, and rotating.
Step 12: Check the result
Finally, compare the background without and with the montage elements. You will immediately see how much impact the individual layers have together. The foundation is now in place, and you can further expand the composite with the figure, typography, and light effects.

Summary ??? Background Montage for a Tomb Raider Poster in Photoshop
You have seen how landscape photos can be combined into a dramatic scene with simple means. You controlled the horizon and perspective using guides and smart objects, determined the image section without destructive cropping, and created soft transitions with layer masks. The fog layer and the "Difference" blend mode gave the scene additional depth and atmosphere. With these techniques, you have a solid foundation for any further compositing.
FAQ
What software is needed for this tutorial?You need Adobe Photoshop, as all techniques work with layers, smart objects, masks, and blend modes.
Do I need a Mac to follow along?No, the keyboard shortcuts are shown for Mac in the video; on Windows, you replace Command with Ctrl.
Why should I use smart objects?Smart objects allow you to distort, scale, and rotate subjects without visibly affecting image quality.
How do I create a fog effect layer?Create a color fill, invert it, add a layer mask, and drag a soft gradient with the Gradient tool.
What does the Difference blend mode mean?Difference blends the brightness values of two layers and inverts areas in the process, giving clouds a striking structure.
Can I still change the image section later?Yes, if you define the section using a mask and Transform, it stays flexible until you finally crop the document.


