
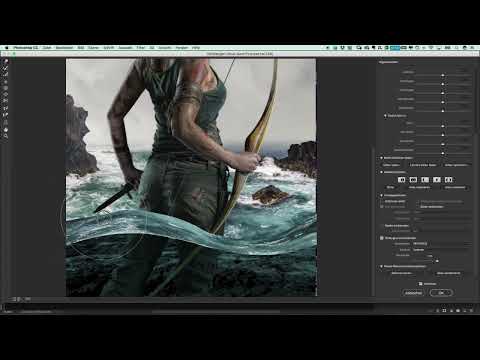
A good poster often lives on a single line: the spot where the water surface transitions into the depth. This is exactly the transition you will build yourself in this tutorial. You don't need a ready-made wave motif for it. Instead, you take a section from an ordinary water photo and shape it with the Liquify filter so that it becomes a slightly blurred wave.
The video is only loaded from YouTube when you play it – data (including your IP address) is then transmitted to YouTube/Google. More in the privacy policy
The path to get there isn't always straightforward. You will try a few approaches that don't work, and that is exactly what makes up the learning effect. If you understand why a method fails, you can later edit other motifs using the same principle.

Key Takeaways
Key Takeaways
- A water section from a stock image works as a reference, even if it doesn't look like a wave on its own.
- Cutting out and distorting with anchor points quickly looks artificial. The Liquify filter offers more control.
- With the "Show Backdrop" option, you can deform only the water layer without changing the background.
- A Freeze Mask protects the edge so that nothing breaks when pushing downward.
- A Smart Object with a mask allows you to adjust blur and liquify independently of each other.
Step-by-Step Guide
Step 1: Select the Water as a Reference
Open your water photo and select the lower area of the water surface that you like. This area provides the structure that will later carry the wave. Drag out the selection, copy it, and paste it onto a new layer at the very top of your document. The layer must be above all others in the Layers panel, otherwise it won't cover your composition in the right place.

Step 2: Adjust Size and Position
The pasted water is usually too large for your motif. Scale it down with Transform until the proportions fit your poster. Then place it roughly where the transition between surface and depth should later appear. It doesn't have to sit perfectly yet, because the actual shape is only created in the Liquify filter.

Step 3: Why Cutting Out and Distorting Aren't Enough
You could cut out the water, but then the transition quickly looks flat and unnatural. Trying to create a wave shape with Mesh Distort also achieves little. You have to set a great many anchor points, and every additional point makes the result harder to control. This step shows you why you need the Liquify filter: it deforms the image freely and feels more like pushing material around than editing individual points.

Step 4: Prepare and Merge Layers
Hide the water layer and give it a clear name, for example "Wave". Then hide all layers that don't belong to the reference. With the keyboard shortcut Command, Alt, Shift and E, you merge all visible layers into a new layer. Name this layer "Reference". This step is important because it gives you a fixed background later that you can use for orientation. Then show the wave again.

Step 5: Convert to a Smart Object
Convert the water layer into a Smart Object. This is the foundation for everything that follows, because only this way can you apply filters and masks flexibly later and change them afterward without destroying the original image.

Step 6: Set Up the Liquify Filter Correctly
Open the filter via the Filter menu and choose Liquify. The first attempt of simply pushing the water roughly up and down often leads to a result you don't find convincing. You can keep liquifying at any time, but it makes much more sense to set the settings correctly. To do this, scroll down in the dialog window to the Layer options and enable "Show Backdrop". Select your "Reference" layer as the reference.
The advantage is obvious: the background remains unaffected, and you can distort only the water layer. Reduce the opacity of the wave a little so that you can see the contour of the reference. To do this, zoom in a bit closer.

Step 7: Shape the lower area of the wave
Start with the lower area, because this is where the basic shape is created. Choose the Push tool, i.e. the Forward Warp tool, and carefully pull the water in the desired direction. Make sure that the shape roughly matches the structure of the reference underneath. Work with small movements and keep checking whether the wave looks harmonious overall.

Step 8: Fine-tuning the height
The wave rarely sits right on the first try. Gently push the affected areas up or down until the height is right. During this fine-tuning, it is worth switching back and forth between the view and the reference more often. If you set the opacity back to 100 percent in between, you can better see what the gradient will look like in the end.

Step 9: Freeze the narrow transition
When pushing the upper area down, the edge of your wave can break apart. To prevent this from happening, show the Freeze Mask and specifically protect the narrow transition. Freeze only this area and not the entire wave, as otherwise the distortion in the transition has no room left to move. Once the transition is protected, you can push the upper area down without risk. The mask can be hidden again afterwards when you no longer need it.

Step 10: Determine the thickness and sweep of the wave
Now you decide how thick the wave should look and what sweep it has. There is no right or wrong here. Try out different variations and make sure the wave does not become too thick. The distortion in the lower area can be a little stronger, because later a blur effect will make the water look softer.
Step 11: Thin out the wave at the edges
I recommend keeping the wave subtle in some places and making it stronger in others. It should overlap slightly, but taper off nicely thin at the edges. This creates the depth you need for a poster look. Check the overlap again and again with the reference layer, because that is precisely where the contours often don't fit perfectly.

Step 12: Remove the Freeze Mask and readjust
When the wave is more or less right, you delete the Freeze Mask and push the wave upward once more in a targeted way. Then check the transition and adjust it in the places where it doesn't sit cleanly yet. This is not wasted time, but the moment when the wave finally feels like a wave.
Step 13: Test the blur
In the next step, you make the transition softer. To do this, apply the Gaussian Blur to the layer. You will quickly notice that the filter causes a problem: it changes the entire image and not just the edges that you want to be softer. This test is still valuable because it shows you what effect you actually want to achieve.

Step 14: Solve the problem with the Smart Object
The filter also affects the Liquify, and that is why you shouldn't simply apply it directly to the layer. Delete the blur and the mask again. Then add a new mask to the layer and convert it into a Smart Object again. Now you can add the Gaussian Blur as a separate filter, and the Liquify filter remains unchanged.

Step 15: Soften only the edges
Apply the blur with a value of about 4 and then invert the mask. This way, the blur only affects the areas that you specifically mask. A value of about 40 for the opacity or fill can make the transition subtle and natural. In the upper area of the wave, the transition should stay rather sharper so that the wave doesn't become blurred.

Step 16: Fine-tuning the transitions
Deliberately mask the lower area more softly, because the transition there is the most important for the effect. The background can also become a bit softer so that the depth looks more believable. Work your way up piece by piece and check the result again and again from a distance. This step decides whether the wave looks like a real dividing line.

Step 17: The first step is complete
You now have a water wave that separates surface and depth from each other. It is not perfect yet, and that is fine. Later you will add light, refine the transition further, and make the details consistent. For a start, though, the result is a solid foundation that you can build on in the next step.

Summary ??? Creating a water wave in Photoshop with the Liquify filter
You have learned how to shape a wave from a simple water cutout using the Liquify filter, one that separates surface and depth from each other. The key lies in the combination of reference layer, smart object, and freeze mask. With a second smart object and an inverted mask, you additionally control where the transition stays soft and where it stays sharp. This keeps your poster flexible, and you can still change every setting later.
FAQ
Why shouldn't I simply cut out the water surface?Cut-out water surfaces usually look flat because they lack the deformation and natural overlap that make up a real wave.
What does the Show Backdrop option in the Liquify filter do?It shows you the reference layer so that you can shape the wave in the right place while the background remains unchanged.
Why do I need a freeze mask?It protects the narrow transition from breaking apart when you push the upper area of the wave downward.
Why do I convert the layer into a smart object?A smart object allows you to change filters and masks afterwards without destroying the original image.
Why shouldn't I apply the blur directly to the layer?The filter would then also affect the liquify effect, and you would lose control over the shape of the wave.
How do I make sure that only the edges become soft?Apply the Gaussian Blur as a filter on the smart object, invert the mask, and paint in only the areas that should become softer.
What do I do if my wave doesn't fit on the first attempt?That is normal. Set the opacity to 100 percent in between, compare with the reference layer, and work in small steps.


