
A dry pair of pants quickly looks lifeless in photos, especially when the model's upper body has already been splashed wet. In this tutorial, you use an adjustment layer and a brush to convincingly bring the pants in line with the rest of the scene. Elaborate water effects are not necessary for this. The original image comes from a Tomb Raider-style poster in which water elements have already been added.
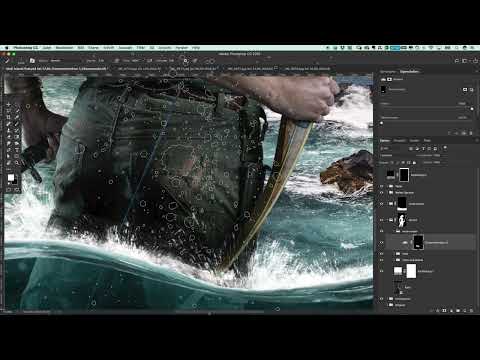
The video is only loaded from YouTube when you play it – data (including your IP address) is then transmitted to YouTube/Google. More in the privacy policy
Key Takeaways
- In reality, wet fabric looks mainly darker, not more transparent.
- A Levels adjustment layer with the Luminosity blend mode changes the brightness without distorting the colors.
- With the layer mask, you determine exactly where the wetness becomes visible.
- You apply water splashes sparingly with a suitable brush, scaled down and in the direction of the water's movement.
- Fine-tuning often means taking things back: with black on the mask, you cleanly remove mistakes.
Step-by-Step Guide
Step 1: Take a Critical Look at the Starting Point
Before you touch a brush, look at the image from a distance. The upper body already looks damp, while the pants look flat and dry. This very contrast is what catches the viewer's eye. So your goal is not to make the pants look see-through, but to depict the wetness realistically.

Step 2: Understand the Principle of Wet Fabrics
Imagine a cotton fabric soaking up water. What changes most is the brightness: wet textiles appear darker and richer. Leather, on the other hand, often stays shiny because water clings to it and beads off. This understanding is the key, because darkening will be your most important tool for realism.

Step 3: Open the Group and Name the Layer
Open the group containing the model's layers and continue working directly inside it. This keeps all changes neatly in one place. Give your new layer a clear name, for example "Pants darker/wetter". A clear label saves you unnecessary searching later when several layers are in play at the same time.

Step 4: Darken the Pants with a Levels Adjustment
Via the Layers panel, add an adjustment layer of the type Levels. Drag the middle gray slider to the right until the pants become noticeably darker. Proceed carefully. The aim is a clear but natural darkening, not black. Switch the layer on and off now and then to check the difference.

Step 5: Set the Blend Mode to Luminosity
In the Layers panel, set the blend mode of the adjustment layer to Luminosity. This way the correction affects only the brightness, while the color of the fabric is preserved. Without this change, colors can quickly look blotchy or unnaturally saturated. Afterwards, check whether the pants still match the light of the scene.

Step 6: Invert the Mask and Paint in the Wetness Selectively
Invert the layer mask with the keyboard shortcut Ctrl+I, or Cmd+I on a Mac. The darkening is then initially invisible. Now, with a soft brush in white, paint on the mask exactly where the wetness should appear. Work with low opacity and build up the effect layer by layer. This way you avoid a flat, artificial look.

Step 7: Carefully Work on the Lower Area of the Pants
In the lower area, where the pants dip into the water, the effect can be a bit stronger. Use a generous brush stroke here. However, make sure not to paint beyond the contours, otherwise the background will smear into the fabric. Work your way up bit by bit and reduce the intensity toward the waist. You can easily mask out small overshoots later.

Step 8: Choose a Suitable Water Splash Brush
Since the model is standing in the water and the water is splashing up, the pants need individual splashes as well. Open the brush presets and look for a tip with irregular, grainy shapes. This looks much more organic than a standard round tip. Feel free to try out several brushes until one fits the scene.

Step 9: Set the Size, Opacity, and Distribution of the Splashes
Reduce the size of the brush, because large splashes quickly look artificial. Place individual dots at the spots where the water shoots upward, and keep the opacity close to 100 percent. For softer transitions to the fabric, an even smaller tip is suitable. Remember: with water droplets, less is usually more.

Step 10: Readjust the Brush Settings on the Graphics Tablet
If the brush reacts too sensitively, this is often due to the pressure or tilt settings of your graphics tablet. Reduce the sensitivity so that the strokes become more even. Since the water splashes upward, rotate the brush tip at an angle until the splashes follow the direction of movement. If you have downloaded a new brush pack, first test the tips on a separate test layer before applying them to the image.

Step 11: Fine-Tune the Tonal Correction After Brushing
Now compare the pants with how they looked before. After painting, the darkening often still looks too bright or a bit flat. Open the adjustment layer again and carefully move the slider toward black. This gives the pants more depth without losing the structure of the fabric.

Step 12: Correct Flawed Areas on the Mask
Not every stroke lands right on the first try. If you have painted over the bow or other areas, reset the correction on the mask with black. Black removes the effect, white brings it back. The same applies to brush marks on the hand that look like foreign objects. Check the edges at a higher zoom level so that no remnants are left over.

Step 13: Do a Final Check of the Overall Image
Finally, look at the complete composition in normal view. A successful water effect doesn't stand out, but blends inconspicuously into the image. If individual splashes bother you, reduce them or remove them selectively. Only when the overall image looks coherent are the pants finished.

Summary – Making Pants Wet in Photoshop: Realistic Look with a Brush
With a tonal correction in Luminosity mode, an inverted layer mask, and a suitable brush, you can convincingly make dry pants look wet. The darkening is crucial, because wet fabric looks darker and not transparent. Place the splashes sparingly, adjust size and direction, and consistently correct mistakes with black on the mask. This creates a credible effect that fits the scene.
FAQ
How can I tell if pants look realistically wet?Make sure the wet areas are darker and the folds look richer, while dry spots stay lighter.
Why should I set the blending mode to Luminosity?The Luminosity method only changes the brightness, so the colors of the fabric are preserved and not distorted.
How do I invert a layer mask?Press Ctrl+I on Windows or Cmd+I on Mac while the mask is selected.
Which color do I use to correct over-painted areas on the mask?Paint over the affected areas with black to remove the effect there again.
Why do my brush strokes look too shaky on the graphics tablet?It is often due to the pressure or tilt sensitivity. Reduce this setting so that the strokes become more even.


