
Rain in compositing often works like a small trick that instantly brings an image to life. With the right technique, however, it doesn't come from a single filter, but from several layers that represent different distances. In this tutorial, you build rain at three depths: in the background, in the middle of the image, and directly in front of the camera. In the end, the rain looks three-dimensional, and it flows around the figures without covering them.
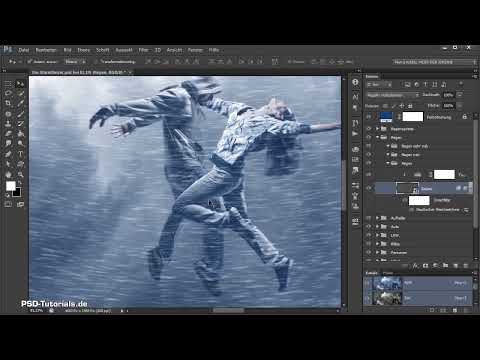
The video is only loaded from YouTube when you play it – data (including your IP address) is then transmitted to YouTube/Google. More in the privacy policy
Key Takeaways
- Rain is created from three layer groups: "Rain" (far away), "Rain close" (middle of the image), and "Rain very close" (directly in front of the camera).
- The foundation is a layer filled with black and the "Add Noise" filter. From the noise, you select only a small section.
- Motion blur turns the dots into rain streaks. Choose a vertical angle for distant drops and a slanted one for close drops.
- The "Screen" mode hides the black so that only the bright streaks remain. Layer styles and opacity control the fine details.
- With layer masks, you control where the rain appears. Figures, cars, and main subjects stay free.
Step-by-Step Guide
Step 1: Create the group structure for the three rain layers
First, create a new group and name it "Rain". All the layers that will later make up the rain go into this group. Then create three subgroups: "Rain" for the background, "Rain close" for the middle of the image, and "Rain very close" for the foreground. This structure helps you edit the depth separately later without losing track.

Step 2: Create a black layer
In the "Rain" group, create a new empty layer and also name it "Rain". Set the background color to black and press Ctrl + Backspace (on Mac Cmd + Backspace) to fill the layer with black. Alternatively, you can find the command under "Edit" and "Fill", where you select black. Black is important here because later, with the "Screen" mode, you will make exactly this background invisible.
Step 3: Create noise
In the "Filter" menu, choose "Noise" and then "Add Noise". A fine, grainy pattern now appears on the black surface. Feel free to zoom in, because even in this view you can see what the raindrops will later be made of. You can leave the filter settings as they are, as long as the grain looks fine enough.

Step 4: Extract and scale the right section
You don't need all of the noise, only a small area. Use the rectangular marquee to select a section and copy it to its own layer with Ctrl + J. You can then delete the original layer. Make sure the section is not too large: the smaller it is, the larger the drops will look later. Scale the new layer via "Edit" and "Transform" so that it covers the entire image area. This makes the dots a bit softer and varies their tonal values, which will come in handy later.

Step 5: Apply motion blur
Now the dots turn into motion. Open "Filter", "Blur" and choose "Motion Blur". For the first layer, set the angle to 0 degrees, that is, vertical, and choose a medium strength. Adjust the strength so that long streaks appear that are not smeared. Confirm with OK. You do this step without a Smart Object at first, because you still want to adjust the setting directly.

Step 6: Smart Object, mode, and Levels adjustment
Now convert the layer into a Smart Object via "Layer" and "Convert to Smart Object". This way you can edit the filter at any time. Then set the layer mode to "Screen". The black disappears, and only the bright streaks remain visible. So that the streaks don't look too bright or too pale, place a Levels adjustment as a clipping mask above the layer stack. Drag the sliders until the contrast is right. The image should become visibly darker and more structured as a result.

Step 7: Warp the Rain Around the Couple
To make the rain look natural, it shouldn't fall rigidly vertically, but should move around the models. Activate "Edit," "Transform," and "Warp." Drag the corners and edges of the grid so that the streaks get a slight curve. Feel free to exaggerate a bit, especially at the edges of the image, because the layer will be masked later. Make sure the rain doesn't disappear completely from the image, but remains visible at the corners as well.

Step 8: Use Layer Styles for More Depth
Open the layer styles by double-clicking on an empty area of the layer. In the "This Layer" section you will find the slider for black. Hold down the Alt key while dragging so that the slider splits. Drag the half inward so that the darker tones are selectively hidden. With this technique you get very fine transitions, and the rain immediately looks more real. Then zoom out to check whether the effect fits well in the overall image.

Step 9: Apply a Slight Blur
So that the rain doesn't look too harsh, apply the Gaussian Blur. To do this, choose "Filter," "Blur Filters," and "Gaussian Blur." A radius of about 0.9 pixels is enough. This minimal blur effect takes the digital sharpness away from the drops and makes them look more like flowing movement.

Step 10: Mask the Rain So the Car Stays Clear
The rain shouldn't appear everywhere. A car in the foreground, for example, should stay clear. To do this, create a layer mask on the rain layer. Hold down Ctrl and click on the car's layer to load a selection. Fill the selection in the mask with black so that the rain disappears there. If you can't get a clean selection of a subject, a soft brush with black as the foreground color is enough.

Step 11: Fine-Tuning with the Brush
With a soft brush in white and low opacity, you can selectively strengthen the rain in individual places, for example between the clouds. In the same way, you paint with black in places where the rain would be distracting, such as at the edge of the image. Work in small steps and reduce the opacity so that the transitions stay soft. This step takes some patience, but it brings the most realism to the image.

Step 12: Build the "Rain Near" Rain Layer
For the center of the image, you repeat the process. Create a new empty layer, fill it with black, and apply the noise filter. This time choose a smaller crop, because the drops will then look larger. Scale the layer up somewhat and apply the "Motion Blur" filter, this time with a diagonal angle. This way the rain doesn't fall straight down, but looks wind-blown. Convert the layer into a Smart Object again, set the mode to "Screen," and adjust the tonal values with a clipping mask. The contrast should now be clearly noticeable. If necessary, reduce the opacity until the layer looks harmonious.

Step 13: The Very Close Rain Right in Front of the Camera
The rain directly in front of the camera needs especially strong streaks. Create a black layer with noise again and choose a very small crop. Enlarge this layer significantly so that the drops appear large and blurry. You use the motion blur so that the streaks run almost sideways across the image, for example around the model's nose. Set the mode to "Screen" again and split the layer styles with Alt so that the streaks blend softly. Since this rain is very close, you usually reduce the opacity strongly at the end so that it remains only a subtle accent. Use the layer mask to mask the areas where faces or important details should not be covered.

Step 14: Final Fine-Tuning and Points of Light
Finally, you adjust the opacity of all rain layers and check the overall image. Turn the layers on and off one by one to see whether the rain works harmoniously together at all three depths. In the area of the light, you can place individual bright dots with a small brush and then process them with a Gaussian Blur. This makes it look as if individual drops are particularly highlighted in the light. This small addition brings a lot of atmosphere to the image.

Summary ??? Creating Rain in a Composite: Three Layers for a Realistic Mood
You have learned how to build rain at three depths, using a black layer, noise, motion blur, and the "Screen" mode. Masking ensures that important subjects stay clear, while layer styles and opacity determine the finer details. With a little practice, you can create rain that gives the image depth and atmosphere.
FAQ
Why should you divide the rain into several layers?Because drops at different distances appear different in size, sharpness, and angle. Only the combination of three depths creates the spatial impression.
What is the black fill of the rain layer for?The black area forms the background. In "Screen" mode it disappears, and only the bright streaks from the noise remain visible.
Do I absolutely have to work with a Smart Object?No, but the Smart Object allows you to adjust the motion blur and other filters at any time later without starting over.
How do I know if the rain is too strong?If the rain covers faces or important details or the image looks restless, reduce the opacity of the affected layer or use a mask.
Can I also use the technique for snow or dust?Yes, you can adapt the process. For snow, you usually choose larger, softer dots and skip strong motion blur.


