
Isolating an object on an almost white background sounds like routine, but it quickly becomes a test of patience when it involves a delicate machine with many contours. This is exactly the task in this tutorial. You will learn how to extract the machine for the belly of the left giant from a Fotolia image, position it appropriately in the composite, and integrate it into the scene with shadows.
The video is only loaded from YouTube when you play it – data (including your IP address) is then transmitted to YouTube/Google. More in the privacy policy
The image comes from an image search and fits the theme perfectly. However, Fotolia does not supply transparency, so you have to do the extraction yourself. The photographer has already done some rough preliminary work, but you need to refine the bright contours and transitions. With the following steps you will reach your goal without having to trace every contour individually by hand.
Key Takeaways
The machine can be precisely separated from the bright background via a color channel. The blue channel is particularly well suited for this, because the gray object looks similar in all channels and you can selectively increase the contrast. With Levels, brush, and mask, you work your way step by step toward the contour. You remove bright edge areas via a selected and shrunk mask. For the shadows, you use a multiplying color fill with a clipping mask, so that only the machine is affected.
Step 1: Choose the Blue Channel as a Basis
Open the Channels panel and look at the individual channels. With a gray object, red, green, and blue look similar, because all three colors mixed equally produce a neutral gray. Still, it is worth a look, because the blue channel provides a usable basis for further work.
Duplicate the blue channel and then open Calculations. Set the blending mode to Linear Burn there and blend the blue channel with itself. The result immediately looks significantly darker, and the machine already stands out from the bright background.

Step 2: Increase the Contrast with Levels
With Ctrl + L you open Levels for the newly created channel. There you see the histogram, which shows the distribution of brightness values. The deep black tones collect on the left side. Since many pixels of the machine tend toward gray, you drag the black slider to the right until the image noticeably darkens. Then confirm with OK.
Make sure you do not move the slider too far. Otherwise you will lose fine details in the object that you will still need later.

Step 3: Paint the Background Black with the Brush
Now zoom in close to the image and choose a black brush at full opacity. Paint over all gray areas that do not belong to the machine. You do not have to hit every millimeter exactly, but you should guide the brush cleanly along the contours.
Switch back to the RGB channel again and again to check where the background shows through. Areas where bright parts remain visible you leave unchanged, because the background actually belongs there. With metal parts and gaps you need to be especially careful. You can vary your pace: you handle large areas quickly, while you take your time with delicate areas.

Step 4: Create the Alpha Channel as a Mask
When most of the machine is painted black, you are almost there. Hold Ctrl and click the thumbnail of the alpha channel to load the selection. Then activate the layer with the image, hold the Alt key, and click the mask icon. This creates a layer mask that shows only the machine.

Step 5: Check the Extraction with an Auxiliary Layer
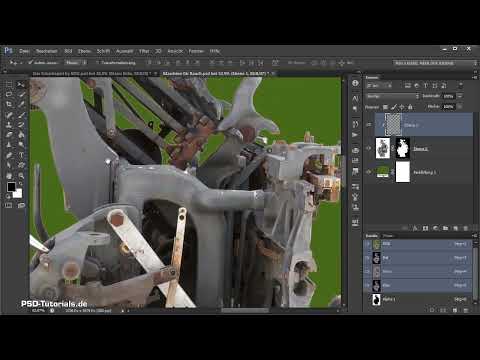
To assess the extraction, place a color fill in a strong color such as green as an auxiliary layer beneath the machine. Zoom into the image and look at the contours. You will notice that bright lines are still visible at the edges. This is because the object was originally in front of a very bright background and the edges blurred into it. When you edited the channel with Levels, individual bright pixels of the background were selected as well.

Step 6: Remove the light edge areas using a reduced selection
You could edit the edge areas with a clone stamp on a clipping mask layer. With such a multi-layered machine, however, that would take a very long time. Therefore, load the mask as a selection again by holding Ctrl and clicking on the mask.
Then go to Select, Modify, and Contract, and choose the smallest value, namely one pixel. The selection thus moves minimally inward. Now invert the selection via Select, Inverse, so that everything outside the machine is selected. Then activate the mask and fill the selection with black. The light edge areas largely disappear, and in the composite the remnants will hardly be noticeable later.

Step 7: Bring the machine into the composite as a Smart Object
Before you drag the layer into your composite, convert it into a Smart Object. This way the mask is preserved, and you can scale or move the object at any time later without losing quality. Then drag the layer into your composite document.
Give the layer a meaningful name, for example Machine, and place it in its own group, which you call Machine Belly. Clear grouping helps you keep an overview as soon as your document contains many layers.

Step 8: Place the machine on the giant's belly
Press Ctrl + T to start the transformation, and zoom into the image. The machine is initially much too large. Shrink it until it fits the body proportions, and position it so that it attaches at the shoulder and runs along the chest. Feel free to experiment a bit with the alignment and rotate the object slightly until the flow looks coherent. You can ignore the details at the edges for now, as they will be adjusted in the next step.

Step 9: Remove disruptive areas with a soft mask
Now create a layer mask for the machine Smart Object. Take a relatively hard brush and paint out all areas that should not belong to the machine. These include parts of the arm or areas that would cover the giant's body. Work roughly at first, following the lines of the arm. Where the edge should look softer, reduce the brush hardness or switch to a softer gradient.
Then zoom out and check the result from a distance. Especially in the overview, inconsistencies become noticeable that got lost when working in detail. Feel free to take more time with filigree areas, because exactly these spots are clearly visible in the finished image.

Step 10: Mask out the belly, trousers, and hand selectively
The before-and-after comparison shows that the giant's belly peeks through the machine in some places. Therefore, click on the giant's layer again, create a mask, and paint out the disruptive parts with black as the foreground color. The same applies to the trousers at the bottom edge of the image, which you can remove completely.
With the hand, you should proceed more carefully. First paint roughly, and then reduce the brush opacity so that the transitions look natural. If you like, you can also create slightly uneven areas, for example where trees touch the hand. This looks more lively than a smooth edge.

Step 11: Set the shadow with a multiplying color fill
So that the machine doesn't look pasted on, it needs shadows. Click on the machine layer, create a Solid Color adjustment layer in black above it, and set the opacity to about 60 percent. Change the mode to Multiply. Then invert the mask so that the color fill initially disappears completely.
Now choose a white foreground color and paint with a soft brush at full opacity directly on the mask, which acts as a clipping mask. You can adjust the opacity afterwards. It is best to work with the edge area of the brush instead of the center so that the shadows blend softly. Since the layer functions as a clipping mask, everything outside the machine remains untouched. Enlarge the brush and move a bit further away from the machine so that shadows, for example from the trees, look softer. Be careful not to use too much opacity so that the machine doesn't darken unnaturally.

Step 12: Fine-tuning light and shadow
Now model the machine step by step with light and shadow. When you run along the armpit, you can place a shadow in certain spots so that it looks as if the machine part is actually hanging from the armpit. Where it looks too dark, reduce the opacity. Always ask yourself from which direction the light falls on the scene.
Take enough time for this fine work. A few extra minutes are worth it, because the shadows determine whether the machine looks believable in the overall picture. In the next part of the tutorial, the mechanical ear follows, which you will also cut out, place, and shade realistically.

Summary ??? Cutting out, placing, and shading a machine in a Photoshop composite
In this tutorial, you saw how to separate a machine from a light background. You used the blue channel, boosted the contrast with the Levels adjustment, and painted over the background. Using the alpha channel, you create a mask, which you then refine via a shrunken selection. After that, you place the smart object in the composite, mask out distracting areas, and set the shadows with a multiplying solid color layer. With a bit of patience, you end up with a machine that blends credibly into the scene.
FAQ
Why is the blue channel suitable for cutting out the object?All color channels look similar for a gray object. However, with the blue channel and the Linear Burn blend mode, the contrast can be boosted well, so that the machine can be separated more clearly from the background.
What should I do if light lines remain along the contours?Load the mask as a selection, shrink it by one pixel, and invert the selection. Then fill it with black in the mask. This makes most of the light edge areas disappear.
Why should I create a smart object?A smart object remains scalable and can be edited non-destructively. In addition, the mask is preserved if you later move or enlarge the object.
Which settings are suitable for the shadows?A Solid Color adjustment layer in black with about 60 percent opacity and the Multiply mode works well. You invert the mask so that you can place shadows precisely with white paint.
Why do you work with a clipping mask for the shadows?The clipping mask ensures that the shadows appear only on the machine. The background and the giant's skin thus remain untouched.


