
The chessboard still looks too harsh in your composite and doesn't quite match the rest of the image in color. In this tutorial, I'll show you how to blend it in harmoniously using several adjustment layers as a clipping mask. Afterwards, you'll select the chess pieces so that you can edit them separately later.
The video is only loaded from YouTube when you play it – data (including your IP address) is then transmitted to YouTube/Google. More in the privacy policy
Key Takeaways
- Adjustment layers used as a clipping mask only affect the layer beneath them, for example the chessboard, and leave the rest of the image untouched.
- A Vibrance layer with reduced saturation and a Color Balance layer with slight blue and green tones blend the chessboard better into the scene.
- With a Levels adjustment, you take the brilliance out of the white values and remove the distracting green cast.
- In Quick Mask mode, you trace the outlines of the pieces. With the Fill tool, you fill the closed areas and save the selection as its own channel.
- You can use the channel as a mask for another adjustment layer, with which you desaturate only the light pieces.
Step 1: Desaturate the chessboard with a Vibrance layer
Start above the chessboard group in your Layers panel. Create a Vibrance adjustment layer and make sure it acts as a clipping mask on the chessboard. It's best to name the layer "Desaturate" right away so you keep track. Then drag the Vibrance slider to about -21. This noticeably tones down the whole chessboard and makes it look somewhat more muted. Compare the result with the state before to see how well the board now blends into the scene.

Step 2: Adjust shadows, midtones, and highlights with a Color Balance
Create another adjustment layer above it, in this case a Color Balance. You also attach it as a clipping mask to the chessboard. For the shadows, you drag the color slider slightly toward blue. For the midtones, you also go a little into blue, but with a significant amount of green and yellow so that the board doesn't look cold. You leave the highlights unchanged. After each change, check the before-and-after comparison by toggling the layer on and off. This way you can see right away whether the chessboard fits better with the other image elements.

Step 3: Tone down the white squares with a Levels adjustment
The white of the chessboard is still too bright and glows too strongly. So create a Levels adjustment as a clipping mask and name it accordingly. Then drag the white slider a bit to the left until the light squares no longer blow out. The squares then look calmer and more subdued. At the same time, the slight green cast that was noticeable in the image disappears. Here too, the before-and-after comparison is worthwhile to properly assess the result.

Step 4: Select the white pieces in Quick Mask mode
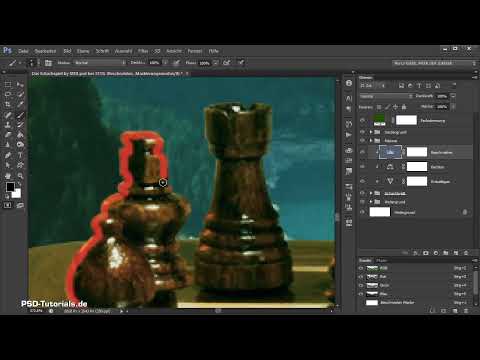
Next, you want to desaturate the white pieces a little. For that, you first need a selection. To do this, switch to Quick Mask mode. Take a relatively hard brush at full opacity and trace the pieces. Pay particular attention to clean linework in the areas where pieces overlap. You don't have to cut out each piece individually. It's enough to follow the outlines consistently. The line doesn't have to be perfectly hard. Since the outlines look somewhat softer anyway, a slightly softer edge fits the image better.

Step 5: Fill closed areas and save the selection
Once you have outlined a piece, you close the outline. Then you take the Fill tool and simply click in the middle of the area. The entire piece is thereby selected. The foreground color should be set to white and the background color to black so that the mask is unambiguous. Repeat this process for each piece or group of pieces until all pieces are captured. If you then leave Quick Mask mode, you have a complete selection.

Save this selection via the Select menu and the Save Selection entry. Give it a descriptive name like "Chess pieces". It then appears as its own channel in the Channels panel and can be loaded again at any time.

Step 6: Desaturate the light pieces with a Vibrance layer
Now comes the actual purpose of the selection. Create a new Vibrance layer and reduce the saturation to about -40. Name it "Desaturate light pieces". Then hold down the Control key and click on the "Chess pieces" channel in the Channels panel. This loads the selection as a layer mask. At first, however, the result also affects the dark pieces, which are thereby desaturated as well. We will correct that in the next step.

Step 7: Refine the mask for the dark pieces
Now edit the layer mask with the brush. In the areas of the dark pieces that are affected by the desaturation, paint over the mask in black so that the effect disappears there. This is not always easy, because some dark pieces hide behind light ones. Work with more care here and zoom in closer if necessary. The surface of the chessboard is not affected by the desaturation. Therefore, you can work more roughly there. Feel free to take enough time for this step, because a clean result is worth it.

Step 8: Check the result
Finally, toggle the adjustment layer "Desaturate light pieces" on and off to check the effect. The light pieces are no longer so garishly yellow, but look more subdued. As a result, the pieces blend better into the overall image. Check the chessboard and pieces side by side once more before you continue.

Summary – Adjusting the chessboard's colors in the composite and selecting chess pieces precisely
You desaturated the chessboard with a Vibrance layer, adjusted it with a Color Balance toward blue and green, and toned down the white values with a Levels adjustment. Then you selected the chess pieces in Quick Mask mode, saved them as a channel, and used them as a mask for desaturating the light pieces. In the next step, you will place and shade the pieces for the second player, who should then also blend in well with the image.
FAQ
Why should I use adjustment layers as a clipping mask?Because the correction then only affects the chessboard and the rest of the image area remains unchanged.
Why do I select the chess pieces as outlines and not individually?Since you will edit the pieces as a group later anyway, it is enough to trace the outlines cleanly and fill the closed areas with the Fill tool.
Why is an outline without a fill not enough?Only the filled area produces a complete selection that can be saved as a channel and used as a mask.
What is the Control key for when loading the selection?With the Control key held down, you click the channel to directly apply its selection as a layer mask.
Why do I still have to edit the mask after loading it?The mask initially affects all pieces, including the dark ones. With the brush, you remove the desaturation where it is not wanted.


