
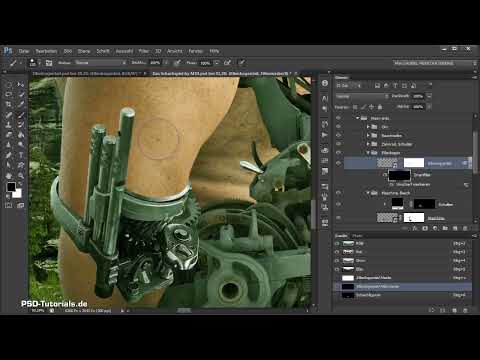
A giant with a real joint looks more convincing than one whose elbow consists only of skin. This is exactly what you work on in this section: You place an isolated machine part on the elbow, decide which parts remain visible, and give the entire mechanism depth with shadows. The video runs for just under ten minutes and is part 15 of a 21-part series on compositing the chess game.
The video is only loaded from YouTube when you play it – data (including your IP address) is then transmitted to YouTube/Google. More in the privacy policy
Key Takeaways
- A machine part is isolated using Apply Image (Calculations) in the "Linear Burn" mode and then brought into the composite as a Smart Object.
- The visible components are selected using a layer mask, not by permanently deleting them. This way, every decision can be corrected later.
- Blurry areas can be selectively sharpened with the "Unsharp Mask" filter on a Smart Object.
- Shadows are created via a color fill layer in "Multiply" mode, which acts only on the figure as a clipping mask. You then paint the shadows with a soft, low-opacity brush tip.
Step-by-Step Guide
Create a Group for the Elbow
Before you insert the new machine part, create a separate group and give it a clear name, for example "Elbow". This organization pays off when you later move or hide several mechanical parts. All following layers then land directly in this group.

Isolate the Machine Part
Open the source file and select the desired machine part. Since it is a grayscale image, all channels look the same, so you can choose any of them. Then call up the function via "Image", "Calculations" and set the mode to "Linear Burn". With this result, you paint the inner areas of the part black, along the contours, just as you already did with the previous components. Make sure to mask only the components that should actually appear in the final image. You can ignore the lower key, since it won't be visible later anyway.

Create a Mask and Transfer the Part
Once the isolation is done, compare the mask and the original image. You can now cleanly drag the area you placed on the mask into your composite. Before that, convert the object into a Smart Object so that you can scale and filter it afterwards without loss of quality. Then drag it into your image. It lands automatically in the elbow group you created earlier. With Ctrl or Command and T, you scale it down to the appropriate size and place it at the spot where the elbow should sit.

Fine-Tune Position and Rotation
The part is quickly roughly aligned, but the fine-tuning takes some patience. First, deactivate the layer mask so you can see the shape, and rotate the part in small steps until it fits the joint movement of the arm. Look at the position several times, because an alignment often only looks right after a few minutes.

Determine Visible Components with a Mask
Now you decide which gears and elements should remain in the image in the end. To do this, create a layer mask and use a brush to paint out everything you don't want to show. You can also hide just part of a component, for example so that a piece of the mechanism still peeks out of the arm. Since the mask works non-destructively, you can go back at any time and revise decisions.

Work Out the Contours Cleanly
The edges on the arm are a key feature of the image, so it's worth working more precisely here. Zoom in closer and paint along the contours so that the part visually disappears behind the arm. If necessary, you have to move the element a bit closer to the arm and readjust its size until the transition looks believable.

Sharpen Blurry Areas
The original photo has a depth of field blur: some parts are sharp, others noticeably softer. So that the mechanism fits together, you apply the "Unsharp Mask" filter to the Smart Object. Choose an amount of 98 and a radius of 0.9. Turn on the preview and check whether the result still looks too soft. Then confirm with OK.

Limiting the filter effect to the blur
The filter usually sharpens the entire object, even where it isn't necessary. Therefore, invert the mask of the Smart Filter so that the sharpening disappears again. Then use a soft brush tip to paint over exactly the areas that are actually blurry. The before-and-after comparison shows that the upper area then blends in much better with the lower one.

Creating a shadow layer
Now it's about dimensionality. Select the layer with the giant and create a "Solid Color" adjustment layer above it. Set the color to a gray value of about 35, set the layer mode to "Multiply" and the opacity to approximately 80 percent. The clipping mask is important so that the solid color only affects this figure. The solid color initially looks unsuitably green, but that is only a display of the mask. Invert the mask so that the effect disappears for the time being.

Painting shadows with low opacity
With the mask, you now paint shadows into the image with a low opacity. Consider each time where a shadow actually belongs. The closer an object is to the skin, the darker and clearer the shadow usually turns out. You can adjust the brush tip and opacity at any time, and with the keyboard shortcut X you swap the foreground and background colors to quickly weaken shadows again. This way you connect the individual image components with each other, and the mechanics look more realistic overall.

Considering side light and transitions
When shading, pay attention to the direction of the light. The light in the image comes predominantly from the side, so you should darken the appropriate edges. The hand, which lies in the dense forest of mechanics, also requires shadows at its edges. Feel free to take a few extra minutes for this, because shadows that are too restrained quickly make the image look flat.

Casting shadows around the corner
A gear that protrudes slightly from the skin casts a shadow that runs around the edge. Paint this shadow along the shape so that the impression arises that the gear is actually pressing through the skin. This small gesture already creates a lot of depth and is immediately noticeable to the viewer.

Shading the fat roll and skin folds
You also paint shadows along the skin folds on the arm. The folds are the natural places where light falls off, and that is exactly where the shadow looks particularly believable. Work with low opacity and several passes instead of a single hard stroke.

Shading the entire image consistently
Now apply this technique to the entire machinery so that the mechanics show up everywhere as a shadow on the giant's surface. If you have put too much shadow in one place, remove it again with the mask; in other places, add to it. Especially in the shoulder area, the impression should arise that the gear continues running beneath the skin and that the machine casts a shadow on the skin.

Summary ??? Placing the machine part on the elbow and refining it with shadows
In this section, you prepared a cut-out machine part using channel calculation and inserted it as a Smart Object into its own elbow group. With layer masks, you determined which components remain visible, and you specifically re-sharpened blurry areas. Using a solid color in "Multiply" mode as a clipping mask, you then added shadows that give the mechanics depth. The next video is about the texture of the mechanical skin and planting small trees.
FAQ
Why should I convert the machine part into a Smart Object?A Smart Object allows you to scale down and rotate the part and apply filters without any loss of quality. In addition, you can adjust filters such as "Unsharp Mask" at any time later.
Why is the mask inverted for the Smart Filter?The filter initially affects the entire object. By inverting, the effect disappears, and you can bring it back with a brush only where the image is actually blurry.
Why do you work with a solid color in Multiply mode?The Multiply mode does not make bright areas brighter, but darkens everything. This creates shadows without losing details. The clipping mask ensures that only the figure is affected.
How do I find the right place for a shadow?Consider how close the object is to the surface. The closer it is, the darker and clearer the shadow turns out. You should also pay attention to the direction of the light in the image.
What happens if I have placed a shadow too strongly?You can rework it with a low opacity, or swap the foreground and background colors with X and weaken the shadow again with the brush. Since everything runs through masks, every correction is possible.
Why is it worth leaving more components in place at first?During the work, it is often not yet clear how much of the machine part should ultimately be visible. If you leave more in place, you can decide later in the mask without having to cut out the original image again.


