
If you want to make a composite look more realistic, you should give your objects signs of wear. With moss, dirt, and weathering, chess pieces look as if they had actually spent years on a desk by the water. In this tutorial, I'll show you how to achieve this result with groups, masks, layer modes, and a soft blur.
The video is only loaded from YouTube when you play it – data (including your IP address) is then transmitted to YouTube/Google. More in the privacy policy
Key Takeaways
- Arrange the dirt layers in their own group above the adjustment layers so that you keep an overview.
- Use a black layer mask to make the texture visible only on the pieces.
- The "Hard Light" layer mode brings out the texture, but it should be toned down via the blending options and the opacity.
- With a white brush on the black mask, you gradually bring the moss back in the appropriate places.
- A minimal Gaussian blur on a smart object makes the dirt look more harmonious with the rest of the image.
Preparation: Weather the dark pieces first
Start with the dark pieces, because moss will look most believable on them. The dirt should initially be only lightly suggested so that the overall image doesn't appear overloaded. Make sure not to cover the pieces evenly, but rather to work on edges, joints, and recesses, because that is where dirt collects in reality.

Create a new group "Moss on Pieces"
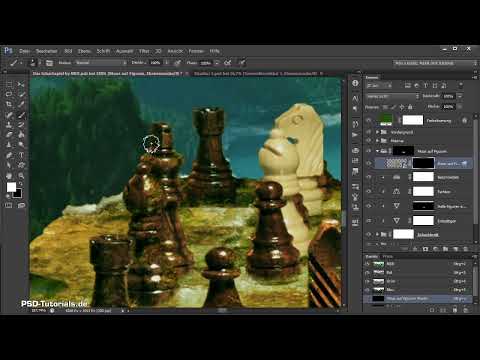
Create a new group above all adjustment layer groups and name it clearly, for example "Moss on Pieces". A clean group structure is important because later you will want to show and hide several layers at the same time to compare the effect. In addition, drag every new layer that you create in the following steps directly into this group.
Place and adjust the moss texture
Place a moss texture via "File > Place". In this example I use texture number 3, but you can take any texture that suits your subject. Then scale the layer with the transform tool so that the moss covers the pieces over a large area. Position it so that you completely cover the pieces. The moss should extend beyond the dark pieces and only be reduced to the desired amount after masking.

Move the moss layer into the group and name it
Drag the placed layer into the group "Moss on Pieces" and give it a meaningful name, such as "Moss on Pieces". Even though it sounds trivial, clear naming pays off as soon as you have several dirt layers stacked on top of each other.

Create a black layer and a mask from the alpha channel
Now create a new black fill layer within the group. This initially hides the moss completely. Then you create a mask from the chess pieces, that is, from the selection or the alpha channel of your cut-out of the pieces. Thanks to this mask, the moss will later only be visible where pieces are actually located. Make sure the mask fits cleanly, since inaccuracies at the edges will be immediately visible.

Set the "Hard Light" layer mode
Change the layer mode of the moss layer from "Normal" to "Hard Light". This immediately gives the moss contrast and structure, but at first glance it quickly looks too strong. This is normal and not a mistake, because you will correct exactly this intensity in the next step.

Dose the intensity via the blending options
Open the layer styles by double-clicking the layer. There you will find the sliders for the underlying layers. Drag the slider for the dark areas slightly to the right so that some black from the lower layers shows through again. This prevents the shadows of the pieces from being completely covered by moss and the result from looking dirty instead of believable. Keep an eye on the strength and rather choose a subtle setting.

Bringing moss back with a white brush on the mask
Now comes the actual fine-tuning. Add a black layer mask to the moss layer that hides everything. Choose white as the foreground color and pick a brush with frayed edges. This brush shape looks more natural than a hard round brush. Click briefly on individual spots on the figures so that small patches of moss appear. In some places the result looks right immediately, in others too intrusive. If you don't like a spot, paint over it with black to undo the effect. Work your way slowly across all the dark figures this way.

Duplicating and offsetting the texture
Not every texture fits everywhere. If stone structures repeat on the figures or look out of place, duplicate the layer and shift it slightly. With this method you achieve a more irregular distribution. Then move the entire texture a bit further to the right so that the remaining figures also get enough moss. Take your time, because the result comes from many small corrections.

Creating a group for the light figures
For the light figures, create a new group, which you name, for example, "Texture on light figures". Place a texture there that you have already used. Scale it down to match the size of the figures, because a texture that is too coarse quickly looks unnatural on small objects. Position the layer so that it covers the light figures with an even layer of dirt.

Choosing the layer mode "Color Burn"
Change the layer mode of the texture layer to "Color Burn". The result initially looks rather unspectacular, and that is exactly the intention. Dirt should be subtle and support the character of the figure, not dominate it.

Working out subtle dirt with the mask
Create a black layer mask here as well. Now take a fine brush with low opacity and carefully stamp along the edges of the figures. Rims, edges, and bases are the places where dirt realistically sticks. Work your way slowly from top to bottom through the figures, because at the base at the bottom you can allow the effect to be a little stronger. With every brushstroke the figures look more aged, without the impression of dirt being exaggerated.

Softening the effect with a blur via a Smart Object
If the effect still seems too harsh to you, you can tone it down. To do so, convert the texture layer into a Smart Object. Then apply a minimal blur of about 0.3 pixels under "Filter > Blur Filters > Gaussian Blur". Compare the result before and after, because even this small value makes the texture softer and a better fit for the rest of the image.

Checking and comparing the result
Finally, hide the "Moss on figures" group once and show it again. This way you immediately see what difference the dirt makes. Zoom in closer on the figures and check details such as transitions, edges, and the distribution of the moss. If everything looks coherent, you are done with this part of the composite.

The next video covers the final steps of the composite, that is, the last part of this tutorial.
Summary ??? Chess pieces in Photoshop: Creating realistic moss and dirt
You have learned how to give chess pieces moss and dirt without the image looking artificial. First you prepare the dark figures, set up a clean group structure, and work with a mask from the alpha channel of the figures. Then you control the intensity via the layer mode "Hard Light" and the fill options. With a frayed brush you selectively bring the moss back, before working on the light figures with "Color Burn" and fine masking at the edges. A minimal Gaussian Blur on a Smart Object rounds off the result.
FAQ
Why should I put the dirt in its own group?A separate group keeps an overview of all dirt layers and allows you to show and hide the effect with one click to compare the result.
Why do I choose the "Hard Light" mode for the moss layer?The "Hard Light" mode emphasizes the contrasts and structures of the moss layer. Since it initially looks too strong, the intensity should then be reduced via the fill options or the opacity.
Which brush shape is suitable for masking?A brush with frayed edges creates irregular, natural-looking transitions. Hard round brushes, on the other hand, often look artificial.
Where should dirt preferably appear on figures?Dirt realistically collects on edges, rims, joints, and bases. You should pay particular attention to these areas when masking.
Why do I use a Gaussian Blur with such a small value?Even a value of about 0.3 pixels makes the texture softer and adapts it better to the rest of the image, without making it look blurry.
Why should the texture layer be converted into a Smart Object?A Smart Object allows you to apply filters such as the Gaussian Blur non-destructively. You can adjust the settings at any time later.


