
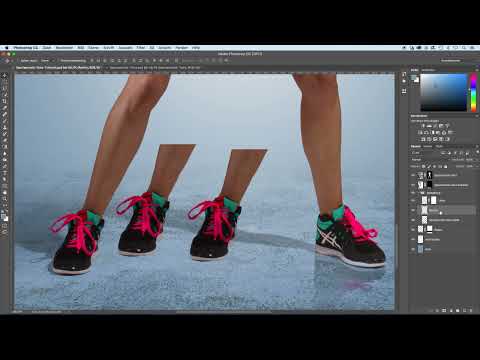
A sports portrait often only comes to life when the model appears to be standing on a glossy surface. This is exactly why a small reflection of the feet is worthwhile. In this tutorial, you will be shown how to isolate the feet, mirror them, distort them, and then insert them into your image so that the reflection looks believable.
The video is only loaded from YouTube when you play it – data (including your IP address) is then transmitted to YouTube/Google. More in the privacy policy
You don't need any complicated tools for this. With layers, a layer mask, the Liquify filter, and the Clone Stamp tool, you can already get very far. I have divided the process into individual work steps so that you can follow each step.
Key Takeaways
The reflection is created from copies of the isolated feet, which you flip vertically downward and then adapt to the shape of the ground with the Liquify filter. The Multiply layer mode, a reduced opacity of about 35 percent, and a layer mask ensure that the reflection looks subtle and natural. The left and right feet are edited separately because the heel of one foot has to be distorted more than the sole.
Step 1: Prepare the Layer
First, duplicate the layer with the model by dragging it onto the new layer icon at the bottom of the Layers panel. You work with the duplicate; the original layer remains untouched. Then rasterize the duplicate so that you can edit it. After that, remove the existing layer mask by clicking "Apply". This way, the cutout area is preserved and not simply deleted.


Step 2: Isolate the Feet
From the isolated model, you only need the lower area with the feet. Therefore, remove the upper part of the image with a selection and then deselect it again. You now keep both feet on the layer.

Step 3: Isolate the Left Foot
For the first reflection, you only need one foot. Therefore, make a selection around the left foot and copy it to a new layer with the keyboard shortcut Command + J. From now on, work only with this new layer. For the following steps, zoom in a little closer to the foot so that you can see the contours better.
Step 4: Mirror and Position the Foot
Activate the transformation with Ctrl + T or Command + T. Flip the foot vertically downward so that it slides below the spot where it would be standing on the ground. Then confirm the transformation. The reflection doesn't have to fit perfectly; it will be adjusted later.

Step 5: Name and Group the Layer
Name the new layer, for example "left", so that you can find it more easily later. Select the layer and combine it into a group with Ctrl + G or Command + G. Also name the group, for example "Reflection". Move the group below the layer with the shadows so that the reflection lies behind the shoe and not above it.
Step 6: Adjust the Reflection with the Puppet Warp
Now select the Puppet Warp under "Edit". With a few points, you can adapt the reflection piece by piece to the shape of the upper foot. First set points on the upper contour, such as at the instep, and drag them to the sole. Then gradually set more points and thus approach the other sole. If you have set one point too many, remove it with the Backspace key and set it again. A slight unevenness in the contour is not a problem, as it can be smoothed later with a filter.


Step 7: Shorten and Compress the Foot
The reflection should not be as tall as the real foot, since from this angle the ground reveals only a small part of the underside to the eye. Therefore, shorten the foot somewhat and set an additional point at the heel so that the end doesn't fray. At the front, you compress the foot slightly. When the shape looks coherent, confirm the Puppet Warp using the checkmark at the top.


Step 8: Fine-tuning with the Liquify filter
Next, open the "Liquify" filter. With the "Push Content" tool and the Smudge finger, you can smooth protruding edges and jagged spots. Pay particular attention to the corners of the reflection and round them off carefully. Pull the bright area up a little so that no unwanted flashes or gaps appear between the reflection and the shoe. You don't have to perfect every millimeter, because the mask will make a lot of it invisible later.


Step 9: Mode, opacity, and layer mask
Set the layer mode of the reflection to "Multiply". This makes only the dark areas visible, and the bright surface of the floor is preserved. Then reduce the opacity to about 35 percent. The reflection should only be hinted at, otherwise it looks artificial.
Then create a layer mask and, using a black brush, carefully take back the areas where the reflection stands out too strongly. This makes it softer toward the edge and fits the subject better.


Step 10: Editing the right foot
The right foot needs slightly different treatment because the heel would have to be distorted more. To do this, open your original file again and delete the left foot, which you no longer need. Duplicate the layer with the right foot twice so that you can edit the heel separately. Put the layers into the "Reflection" group and name them "right".

On one of the copies, select only the rear area of the heel and delete the rest. Flip this part vertically downward and attach it to the heel. With Warp, you check whether the transitions can be adapted better. Once the fit is right, you can attach the sole from behind as a reflection in the same way.


Step 11: Adding the second part of the right foot
Transform the remaining foot copy vertically downward, flip it, and attach it at the back. Then erase the superfluous area of the heel that now overlaps twice. With the Puppet Warp, you again set a few points that hold the front part in place and trace the curvature of the floor. Press the shoe together a little at the back so that the reflection doesn't extend too far down.


Step 12: Retouching transitions with the Stamp and Eraser
To make the two reflections merge seamlessly, you use the Clone Stamp tool. Use it to copy the area that still looks too short and extend the reflection at the back bit by bit. With the Eraser, you remove remnants, for example of the shoelace, that protrude into the reflection.


Then use the Liquify filter again to remove the remaining jagged spots on this layer and round off the edges. With Ctrl + Z or Command + Z, you can go back a step if needed when an edit turns out too strong.

Step 13: Merging layers and final masking
When both foot reflections look satisfactory, select the two layers and merge them with Ctrl + E or Command + E. You now have just one layer for both feet. Set this layer to "Multiply" as well, reduce the opacity to around 35 percent, and add a layer mask. With a black brush, you take back the reflection in the places where it looks too conspicuous.


Conclusion and Outlook
In the end, you have a reflection that doesn't have to be one hundred percent correct, but is convincing at first glance. The model was photographed, so an exact physical reflection is hardly possible. With the tricks described, above all the combination of distortion, Multiply, reduced opacity and a mask, you can still achieve a believable impression.

Summary ??? Realistically Reflecting Feet in Photoshop
You cut out the feet, mirrored them on separate layers, and adapted them to the ground with the Puppet Warp and the Liquify filter. Then you subtly blended in the reflection using the Multiply mode, an opacity of about 35 percent, and a layer mask. The left and the right foot were edited separately so that the heel looks clean. With this workflow, you create reflections that suit your sports portrait.
FAQ
Why don't I simply mirror the feet completely?A complete reflection often looks unnatural because the feet are only partially visible from the photo angle. That is why each foot is mirrored and adjusted individually.
Why is the opacity reduced to about 35 percent?A low opacity ensures that the reflection is only hinted at. It therefore looks like a reflection on the floor and not like a second copy of the foot.
What does the Multiply layer mode do?Multiply lets the dark areas of the reflection show through, while the bright surface of the floor is preserved. This helps the reflection blend better into the background.
What is the layer mask for?With the layer mask, you can selectively hide the reflection in individual places without deleting the layer. This way, edges that are too hard can be softened.
Does the reflection have to be perfect?No, an exact reflection is hardly achievable with a photographed model. What matters is that the reflection looks coherent at first glance.


