
A sports portrait thrives on dynamism and expression. If the background takes up too much space or the corners look bright and busy, the viewer's gaze quickly wanders off. With a curves adjustment layer, an oval layer mask, and a few fine adjustments, you direct attention to where it belongs: on the model.
The video is only loaded from YouTube when you play it – data (including your IP address) is then transmitted to YouTube/Google. More in the privacy policy
In this tutorial, I show you step by step how to crop and center the image, darken the edges, and make the darkening so soft that it looks natural. The technique is not complicated, but in a few places small details decide the result. I will go into these in detail.
Key Takeaways
- The model is centered in the frame before the darkening, so that the edge editing works cleanly.
- The darkening is done via a tone curve as an adjustment layer. This way it remains adjustable at any time.
- An oval selection, filled with black in the layer mask, protects the inner area from the darkening.
- A greatly increased feather creates an inconspicuous gradient instead of a visible frame.
- With the transform tool, you can subsequently move the darkened area if, for example, the shoes look too dark.
Step-by-Step Guide
Step 1: Reduce the background and center the model
Before you even think about the darkening, you should check whether the framing is right. In this example, the model stands too freely in the image, and the background is too distracting. To do this, activate Transform and grab the layer at the top right corner. Hold down the Shift key to maintain the proportions. Shrink the image until the model is positioned centrally and harmoniously. Then confirm the transformation with a double-click inside the frame or with the Enter key. It is important that you set the position before you start with the darkening. If the framing changes later, the edges will no longer fit the subject.

Step 2: Create a tone curve as an adjustment layer
Now create a tone curve as an adjustment layer. The advantage of an adjustment layer is that you can open and change it at any time without damaging the original image. In this step, feel free to pull the curve down significantly. Exactly how much does not matter at first. You will fine-tune the intensity at the end anyway. The only important thing is that the effect becomes visible in the image at all, so that you can judge the result.

Step 3: Fill the layer mask with an elliptical selection
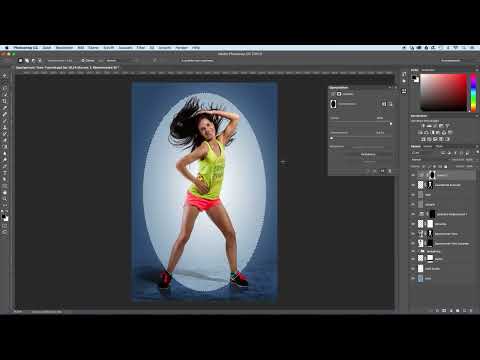
A layer mask is automatically created with the curve. Click on it so that it is active. Then create an oval selection around the model. The ellipse should be generous so that the main area of the subject is completely enclosed. Set the foreground color to black and then use the "Fill" function via the "Edit" menu. Within the selection, the mask now turns black. In the mask, black means that the adjustment layer is hidden at that spot. The area in the center therefore stays bright, while the edges outside the ellipse continue to be darkened.

Step 4: Deselect and check the mask
As soon as the area is filled, you deselect the selection again. You can do this via the "Select" menu or with the corresponding keyboard shortcut. At this point, make sure that you are no longer working with the selection, otherwise later changes would only affect part of the image. In the Properties panel, you will now find the section for the layer mask. There you can edit the mask afterwards, and that is exactly where we will apply the blur in the next step. Briefly check in the image whether the transition runs visibly sharp at the places where you placed the ellipse. If that is the case, it is not a problem, because that is exactly what we will solve next.

Step 5: Set the feather for a harmonious gradient
The hard edge of the ellipse would later look like a visible frame. In the Properties panel, with the layer mask activated, you will find the slider for the feather. Pull it up strongly and watch the result live in the image. From about 200 to 300 pixels, a gradient emerges that looks like an even, soft frame and no longer creates contrast between inside and outside. In this case, I chose slightly over 300 pixels. What matters is that you adjust the value to your image size, because with smaller files the same values have a much stronger effect.

Step 6: Adjusting the Strength of the Darkening
Now it's about intensity. The darkening can definitely be quite pronounced, because it supports the visual guidance. To do this, open the tone curve again and change the shape of the curve until you achieve the desired effect. Since the adjustment layer works non-destructively, you can go back and readjust at any time. While making changes, pay particular attention to the transitions to the model. If the darkening looks too harsh on the subject itself, the mask may be set too tightly.

Step 7: Correcting the Shoes
In the result, it was noticeable that the shoes were darkened too much. This is typical when the gradient of the mask at the bottom is too close to the subject. You don't have to create the whole mask again for this. Select the layer mask and activate the Transform tool using the key combination Ctrl+T on Windows or Cmd+T on the Mac. Move the black area of the mask a bit downward so that the dark area slides further out of the image area of the shoes. Then confirm the transformation with the Enter key or a double-click. The shoes are now back in the brighter area, and the model remains in focus.

Step 8: Checking the Result
Finally, look at the image as a whole. Briefly switch the adjustment layer on and off to see the difference. The corners should be noticeably darker, the center bright and clear. The viewer's eye now travels directly to the center of the image, to the model. If you like the overall effect, the image is ready for further steps, such as lighting effects or a final color correction.

Summary – Darkening the Edges of a Sports Portrait: Visual Guidance with a Curves Layer and Mask
With a tone curve as an adjustment layer, an oval selection in the layer mask, and a generously chosen feathered edge, you deliberately direct the viewer's gaze to the model. Make sure to center the subject cleanly beforehand and to check the darkening afterward. With the Transform tool, fine corrections such as shoes that are too dark can be fixed easily. The technique can be applied to almost any portrait.
FAQ
How can I tell whether the feathered edge is set too strong or too weak?A good edge is achieved when no visible frame can be seen anymore and the gradient transitions evenly into the surroundings.
Why should I use an adjustment layer instead of editing directly?An adjustment layer is non-destructive, meaning you can adjust the curve at any time without altering the original image.
Why does the mask have to be filled with black?In a layer mask, black hides the effect. This way, the area inside the ellipse is spared from the darkening.
What should I do if the model still looks too dark after the darkening?Move the mask with the Transform tool or adjust the size of the ellipse so that the dark area lies further away from the subject.
Can I still change the ellipse after filling it?Yes, you can edit the mask at any time by clicking on it and painting over it with white or black.
Which key combination do I need for transforming the mask?On Windows you use Ctrl+T, on the Mac Cmd+T.


