
Flat sports photos often look lifeless, even though muscles, sweat, and movement should actually create tension. This is exactly where this tutorial comes in. You will learn how to use a Black & White adjustment layer to increase the contrast of your sports portrait, deepen the shadows, and selectively darken individual color tones so that the viewer's eye is drawn to your model.
The video is only loaded from YouTube when you play it – data (including your IP address) is then transmitted to YouTube/Google. More in the privacy policy
This tutorial is based on the last part of my series on image optimization for sports portraits (Section 3.14). You will need an open photo of a person in sportswear and an image editing program that supports adjustment layers, such as Photoshop. The method is non-destructive, so you can go back at any time.
Key Takeaways
- A Black & White adjustment layer in Soft Light mode works like an additional contrast control.
- An opacity of around 50 percent usually delivers a natural result without overdoing the image.
- With this method, mainly the shadows become darker, while the highlights remain almost unchanged.
- With the color sliders, you can darken blue and cyan tones and selectively lighten or darken yellow tones.
- A before-and-after comparison shows you whether the contrast has actually improved or whether the image has just become darker overall.
Step-by-Step Tutorial
Step 1: Create a Black & White Adjustment Layer
Open the Layers panel and click the icon for new adjustment layers. Then select the Black & White entry. The layer sits on top of your image without changing the original data. This separation is important because you can still correct every adjustment later.

Step 2: Set the Layer Mode to Soft Light
In the dropdown menu at the top of the Layers panel, set the mode to Soft Light. The image immediately looks higher in contrast, because bright areas appear brighter and dark areas appear darker. The effect is usually much too strong at first; you will correct that in the next step.

Step 3: Reduce the Opacity to About 50 Percent
Lower the layer's opacity to about half, so around 50 percent. This gives you a subtle boost instead of a harsh effect. Half is a good starting point, but you should then fine-tune the value according to your impression of the image.

Step 4: Check the Shadows and Use the Before-and-After Comparison
Toggle the layer visible and invisible once to check the difference. You will notice that mainly the shadows become darker, while the highlights stay almost the same. Make sure that details in the shadows are still recognizable. If shadow areas become too black, reduce the opacity further.
Step 5: Selectively Darken Blue and Cyan Tones
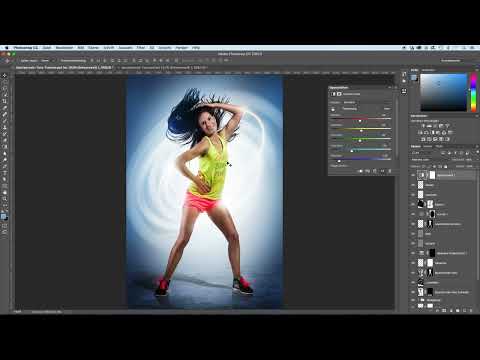
With the color sliders of the Black & White adjustment layer, you control each color tone individually. Drag the slider for blue tones and the one for cyan tones to the left to make them darker. This mainly darkens the edges of the image, and attention is drawn more strongly to the center of the subject.

Step 6: Adjust Yellow Tones for Clothing and Body
The yellow slider is your tool for clothing and skin tones. In the example, you use it to slightly lighten the T-shirt and parts of the body, which makes them look more radiant. Alternatively, you can lower the value if the clothing appears too dominant. Change the value only carefully, otherwise fabrics and skin quickly lose their naturalness.
Step 7: Deliberately Leave Red Tones Unchanged
Not every image needs adjustments in all color ranges. In this example, the red tones remain untouched because skin tones and accents already look harmonious. With portraits, it is worth treating red and skin tones with restraint, since even small shifts quickly look artificial.
Step 8: Darken the Background via the Cool Tones
The real focus of this edit is on the cool tones in the background. Lower them slightly so that the model stands out clearly from the surroundings. Take care not to go too far, because a background that becomes too black quickly looks unnatural and makes the image appear oppressive.
Step 9: Compare and evaluate the overall result
Finally, compare the result with the original. The edges are now darker, the model stands out more strongly, and the eye goes straight to the person. The image looks harder-edged, more interesting, and much more vivid overall. In this form, the edit can stay as it is, provided you like the overall picture.
Summary – Deliberately increasing contrast in sports portraits with a black-and-white layer
With a black-and-white adjustment layer in Soft Light mode, you increase the contrast of your sports portrait in a controlled way. The opacity determines the intensity, and the shadows become darker while the highlights are largely preserved. Afterwards, you can use the color sliders to darken blue and cyan tones, adjust yellow tones for clothing and skin, and tone down the background. The result draws the eye to the model and gives the photo more expression.
FAQ
Why should I use Soft Light mode?Soft Light mode enhances brightness differences without overdoing the image as much as other blend modes. This creates a contrast that looks natural.
Which opacity is best suited?Around 50 percent is a good starting point. Then adjust the value to your image, because every shot reacts a little differently.
Why are the highlights hardly changed?The effect is only weak on bright areas because they are already close to the maximum. As a result, highlights are preserved, while the shadows gain noticeably in contrast.
Can I still change the color sliders after creating the layer?Yes, the adjustment layer remains editable. You can adjust values at any time or hide the layer again.
How do I know that I have gone too far?If details in shadows or in the background disappear or skin tones look unnatural, you have overdone it. In that case, reduce the opacity or correct the relevant color slider.


