
Portrait effects for sports photos in Photoshop

- 38 lessons in over three hours of video training for editing sports portraits
- Photoshop tools in practical use with three concrete examples
- Raw development and frequency separation, high-pass filter and various color looks
- To join in and understand: working materials included
- By Michael Stifter, who reports from 20 years of Photoshop experience
Work-out for your workflow! Gyms will love your pictures, you'll be able to promote sports events with flying colors and you'll learn techniques for other sports photos that will turn you into a Photoshop champion!
38 Videos, 202 minutes
Introduction
Image optimization of sports portraits - Intro
Image optimization of sports portraits: Here you can see the intro to the course.
Sports portrait No. 1 - Martial arts/Woman with boxing gloves
Image optimization of sports portraits - 1.1 Overview
Image optimization of sports portraits: Here is an overview of the image.
Image optimization of sports portraits - 1.2 Raw development
Now the contrasts are increased and the colors desaturated in the raw development. By brightening the dark areas, the structures in these areas are enhanced.
Image optimization of sports portraits - 1.3 Crop image
The cropping tool is used to rotate and crop the image format. The result is a more exciting image composition.
Image optimization of sports portraits - 1.4 Cropping
Selection tools are used to separate the model from its surroundings. This allows it to be placed in front of a new background.
Image optimization of sports portraits - 1.5 Create background: "Smoke"
Use the brush tool and the "smoke brushes" to paint a smoky background with white paint.
Image optimization of sports portraits - 1.6 Retouching with frequency separation
Thanks to the frequency separation, colors and details can be edited separately. The face in particular can be optimally retouched in this way.
Image optimization of sports portraits - 1.7 Darkening the surroundings
The image is darkened with a curve adjustment layer. An oval, blurred mask hides the inner part and therefore does not make it darker.
Image optimization of sports portraits - 1.8 Creating a color look with gradient fills
Two layers with gradient fills are created in the background and above the model. These provide the color look.
Image optimization of sports portraits - 1.9 Dodge & Burn
Using dodge-and-burn processing on a separate layer, depths and highlights are worked out. This makes the model look more vivid, but also more artificial.
Image optimization of sports portraits - 1.10 Hinting at studio light with lens flares
A photo of a lens flare is inserted on a new layer. This provides a hint of the studio lights. A second layer provides a further color look.
Image optimization of sports portraits - 1.11 Increase contrast with black and white adjustment layer
The contrast is increased with a black and white adjustment layer in the "Soft light" layer mode.
Image optimization of sports portraits - 1.12 Sharpening
The image is sharpened with the "Reduce blur" filter. More precisely, the contrasts in the details are increased.
Image optimization of sports portraits - 1.6 Retouching with frequency separation
11 min OpenImage optimization of sports portraits - 1.8 Creating a color look with gradient fills
6 min OpenImage optimization of sports portraits - 1.10 Hinting at studio light with lens flares
7 min OpenImage optimization of sports portraits - 1.11 Increase contrast with black and white adjustment layer
2 min OpenSports portrait No. 2 - Gymnastics/Woman with Ball
Image optimization of sports portraits - 2.1 Overview
Image optimization of sports portraits - first an overview of the image.
Image optimization of sports portraits - 2.2 Raw development
In raw development, the contrasts are increased and the colors desaturated. The dark areas are also brightened.
Image optimization of sports portraits - 2.3 Background retouching
The background is retouched with the stamp tool. Disturbing elements, wrinkles and dust are removed.
Image optimization of sports portraits - 2.4 Face retouching
The repair brush is now used to remove impurities from the face and hair and dust from clothing.
Image optimization of sports portraits - 2.5 Darkening the background
The image is now darkened using a curve adjustment layer. The inner part is hidden by an oval, blurred mask and is therefore not darker.
Image optimization of sports portraits - 2.6 Dodge & Burn
Let's move on: Dodge-and-burn processing on a separate layer brings out the depths and highlights. This makes the model look more vivid, but also more artificial.
Image optimization of sports portraits - 2.7 Tanning the skin: gradient conversion
A gradient fill is used to create a golden color look over the image. This gives the skin in particular a warm color tone.
Image optimization of sports portraits - 2.8 Create look: black and white
The contrast is increased with a black and white adjustment layer in the "Soft light" layer mode.
Image optimization of sports portraits - 2.9 Sharpening with high-pass filter
Now a summary of all visible content is processed on a new layer with the high-pass filter. In the "Soft light" layer mode, the sharpness and details are enhanced.
Image optimization of sports portraits - 2.10 Using lateral lighting
Color gradients are created with the brush on a layer in "Multiply negative" mode. These simulate light coming in from the side.
Image optimization of sports portraits - 2.7 Tanning the skin: gradient conversion
3 min OpenSport Portrait No. 3 - Dance
Image optimization of sports portraits - 3.1 Overview
Image optimization of sports portraits - Here is an overview of the image.
Image optimization of sports portraits - 3.2 Raw development
In raw development, the contrasts are increased and the colors desaturated. By brightening the dark areas, the structures in these areas are enhanced.
Image optimization of sports portraits - 3.3 Create background and floor
The background is simulated with a colored surface and a point of light. The floor is created by distorting a photo of a concrete wall.
Image optimization of sports portraits - 3.4 Creating clipping frames
The model is roughly selected with the quick selection tool, worked out more precisely with the brush and the hair is cropped with the "Improve edge" brush tool.
Image optimization of sports portraits - 3.5 Creating shadows
This shadow is created realistically using the photographed shadow from the original shot. In "Multiply" layer mode and with reduced opacity, it is shown to its best advantage.
Image optimization of sports portraits - 3.6 Creating a mirror image
The two feet are cut out, mirrored downwards and distorted. In "Multiply" layer mode, with reduced opacity and a layer mask, the mirroring looks more realistic.
Image optimization of sports portraits - 3.7 Retouching
The repair brush removes impurities from the face and hair and dust from clothing.
Image optimization of sports portraits - 3.8 Sharpening
A summary of all visible content on a new layer is processed with the high-pass filter. In the "Soft light" layer mode, the sharpness and details are enhanced.
Image optimization of sports portraits - 3.9 Dodge & Burn
Dodge-and-burn processing on a separate layer brings out the depths and highlights. This makes the model look more vivid, but also more artificial.
Image optimization of sports portraits - 3.10 Adding lights to the edges
A glow at the edges in the area of the light background allows the model to blend in more with the surroundings.
Image optimization of sports portraits - 3.11 Darkening the edges
The image is darkened using a curve adjustment layer. An oval, blurred mask hides the inner part and therefore does not make it darker.
Image optimization of sports portraits - 3.12 Inserting lighting effects
Separately created light effects are inserted and set to the "Negative multiply" layer mode. Certain areas are hidden with a layer mask.
Image optimization of sports portraits - 3.13 Making colors shine
On a layer in "Negative multiply" mode, dots of color are applied with a soft brush to intensify the colors.
Image optimization of sports portraits - 3.14 Increase contrast with black and white adjustment layer
The contrast is increased with a black and white adjustment layer in the "Soft light" layer mode.
Image optimization of sports portraits - 3.14 Increase contrast with black and white adjustment layer
2 min OpenExamples of use
-
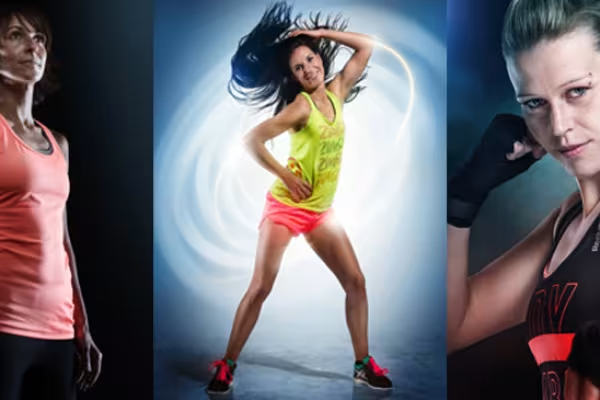 Optimize sports photos and portraits with effects in Photoshop. The guide for sports photographers.
You might also like

Full power, more inspirations, maximum WOW effect!

Photo editing & image composition

More style, more power, more templates!

Save time with artificial intelligence
Comment now „Portrait effects for sports photos in Photoshop“