The editing of sports portraits can significantly enhance the visual impact of your images. Using raw-development in Adobe Photoshop, you can optimize contrast, brightness, and colors to get the best out of your shots. In this guide, you'll learn step by step how to achieve impressive results with the raw converter and subsequent editing in Photoshop.
Key insights
- Adjusting exposure, shadows, and highlights are fundamental steps for optimization even with sports subjects.
- The color temperature affects the warmth and friendliness of your portraits.
- The difference between vibrance and saturation can be crucial in controlling color intensity and the overall impression of your image.
Step-by-Step Instructions
Open the Raw Converter
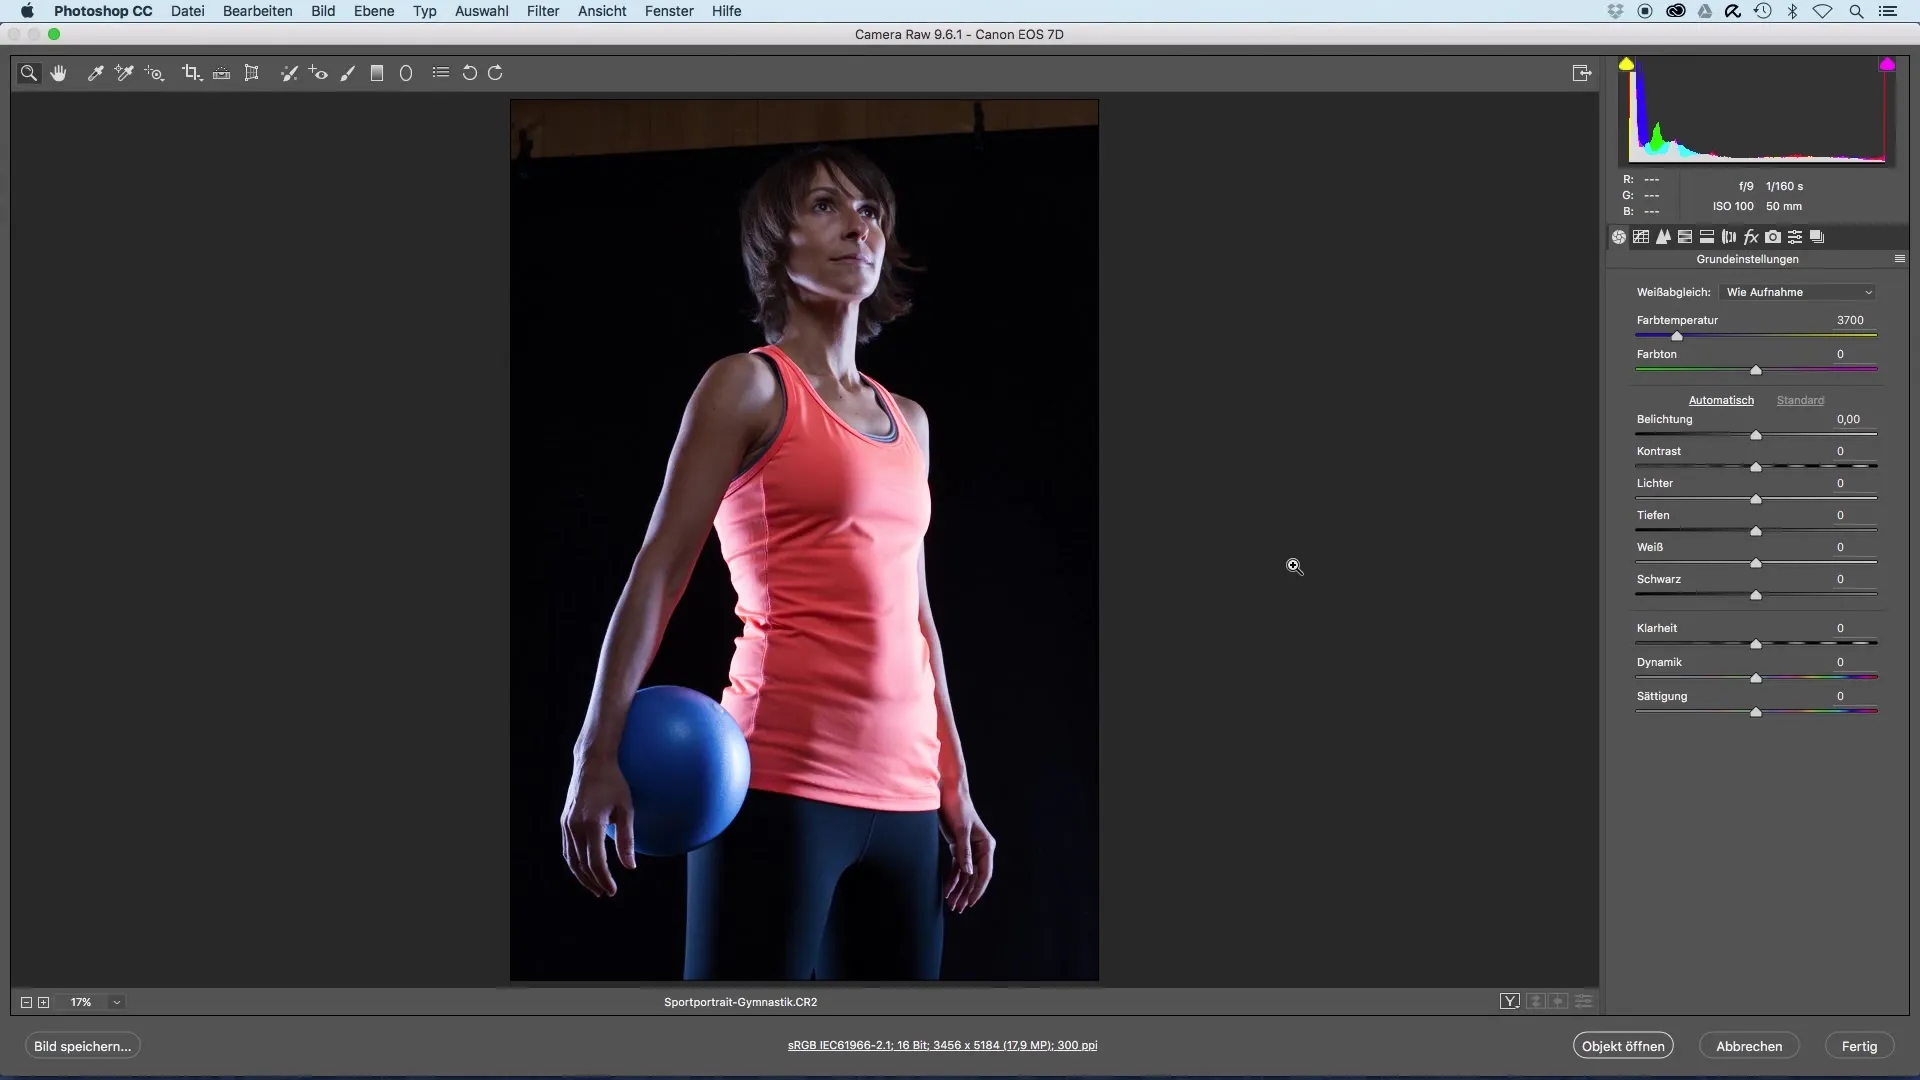
To start editing your image, open the raw converter in Adobe Photoshop. Here, you can make basic adjustments before continuing your work in Photoshop. Once your image is loaded, you will see the various sliders available to you.

Adjust Brightness and Contrast
Start by adjusting the exposure. Here, you play around with the sliders for brightness, shadows, and highlights. Make sure that the image does not become too bright or too dark. Especially with sports portraits, it is important to keep the details visible in both the dark and light areas. Optimize the shadows and highlights to achieve a balanced and high-contrast image.
Adjust Color Temperature
The color temperature can change the overall impression of your image. If you feel that your image is too cool, as is often the case with sports shots, you can increase the color temperature. A value around 4000 Kelvin usually provides a pleasant, warm skin tone that makes the image friendlier.
Increase Exposure
If the image still appears too dark, don't hesitate to slightly raise the exposure. Work intuitively, especially if your monitor is calibrated. Be careful not to overexpose the highlights by lowering them after increasing the exposure.
Adjust Whites
To further emphasize contrast, add some whites. This lifts the image and makes it look crisper and more interesting.
Reduce Saturation
Colors can quickly appear too intense in sports portraits. To create a more harmonious image, it is advisable to reduce saturation. You have sliders for vibrance and saturation available for this. Vibrance only affects the mid-tones, while saturation affects the entire image. Take a look at the difference and find the best value for your image.
Test Differences of Vibrance and Saturation
It is worth taking a closer look at the differences between the two sliders in Photoshop. Create two adjustment layers: one for vibrance and one for saturation. Cover half of the image to see how the changes affect color reproduction. You'll quickly notice that vibrance creates smoother transitions, while saturation tends to make the image appear duller.
Prepare to Return to Photoshop
After making the necessary adjustments in the raw converter, confirm your settings and open the image as a smart object in Photoshop. This allows you to return to the raw settings at any time if you want to make further adjustments.
Final Adjustments in Photoshop
In Photoshop, you can make further adjustments to work on specific areas or darken the background. Here, you'll use adjustment layers and masks to make targeted adjustments and reduce distractions in the background.
Check the Histogram
When editing, be sure to check the histogram. It provides information on whether the shadows and highlights are rendered correctly and if there are outliers that could lead to overexposure or underexposure.
Summary – Image Optimization for Sports Portraits in Raw Development
By correctly applying the steps mentioned for raw development in Adobe Photoshop, you can significantly improve the visual quality of your sports portraits. Combining a solid adjustment of exposure, color adjustments, and an understanding of saturation and vibrance is crucial for achieving impressive results.
Frequently Asked Questions
What are the first steps in image editing in the raw converter?You should adjust the exposure, shadows, highlights, and saturation.
How can I adjust the color temperature to improve skin tones?Increase the color temperature, around 4000 Kelvin, to make the skin look warmer.
Why should I distinguish between vibrance and saturation?Vibrance only affects the mid-tones, while saturation influences the entire image.
How can I continue working in Photoshop after raw development?Open the image as a smart object to make adjustments in Photoshop and return at any time.
What should I pay attention to when checking the histogram?Ensure there are no outliers in the shadows and highlights to avoid over- or underexposure.


