

With the April 2024 version, Adobe InDesign has introduced a few new features, and one of them seems almost like magic at first glance: image generation via text description. You type in an idea and get illustrations or photos that you can place directly into your layout. However, not everything is fully mature yet. The AI feature is still in the beta phase, and the password protection for online publications showed weaknesses in my test. This guide takes you through all the important new features, shows you the steps in detail, and honestly points out where things still go wrong.
The video is only loaded from YouTube when you play it – data (including your IP address) is then transmitted to YouTube/Google. More in the privacy policy
Key Takeaways
The "Text to Image" feature is currently only available in the English version of InDesign. To use it, you have to change the default installation language and reinstall InDesign.
Generated images can be moved within the image frame, selected in different variants, and created in formats such as portrait or landscape.
Documents can be saved directly as cloud documents, opened on multiple devices, and marked for offline use.
Password protection for online publishing is available, but did not work reliably in the test.
The accessibility of EPUB files has been improved, and user settings can be exported and imported.
Step 1: Prepare the English language version
The AI image feature is currently not enabled for the German interface. That sounds annoying at first, but it can be solved with a few clicks. In InDesign, open the "File" menu and select "Preferences". In the "Application" section, you will find the option "Default Installation Language". Switch it to English, either to "English International" or to "English North America".

Step 2: Install InDesign in the English version
After the change, you have to reinstall InDesign so that the language version actually switches. You can uninstall the German version beforehand, which is what I did in my test. Then you install the program again, and the English interface is available to you. Allow some time for this and make sure your license is active.

Step 3: Open the contextual task bar
The "Text to Image" feature is controlled via the contextual task bar. You will find it in the "Window" menu, at the very bottom of the list. You may already know it from Photoshop, as it appears directly at the object depending on the selection. Once you have displayed the bar, the tool is available to you for every suitable frame.

Step 4: Generate an image from a text description
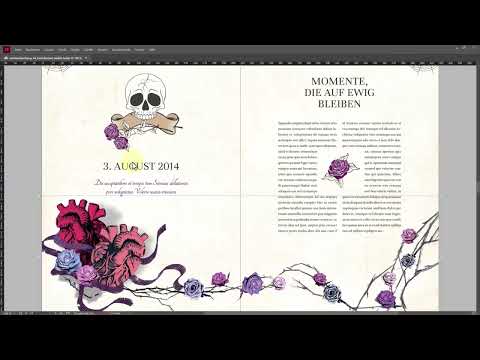
First, click on an empty area or a placeholder in your document. Then you open the input field of the AI feature and type in your description. In the example, I chose a standard area for a wedding newspaper in a spooky style and entered the term "spooky wedding". The description may, by the way, also be in German; even in the English interface it was processed correctly. After a short wait, the first results appear directly in the layout.

Step 5: Compare variants and adjust image sections
InDesign doesn't just give you a single image, but several variants to choose from. You can view them one after another and select the suitable one. Some results are initially only partially visible, so it is worth moving the image content with the selection tool. The image is not firmly bound to the frame, so you can reposition it within the frame. In the test, the generated images reached a resolution of 2048 × 2048 pixels, which is sufficient for most print and screen applications.

Step 6: Define style and format
Via the options, you can specify whether you would rather have a photo or an illustration. This also includes the desired format of the image. In addition, InDesign offers sample prompts. If you click on one of them, you immediately see what kind of result the software produces. In the test, the prompt led to a portrait of a cat with blue eyes, which shows how precisely the descriptions can be implemented.

Step 7: Generate a Portrait-Format Image
A second run requesting an illustration, with the addition "portrait format", shows how flexible the function is. The result adapts to the desired aspect ratio, so you have more area to move things around. If you enlarge the image frame, you can additionally place the subject according to your own ideas. For templates, such as those offered on tutkit.com, this is especially practical because you can use the generated image directly.

Step 8: Save Documents as a Cloud Document
One of the most practical new features for everyday use is saving to the cloud. In the "File" menu, choose the "Save As" command and select a cloud document. Then you assign a name and confirm. InDesign then uploads the file. This is particularly helpful if you switch between home office and the office, because you no longer have to check whether the file is on the other computer or in a Dropbox folder. A checkmark shows you that the file was successfully saved in your cloud.

Step 9: Make Files Available for Offline Use
On the start page, you will find all cloud documents under "Your Files". If you click on a file, you can activate the option "Always make available offline". The file is then actually downloaded to your computer. This makes sense if you do not have a stable internet connection on the go or if maintenance work is scheduled. Simply select all the documents you want to edit even without a network, and activate the option for them.

Step 10: Publish a Document Online and Protect It with a Password
Via "File" you can publish your document online, for example to give a client a preview. In the "General" tab, you activate password protection and assign a password. Make sure the password meets the minimum requirements. In the video, among other things, an uppercase letter was required, and a minimum length also applies. After clicking "Publish", the upload usually takes about a minute. Afterwards you receive a link that you can copy together with the password.

Step 11: Test the Password Protection in the Browser
In my test, the link opened in the browser with a password prompt, which I was able to answer with the chosen password. However, an error message with the display "Access denied" followed. A second attempt by copying the link and password also failed. This is presumably a bug in this still-new feature. Therefore, always test the publication before an important send-out, and have an alternative route ready for clients, such as a PDF export.

Step 12: Use the Accessibility of EPUB Files
In the EPUB format, Adobe has improved page navigation. Readers can jump through the text more quickly on all devices, which makes reading smoother. In addition, you can insert endnotes and footnotes, add alternative text to cover images, and mark decorative images without a description. With your books, make sure that all important content is accessible to readers with visual impairments, because these options were created for exactly that purpose.

Step 13: Export and Import User Settings
The last new feature concerns your personal working environment. Under "File" and "User Settings", you can export or import your settings. This is handy if you have defined your own keyboard shortcuts or created workspaces. If you export this data, you back up your working environment and can restore it immediately on another computer or after a reinstallation.

Summary – InDesign 2024: New Features at a Glance
With InDesign version 2024, you get some exciting new features. The AI-powered image generation via "Text to Image" saves you the search for suitable images, but is for now limited to the English version and still in the beta phase. Cloud documents make working at multiple locations easier, and the offline option protects you when there is no connection. Password protection for online publications is a useful approach, but should be thoroughly tested before use. The improved accessibility for EPUB and the export of user settings round off the update sensibly.
FAQ
Can I also use the "Text to Image" function in the German interface?Not currently, you need the English version of InDesign, which you set via the default installation language and reinstall.
May I enter the description for an AI image in German?Yes, in the test, German descriptions were also implemented correctly in the English interface.
How large are the generated images?In the example, the images had a resolution of 2048 × 2048 pixels.
Can I move a generated image within the frame?Yes, you can reposition it within the image frame using the Selection tool.
What is the advantage of cloud documents?You have your files available anywhere and no longer need to check whether they are on the respective computer.
Can I edit cloud documents without an internet connection?Yes, if you activate the option "Always make available offline", the file will be downloaded to your computer.
Does password protection for online publications work reliably?In the test, an error message occurred; the function is presumably still in an early phase and should be tested before use.
What improvements are there for EPUB files?Page navigation has been improved, and endnotes, footnotes, and alternative texts for images can also be inserted more easily.
Can I back up my user settings?Yes, via "File" and "User Settings" you can export keyboard shortcuts and workspaces and import them again later.
