
A portrait can be technically clean and still look flat. This is exactly where Dodge & Burn comes in: you selectively brighten where light belongs, and darken where shadows should give the face shape. With tone curves, this works in a particularly controlled way, because you edit highlights and shadows on two separate adjustment layers.
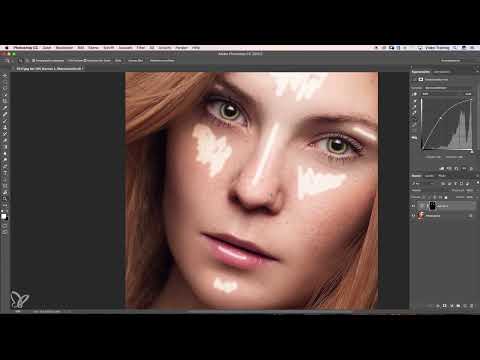
The video is only loaded from YouTube when you play it – data (including your IP address) is then transmitted to YouTube/Google. More in the privacy policy
In this crash course, I show you how to build both layers, how to use masks to control exactly where the effect becomes visible, and which brush tricks make the work easier. At the end, I assess what the technique is well suited for and where its limits lie.
Key Takeaways
- Highlights and shadows are edited on two separate tone curves so that you can control both independently of each other.
- The tone curve is pulled so far that the effect looks exaggerated. The actual dosing is done via the layer mask.
- An inverted mask (black) hides the effect. With a white brush, you paint it back in specifically where it should take effect.
- A soft mask edge ensures that the transitions look natural.
- The method is precise for facial modeling, but less suitable for fine detail work such as removing blemishes.
Step-by-Step Guide
Step 1: Create the Adjustment Layer for the Highlights
Open the menu for adjustment layers and select the tone curve. It sits as its own layer above your image and leaves the original untouched, so you can go back at any time.

Step 2: Raise the Highlights in an Exaggerated Way
Pull the upper area of the curve clearly upward until the brightest areas almost blow out. This looks exaggerated at first, but that is intentional. The strength of the effect is controlled later via the mask, not through the curve alone.

Step 3: Invert the Mask
If you invert the layer's mask with the keyboard shortcut Cmd + I (on Windows Ctrl + I), it turns black. The effect disappears completely as a result, and you have a clean starting point to paint the highlights back in selectively.
Step 4: Emphasize the Highlights on the Nose
Choose a soft brush with white as the foreground color and paint on the mask where light should hit. On the nose, you place bright strokes along the bridge so that the shape of the nose emerges more clearly.
Step 5: Work Under the Eyes and on the Contours
You emphasize the triangle under the eye with long, calm brush strokes. Make sure that the strokes follow the shape of the face. Do not apply the brush in single spots, but draw the lines softly across the surface.
Step 6: Fine Work with a Thinner Brush Tip
For smaller areas, you switch to a thinner brush tip. This way, you avoid the highlights looking applied too thickly. Under the eyebrow, on the eyelid, and in the eye itself, you brighten only very subtly. If you paint outside the lines, you simply correct it with black or reduce the brush opacity.
Step 7: Place the Shine Spot on the Forehead
At the top of the forehead, you add a shine spot. A short, strong brush stroke is usually enough to make the area look alive.

Step 8: Let the Mask Edge Fade Out Softly
Open the mask settings and increase the softness of the edge. Pull the slider to the right until the transitions blur and the highlights no longer appear as hard patches. The layer deliberately stays somewhat stronger so that you can judge the effect well later.

Step 9: Name the Highlights Layer and Compare
Name the layer clearly "Highlights". That sounds trivial, but it prevents mix-ups as soon as you work with multiple curves. A before-and-after comparison then shows you whether the highlights sit harmoniously.
Step 10: Create the Second Tone Curve for the Shadows
Now create another tonal curve, this time for the shadows. To do this, drag the middle slider of the curve slightly down and to the right. This darkens the dark areas of the image overall, and the shadows in the face stand out more clearly.

Step 11: Invert the shadows mask and paint dark areas
Here too, you invert the mask with Cmd + I (Ctrl + I on Windows). With white as the foreground color, you then paint in exactly the areas that should become darker. Use the brush only where shadows should actually appear, otherwise the image quickly looks dirty.
Step 12: Emphasize the nose, eyebrows and outer shadows
The nose gets a small, subtle shadow on the side. You may make the eyebrows a bit darker to give them more expression. You emphasize the outer shadows on the face with soft strokes that follow the contour.
Step 13: Darken the cheekbones, pupils and edges
The cheekbones receive a clear shadow that gives the face structure. You can also darken the pupils and the outer edges of the iris a little so that the gaze looks more expressive. If the effect seems too strong to you, simply reduce the value of the layer or the opacity. This way you keep control over the result.
Step 14: Blend the mask edge of the shadows layer
Go back to the mask settings and soften the edge of the shadows mask as well. This prevents harsh transitions between dark and light areas and ensures that the face looks coherent as a whole.
Step 15: Compare the result with the original
Turn the layers on and off one after another to check the difference from the original. Make sure that the face looks more three-dimensional without appearing artificial. If both are right, the edit is a success.

Summary – Dodge & Burn with tonal curves: Targeted modeling of highlights and shadows
With two tonal curves, one for the highlights and one for the shadows, you model a face precisely and in a controlled way. The mask is your most important tool here: it determines where the effect becomes visible, and with soft edges the result looks natural. The method is particularly suitable for portraits because you can deliberately work out the shape and structure of the face. Its limit lies in fine, small-scale retouching, such as removing blemishes. For such tasks, other dodge & burn techniques are better suited.
FAQ
Which software do I need for this technique?You need an image editing program with tonal curves, adjustment layers and layer masks, such as Photoshop or a comparable program.
Why do I work with two tonal curves instead of one?Two separate curves can be adjusted independently of each other. This way you can change the highlights without affecting the shadows, and vice versa.
How do I quickly invert a layer mask?With the keyboard shortcut Cmd + I (Ctrl + I on Windows) you invert the mask. White becomes black and vice versa.
What do I do if the effect looks too strong?Reduce the value of the layer or the opacity of the brush. A corrective stroke with black also removes the effect at the desired spot.
Why is the method not suitable for blemishes?The technique works with large-area highlights and shadows. Small, localized irregularities can only be edited cleanly with difficulty this way; other retouching techniques are better suited for that.


