
Imagine a comic character whose basics have long been in place, but whose face still looks like a flat graphic. This is exactly where this tutorial comes in. With the Dodge & Burn technique, you bring depth, volume, and contrast out of the skin areas without having to redraw the character. Everything happens on a separate layer that you can adjust or remove at any time.
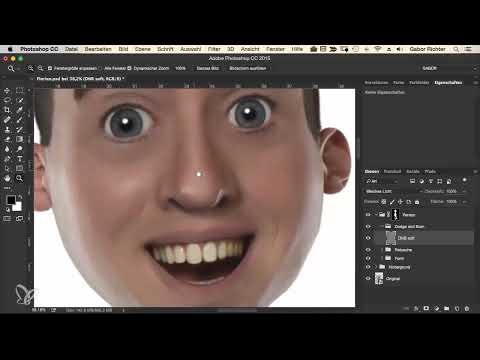
The video is only loaded from YouTube when you play it – data (including your IP address) is then transmitted to YouTube/Google. More in the privacy policy
Key Takeaways
- Dodge & Burn works with light and shadow: bright areas highlight shapes, dark ones make them recede.
- The layer in Soft Light mode, filled with 50% gray, doesn't change the image directly, but only where you paint.
- With a low opacity of 3 to 5%, you work slowly and in a controlled way. This looks more natural than a single hard stroke.
- The eyes, nose, mouth, and head shape get the greatest effect when you deliberately place highlight edges and shadow areas.
- Regularly comparing with and without the layer shows you whether your changes are actually making a difference.
Step-by-Step Guide
Step 1: Realistically Assess the Starting Point
Before you get started, take a calm look at the character. The cheeks and the forehead still look too flat at this stage, and that is exactly the starting point. Dodge & Burn is not meant to decorate, but to create form. So think in advance about where the light is coming from and which areas belong toward the front or the back.

Step 2: Create a Folder and a New Layer
First, create a folder in your layer group and name it Dodge & Burn. This way you keep an overview when clothing and other areas are added later. Then create a new empty layer using the icon in the Layers panel. Hold down the Alt key while doing so so that the dialog window appears. There you can name the layer directly, for example Face Dodge & Burn, and set the most important settings.

Step 3: Set the Layer Mode and Neutral Base Color
In the dialog window, set the mode to Soft Light. Also enable the option to fill the layer with 50% gray. This neutral gray tone doesn't change the image as long as you aren't painting anything. Light brush strokes then become light, dark ones become shadow. Confirm with OK. From now on you work exclusively with the brush, and your original image remains untouched.
Step 4: Set Up the Brush and Work with Black and White
Choose a soft round brush and set the opacity to 3 to 5%. These low values are the secret of the technique. You build up the brightness layer by layer, and this creates a subtle skin texture that feels much more alive than with a high value. With the X key you swap the foreground and background colors and thus switch between black for the shadows and white for the highlights. You constantly adjust the brush size while working, because for contours you need smaller values than for large areas.

Step 5: Model the Eye Area
Start with the eyebrows. With 3% you darken them slightly so that they get more definition. Then you emphasize the area where the eyelashes used to be by going over it several times with an opacity of 3%. The result looks inconspicuous at first, but immediately gives the eye more sharpness. Then trace the iris along the edge so that a strong contrast emerges. If you don't like a step, use the history or the keyboard shortcut Ctrl+Z or Command+Z to go back.

Step 6: Work Out the Whites of the Eyes, Reflection, and Eyelids
In comic style, the whites of the eyes can look brighter and higher in contrast than they would in reality. So add a white reflection and subtly brighten the white of the eye. You reduce the hardness of the brush so that the transition stays soft. Then you emphasize the eyelids by making the upper edge darker. Compare the left and right sides again and again, because small differences quickly add up to a coherent overall picture.

Step 7: Deepen the Areas Under the Eyes and the Eye Sockets
Below the eyes, you add depth with a light shadow, as well as in the upper area of the eye sockets. This way, the face no longer looks like a flat, pasted-on surface, but like a body with real structure. Make sure the shadows don't become too strong. A single pass at 3% is usually enough, and you can repeat it at any time.

Step 8: Shaping the Nose
For the nose, you work with light and shadow as if you were modeling a ball. Brighten the bridge of the nose, place a round shadow under the tip of the nose, and darken the side areas so that the form becomes clearer toward the bottom. The nostrils and the nasal openings also deserve attention: brighten the wings and darken the openings. Compare the result with the before state to assess the effect.
Step 9: Designing the Lips and Mouth Area
Lightly trace the contour of the lips, even if it is barely visible in the original. You darken the lower lip slightly so that it looks three-dimensional. For a shine, you place a small white dot in the middle of the lips. Then you darken the areas around the mouth, especially the corners of the mouth, since they are farther from the light. The teeth get a subtle contour so that they remain legible in the overall picture.

Step 10: Rounding the Chin and Cheeks
The chin gets a dimple or a hollow, which you work out with a shadow. At the bottom, you additionally darken so that the chin comes forward. On the cheeks, you place a slight highlight that catches the light. Around the cheek, you work with darker tones so that it emerges from the face like a round form. Keep checking whether the transitions are smooth.

Step 11: Modeling the Head Shape, Forehead, and Ears
Darken the upper area of the head and brighten the center of the forehead. This makes the forehead look curved forward and the face rounder overall. On the side of the head, you strengthen the existing rim light, which gives the head additional dimensionality. For the ears, it helps to darken the inner areas and place a small edge of light on the rims. Switch regularly between black and white while painting, then the result stays lively.

Step 12: Working on the Neck, Hands, and Fingers
On the chin, you can add a subtle edge of light that gives the face a clear transition to the neck. To do this, rotate the canvas with the R key so you can paint more comfortably. You darken the neck at the bottom and lightly brighten the middle so that it looks rounder. The same principle applies to the arms and hands: darken the sides, place bright light reflections, and work on the fingers with fine contours. With an opacity of 5%, the result can be controlled very well.

Step 13: Checking the Overall Result and Outlook
Toggle the layer on and off repeatedly to see the difference. You will notice that small corrections to the cheek or the highlight can still improve quite a lot. Once you are satisfied with the face, the next logical step is the clothing. There, too, you can work with Dodge & Burn so that the entire figure looks three-dimensional and graphic, like a round comic character in the light.

Summary ??? Modeling Comic-Style Skin: Dodge & Burn Step by Step
You have learned how to model your character's skin tones with a layer in Soft Light mode, filled with 50% gray. With low opacity, alternating black and white, and a look at the before-and-after differences, a face with depth and structure emerges. Repeat the steps as needed, and adjust the strength to your style.
FAQ
Why should I choose such a low opacity?With 3 to 5%, you build up the brightness slowly. This creates a natural skin structure, whereas high values quickly look uneven and artificial.
What does Soft Light mode with 50% gray do?The layer does not change the image as long as you don't paint anything. Bright areas are brightened, dark ones are darkened, and you can correct the effect at any time.
How do I quickly switch between black and white?With the X key, you swap the foreground and background colors. This way you paint shadows and highlights alternately without constantly having to choose the color again.
Can I undo a step if I don't like it?Yes, via the history or with Ctrl+Z or Command+Z. The history allows you to go back several steps.
Why is it worth comparing with and without the layer?This lets you see immediately whether your changes really improve the form. Small differences often only become apparent in a direct comparison.


