
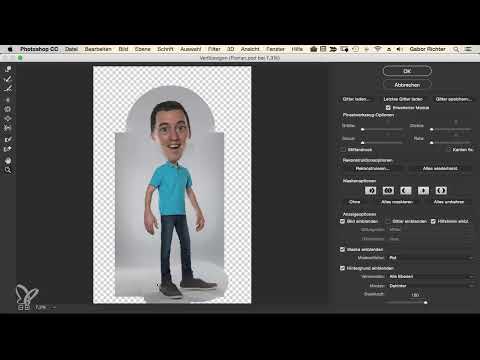
Deforming a pair of pants is quick to do. To make the result look clean and remind people more of a cartoon character than a distorted photo, a few details matter. In this tutorial, you follow the editing of a pair of jeans in Photoshop's Liquify filter, from preparing the layers to the fine smoothing of the wrinkles. You will learn why you start with the legs, how to protect body parts with freeze masks, and why a smart object always leaves you a way back.
The video is only loaded from YouTube when you play it – data (including your IP address) is then transmitted to YouTube/Google. More in the privacy policy
Key Takeaways
Start with the easier area. The legs are ideal for getting used to the filter before you tackle the face and head.
Work on a smart object. This allows you to reopen the Liquify filter at any time and correct mistakes.
Protect neighboring areas with the freeze mask. Hands, shoes, or the waistband should not be accidentally deformed along with everything else.
Work in stages. First define the shape roughly, then smooth the details, and finally remove the wrinkles.
Pay attention to the tool size. Adapt the brush size to the respective area so that you stay precise.
Distribute the deformation in several directions. If you push bulges in only one direction, the result quickly looks unnatural.
Step-by-Step Guide
Determining the Right Order
You don't have to start with the head, even though it appears most important in a portrait. The head is technically more demanding, so it's worth editing the legs first. This way you become familiar with the tool and gain routine before tackling more difficult areas. The pants are a good practice field for this because you can work with generous movements here.

Preparing the Layers
Make sure you are in the group and working in the topmost layer. Only then do you merge all visible layers. On a Mac, press Command, Alt, and Shift together with E; on Windows, Ctrl, Alt, and Shift together with E. Name the new layer created this way, for example, "Form" and convert it directly into a smart object. This step is important because otherwise you won't be able to go back cleanly afterward.

Opening the Liquify Filter
Once the smart object is created, open the "Liquify" filter via the menu. This gives you access to all the tools, and your changes remain saved non-destructively.

Defining the Goal
Before you get started, decide what you want to achieve. For the legs, the aim is to make them slimmer and straighter. Bulges, creases, and unnecessary bumps in the jeans should disappear. A clear idea prevents you from jumping back and forth aimlessly between areas.

Setting Up the Forward Warp Tool
Select the tool for pushing forward, which appears in the filter as "Forward Warp". First reduce the brush size to about 250 so that you can work subtly. Leave pressure and density at the default values. With this setting, you first push the pants roughly in the desired direction.
Creating the Rough Shape
Work piece by piece. First push the material roughly into shape and, if necessary, enlarge the brush to about 350 or even 500 when larger areas need to be moved. In this phase, it's perfectly fine if the shoes get pulled into the image as well. Their turn comes later. Your goal is a clean basic shape, not a perfect surface.
Making the Thighs Slimmer
This is where it gets more precise. Carefully push the thighs slimmer and make sure you don't accidentally drag over the hand. If something is pushed outward in one spot, push it slightly inward on the opposite side so that the proportions are right. This creates a harmonious overall picture.
Editing the Waistband
The waistband is at the top of the body and can be edited in a similar way to the legs. You push the edge smooth until it runs straight. Make sure you don't stray into areas that might look unnatural later.

Protecting with the Freeze Mask
As soon as the hand or other body parts are nearby, you should use the Freeze Mask. In the filter, activate the option to show the mask, mark the area with the Freeze Mask tool, and check whether the area is highlighted in color. After that, you can safely brush over the protected area without it changing. You also use this protection for the shoes if you want to leave them untouched for now.


Shaping the Transition to the Shoes
Zoom out from time to time so you keep the overall picture in view. The transition between pants and shoe can quickly turn out unattractive. Therefore, work here with small, deliberate movements and freeze the shoe while you work on the pants. Once the transition is right, you can remove the freeze by deleting the mask.


Straightening the Pants
Now it's time for the last major refinement. Gradually push the contours into a straight line until the overall impression is coherent. It's normal to switch back and forth several times. What's important is that you compare in the document from time to time and assess the change.
Checking the Result in Photoshop
Close the filter and look at the result in the normal workspace. Compare the before and after states. Especially with the comic look, the difference often only becomes truly noticeable in the overall picture. The big advantage of the Smart Object shows here: if you notice a mistake, you open the Liquify filter again and correct the spot.


If you want to undo a change, you can use the Reconstruct tool to paint the distortion away over the affected spot. If you cancel the process without saving anything, the original remains unchanged.

Fine-Tuning the Surface
Now the surface becomes smoother. Zoom in close and reduce the brush size to about 70, so significantly smaller than before. Push the small bumps and irregularities specifically to the right spot. The rule here: don't push in only one direction, but alternate in and out. This way the pants look taut, but not artificial.


This style is typical of comics and animated films. Look at characters from Disney or Pixar productions, and you'll see how smooth and clear the contours are there. This is exactly the slightly unrealistic look you achieve with the taut smoothing.

Editing the Other Side
Repeat the steps on the right side of the pants. Here too, you work your way toward the desired shape from the inside and outside. This work takes patience, but with each pass your feel for the movement becomes more confident.

Making Small Corrections
Often a small detail remains in individual spots. You correct these with significantly smaller or larger brushes, depending on how big the spot is. It's worth checking from time to time whether you're still working within the desired style, and not changing too much.

Removing the Wrinkles in the Top
You apply the same technique to the top, for example a T-shirt. The wrinkles in the fabric can be smoothed in a similar way. When you look at the result, the figure appears much tidier afterward.


Preview of the Shoes
Once the pants and the upper body look consistent, the shoes follow. They need their own editing so that they fit the new overall look.
Summary ??? Liquifying Pants in Comic Style: Step-by-Step Guide
You have seen how to transform a pair of pants into a comic-like look step by step using the Liquify filter. The key lies in a well-thought-out sequence: start with the legs, work on a Smart Object, protect neighboring areas with the Freeze Mask, and compare your result regularly. Afterward, you smooth the surface with smaller brushes and distribute the distortion across several directions. This creates a tight, clean look inspired by animated films.
FAQ
Why should I start with the legs instead of the head?The legs are less complex than the head. This helps you get used to the tool and develop a feel for pressure, size, and movement.
Why do I need to create a Smart Object?The Smart Object saves your distortions non-destructively. You can reopen the filter at any time and correct mistakes without losing the original image.
What is the Freeze Mask for?With the Freeze Mask, you protect areas such as hands or shoes from unwanted changes while you continue working on other areas.
Which brush size should I choose?Values around 250 to 500 are suitable for the rough shape. For fine smoothing of the surface, much smaller values, such as 70, are sufficient.
Why should I push in several directions?If you only shift bumps in one direction, the result looks artificial. Alternately pushing in and pulling out creates a more natural, yet still tight look.
How can I undo a mistake?With the Reconstruct tool, you paint the distorted area back. If you cancel the filter without saving, the original image remains unchanged.
What can I do when taking photos to have less rework?Wear tighter-fitting clothing. Loose or heavily wrinkled fabrics create many wrinkles that later have to be laboriously smoothed out.


