
Stray hairs are the nightmare of every cutout. As soon as they are supposed to reappear in the finished image, a simple selection edge is no longer enough. This is exactly where this tutorial comes in. You will learn how to prepare a person in the comic-style workflow so that the "Refine Mask" function in Photoshop brings back the fine hair structures, and how to then edit the edges with a soft edge so that they no longer look artificial.
The video is only loaded from YouTube when you play it – data (including your IP address) is then transmitted to YouTube/Google. More in the privacy policy
The process is no rocket science, but it requires a clean layer structure. If you carry out the individual steps in the right order, you stay in control of the result at all times.
Key Takeaways
- First give the cutout person more room on the canvas, because a reflection will be created at the bottom later.
- The "Refine Mask" function only works on a single layer, not on a group. That is why you have to merge all layers into one layer beforehand.
- Running the brush along the contours brings the hair back without you having to redraw fine details by hand.
- A soft edge can be set directly via the mask and readjusted at any time. This is more flexible than a permanently applied blur.
Step 1: Create Room for the Reflection
Before you work on the mask, you should give the person a bit more space. To do this, select all layers that belong to the person and pick up the Move tool. Drag the layers up a little so that enough space remains at the bottom for a reflection. You cannot quickly correct this step afterwards, so it is worth doing it cleanly right away.

Step 2: Critically Check the Contour
Take a close look at the contour of your cutout. With stray hairs, it often looks very sharp-edged and hard, and the individual strands look unnatural. This is normal and no reason to worry, because that is exactly what the next step is for. Zoom out a little if necessary so that you keep the overall picture in view.

Step 3: Merge Layers into One Layer
Now comes the most important preparation step. Click on the "Person" group and hold down the Shift key while you click on the layer mask. This temporarily disables the mask. Then select the top group and press Command, Option, Shift and E. On Windows, you use Ctrl, Alt, Shift and E. This creates a new layer that contains all visible content of the groups.

Step 4: Duplicate the New Layer
You need the new layer as the basis for the refinement. Show the mask again by using the Shift key once more. Then hold down the Option key and drag the layer upward to create a copy. You can repeat this process once more if you need several variants. Then hide the group, since you no longer need it now.

Step 5: Refine the Mask
Now zoom in on the person's head and, if necessary, move the image a little to the left so that everything is easy to see. Select the top layer that contains the mask and call up the "Refine Mask" function. Photoshop now opens a dialog. By default, you leave the tool settings unchanged. Just make sure that the brush size is around 80. This way you can easily run along the contours.

Step 6: Run Along the Contours
Now comes the actual manual work. Run the brush very subtly along the contours. You do not have to trace every strand individually. What matters is that you go over the areas where Photoshop did not recognize the hair properly. Work slowly and calmly, because the software reacts to every movement. In the example, you go all the way down to the earlobe and then release the mouse. Photoshop then calculates a new result.

Step 7: Check the result and accept it
Check what Photoshop has calculated. If the result is fine, confirm it by clicking "OK". Then hold down the Option key and click on the mask to view it in isolation. This way you can see exactly which hairs have been restored. In the example, the hair is significantly improved and the user is satisfied with the result.
Step 8: Transfer the mask to the group
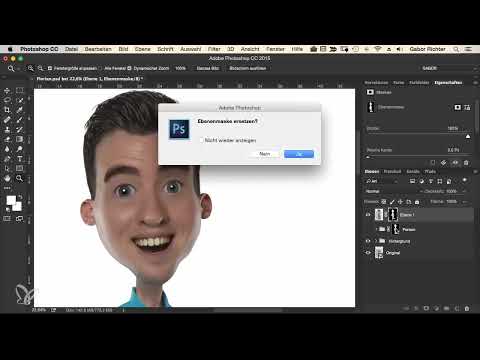
Now it's about bringing the improved mask back into your group structure. To do this, you move the top layer no longer needed, so you can delete it later. Only drag the mask down onto the group. Photoshop then asks whether you want to replace the existing mask. Confirm this with "Yes". Afterwards you can remove the superfluous layer.

Step 9: Why the group doesn't work at first
You may be wondering why the detour via the merged layer was necessary. The "Refine Mask" function works exclusively with pixels of a single layer. A group, on the other hand, only contains references to other layers. Therefore, applying the function directly to the group would not have worked. Merging creates the necessary pixel basis and makes the improvement possible in the first place.

Step 10: Smooth the edge with a feathered edge
The hair is now fine, but the outer edge still looks hard. Photoshop offers a solution for this as well. Click on the mask so that the dialog with the settings appears at the top. There you will find the "Feather" option. First drag the slider to the right to see how much the edge changes. At a value of 30 it becomes very soft, which is not desired in this case. A value of about two pixels usually gives the desired result. Move the slider carefully and watch the edge closely until it looks natural.

Step 11: Why the feathered edge via the mask makes more sense
You could also process the edge using a blur filter such as the Gaussian Blur. However, that has a disadvantage: The filter is permanently baked into the image, and you can no longer flexibly adjust its strength later. If you set the feathered edge directly on the mask, it remains changeable at any time. If you later find that it is too soft, you simply reduce the value again. If you want it even softer, you increase it to four pixels. This convenience makes the method very pleasant.

Step 12: Conclusion and continuing work
In the example, two pixels worked well for the feathered edge. Leave the setting as it is and accept the mask. With that it is adjusted, and you can continue designing your comic motif. Save the file in between so that your progress is safe.

Summary – Improving a Photoshop mask: Precisely cutting out hair and edges
You have learned how to prepare a person in the comic-style workflow so that stray hairs are preserved. The process begins with creating space for the reflection and checking the outline. Then you merge the layers so that the "Refine Mask" function can be applied at all. With the brush you trace the contours and let Photoshop bring back the hair. Finally, you smooth the edge using a feathered edge on the mask, which you can adjust at any time.
FAQ
Why do I have to merge the layers before I can refine the mask?The "Refine Mask" function only works with pixels of a single layer. A group merely contains references to other layers, so a merged layer must be created first.
How do I disable the mask before merging the layers?Hold down the Shift key and click on the layer mask. This temporarily turns the mask off so that the merge captures all visible content.
What brush size should I use for "Refine Mask"?A size of about 80 proved effective in the example. It lets you trace along the contours well without working too imprecisely.
What is the advantage of a feathered edge over the Gaussian Blur?The feathered edge remains stored on the mask and can be adjusted at any time. The blur, on the other hand, is permanently baked into the image and can no longer be changed afterwards.
Which value for the feathered edge is recommended?In the example, about two pixels proved effective. A value of 30, on the other hand, is too strong and looks unnatural.
What happens when I drag the mask onto the group?Photoshop asks whether the existing mask should be replaced. If you confirm with "Yes", the group takes on the improved mask.


