
You liquify a head, and suddenly the character looks like a completely different person. This tutorial addresses exactly that problem. The deformation of the head affects the final image more than almost any other step in the comic workflow, so you should deliberately take your time with it. I'll show you how to adjust the chin, cheeks, ears, forehead, and hairstyle in Photoshop's Liquify filter so that a realistic portrait reference turns into a distinctive, slightly caricatured character.
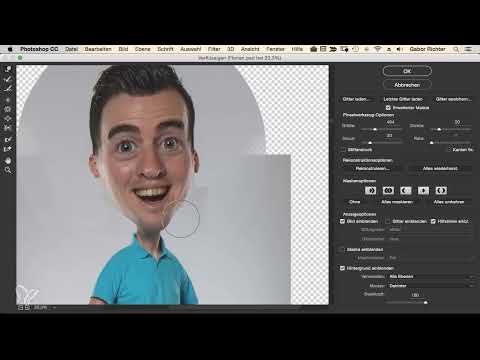
The video is only loaded from YouTube when you play it – data (including your IP address) is then transmitted to YouTube/Google. More in the privacy policy
One thing upfront: you don't have to achieve exactly the same result as in my example. Deformations turn out differently for everyone, and that's exactly what makes the style lively. What matters is that you like the final result.
Key Takeaways
- Before deforming, protect all areas that should remain unchanged, especially the eyes, eyebrows, nose, and mouth.
- Work on the outer contours, because areas inside are fixed and can hardly be changed anymore.
- Define a clear target shape in advance, for example a bulbous pumpkin shape with a narrower chin.
- Check the mask each time you reopen the filter, because it can disappear in the process.
- Let the result rest in between and look at it with fresh eyes.
Step-by-Step Guide
Step 1: Protect Areas with the Mask
Open your image and start the Liquify filter via Filter, Liquify, or with the keyboard shortcut Ctrl+Shift+X (on a Mac Cmd+Shift+X). Before you shape anything, protect the areas that should stay the same. To do this, use the Freeze Mask tool (shortcut F) and paint over the eyes, eyebrows, nose, and mouth. Pay special attention to the eyebrows so that the forehead doesn't get frozen too, because you want to modify the forehead later. The nose and mouth should definitely stay protected, while the cheeks don't necessarily need to be protected.

Step 2: Check and Hide the Mask
The protected areas are now marked, but they obstruct the view of your contours. Therefore, activate the advanced mode at the bottom right of the dialog. There you'll find the Show Mask option. When it's active, you see the protected areas overlaid in color. Deactivate it when you want to assess the contours unobstructed. The mask remains active nonetheless, you just no longer see it. This lets you judge the face more clearly without losing the protection.

Step 3: Define the Target Shape
Before you get started, you should know where you're headed. In my example, the head should resemble a pumpkin: bulbous at the bottom, somewhat narrower at the top, so a narrow chin and a large, massive forehead. Find references for this from comics, Disney animated films, or painted illustrations. Note which head shape you like, and keep this image ready next to the Liquify window. You don't have to copy the reference exactly, but a clear idea prevents your deformations from looking random.
Step 4: Raise the Chin and Make It More Angular
Now it's time for the chin. Choose the Forward Warp tool (shortcut W) and gently push the chin upward. Take the neck along with it so the transitions remain consistent. Then add a small indentation to the chin line. This makes the chin look more masculine, almost like an angular rock. A round chin arc, on the other hand, looks soft and friendly. Work in small steps and with an appropriate brush size so you don't overshoot your goal.
Step 5: Shape the Cheeks and Keep an Eye on the Ears
To give the face more strength, push the cheeks outward slightly. Since this area borders directly on the ears, you should handle the brush carefully. Even one small step too far can ruin the shape of the ear. Reduce the brush size as soon as you approach the ear, and rather pull lightly several times than strongly once. This way the result is much easier to control.
Step 6: Enlarge the Forehead
The forehead is an important design element of this head shape. You push it downward so that it looks large and massive. Work in several passes so the deformation progresses evenly. Make sure the eyes aren't pulled along. If they do move, undo the step or correct it with the Reconstruct tool.

Step 7: Lift the hairstyle and shape a wave
The character already has a hairstyle, which you now adapt to the new head. Push the hair upward so that more volume is created and the hairstyle looks slightly swept upward, as if it had a small wave. While doing so, check the transition between the hairline and the forehead. It should remain soft, otherwise an unnatural edge will appear.

Step 8: Balance the outer contours and the hair contour
Here lies the most important principle of the tutorial: work on the outer contours. Everything on the inside is already fixed and can hardly be changed anymore. The hair contour is only a thin strip on one side, while on the other side it is quite wide. Therefore, you make it a bit narrower until both sides look harmonious. In between, it is worth taking a look at the overall picture. To do this, briefly leave the filter, because in the Liquify window changes often appear stronger than they do in the finished image.

Step 9: Work out the ears
Ears are unforgiving. They need to become larger, but stay round. Strongly arched, jellyfish-like ears quickly stop fitting the style. Increase the brush size, work outward from the ear, and shape the earlobe so that it looks round. Afterwards, compare both sides with each other. The right ear often looks darker and therefore stands out more. However, you can still correct these differences during the final refinement.

Step 10: Check the mask again and readjust the cheeks
A typical mistake is forgetting to freeze after reopening the filter. The mask is then gone, and the risk increases that you unintentionally change the mouth or the eyes. Therefore, before every further step, freeze the protected areas again and reactivate the mask. After that, you can push the cheeks out slightly and work out the chin a bit harder. In doing so, you take back edges in the hair, because they quickly look unnatural.

Step 11: Final refinement after a break
Finally, a break is worthwhile. Let the image rest for 15 to 20 minutes, then look at it again and make only small corrections. Inconsistencies often only become noticeable after a break, for example with the ears, which can still be a little larger. Only when the overall picture looks coherent is the head finished being reshaped.

Summary – Liquifying comic heads: The path to the pumpkin shape
Reshaping the head is a step that demands patience. You first protect the areas that should stay the same, define a clear target shape, and then work from the outside in on the chin, cheeks, forehead, hairstyle, and ears. Check the mask regularly, take breaks, and view the result from a distance. This creates a character with its own personality, which doesn't have to be perfect but fits your style.
FAQ
Why does the mask disappear when I reopen the Liquify filter?When you close and reopen the filter, the mask is not always automatically retained. Therefore, freeze the protected areas again before continuing and check whether they are active.
Does my result have to look exactly like the one in the tutorial?No. Every head reacts differently to the reshaping, and your personal vision counts too. What matters is that you like the final result.
Which areas should I definitely protect?The mouth should always be protected, as well as the eyes, the eyebrows, and the nose. You don't necessarily have to protect the cheeks.
How do I find good references for the head shape?Look at comics, Disney animated films, and painted illustrations. Choose heads whose shape you like, and keep them ready next to the Liquify window while you work.


