

Cutting out subjects is one of the tasks in Photoshop that tests your nerves the most. Hardly any other topic is discussed so intensively, and hardly any area has produced so many tutorials. Especially with hair, fine contours and shadows, a cutout can quickly turn out messy. So you shouldn't be surprised if you feel unsure about this topic at first.
The video is only loaded from YouTube when you play it – data (including your IP address) is then transmitted to YouTube/Google. More in the privacy policy
In this tutorial, I'll show you how I go about it. I work with the Pen tool about 95 percent of the time because it gives me full control over the result. In addition, I'll look at two simpler methods: the Quick Selection tool and the Focus Area selection, which has been available since Photoshop CC. You'll learn where these tools reach their limits and why the path is worth the effort despite the work involved.
Key Takeaways
Key Takeaways
- The Pen tool delivers the cleanest and most controllable edge, even if it requires some patience.
- The Quick Selection tool works well with hard contrasts, but is not suitable for precise cutouts.
- The Focus Area selection depends heavily on the image and needs good contrast between subject and background.
- You should do retouching and shape corrections before cutting out, so that no remnants of the original layer show up later.
- Hair is best prepared with a rough path and then fine-tuned using Refine Edge.
- Save your selection in between, so you don't have to start over if you make mistakes.
Step-by-Step Guide
Step 1: Recognizing the Limits of the Quick Selection Tool
Start with the Quick Selection tool, because it quickly shows where the strengths and weaknesses lie. It recognizes hard contours quite well. You simply drag over the subject, and Photoshop creates a selection. This works particularly well when the subject stands out clearly from the background. However, as soon as shadows, edges or fine transitions come into play, the result becomes messy. You then have to zoom in very close and constantly make corrections. With the Alt key, you remove too much of what was selected. For figures in the background, where nobody looks closely at the edge, the tool is still a practical solution.

Step 2: Testing the Focus Area Selection
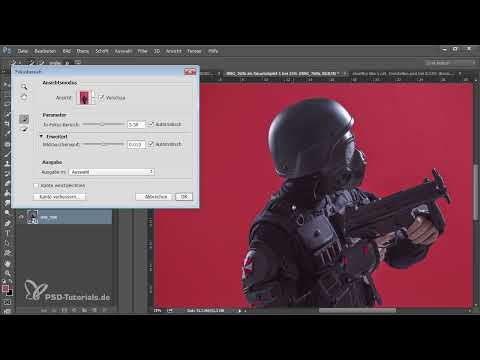
You'll find the Focus Area selection under the Select menu item. It analyzes the sharp area of a photo and marks it as a selection. For this, the sharp area must be clearly separated from the blurred background, and the contrasts must be right. The dialog offers sliders, which you should mostly leave on Auto. The more you turn the sliders, the worse the result often gets. With an image that has an unfavorable sharpness gradient, the tool fails to recognize numerous contours. With the Minus brush you can remove areas and with the Plus brush you can add them, but the edge areas usually remain inferior to a path.

Step 3: Applying the Focus Area Selection to a Suitable Image
With images containing many people who stand out clearly from the background, the Focus Area selection shows its strengths. Imagine a shot in which the same person was photographed from different perspectives. A path for each individual figure would cost you a great deal of time here. In such cases, the Focus Area selection delivers a surprisingly good basis. Afterwards, however, you have to add smaller details such as individual fingers manually. In Refine Edge mode, you can use Smart Radius to round off the edges a little and raise the contrast so that frayed spots disappear. It's important that you check with a dark background whether the edges are clean.

Step 4: Cleaning Up the Subject Layer Before Cutting Out
Before you start with the path, you should do all retouching and shape corrections. If, for example, you make an arm thinner after you've cut it out, the original layer with the model underneath can become visible again at that spot. This leads to conflicts that you can only remove with difficulty. With a clean layer, you can go back to the work at any time later, set lights in the background and edit both parts separately. A good cutout is therefore already half the battle.

Step 5: Setting Up the Pen Tool and the Path Preview
Select the Pen tool and make sure that the Path option is active and not Shape. Also activate the Rubber Band function in the options. It shows you how the path runs while you're dragging, before you click. This makes the work much clearer. Then enlarge the image to about 200 to 300 percent and begin at a spot on the edge of the image where the contour is easy to see.

Step 6: Draw the path along the contour
Set the first point and drag while holding the mouse button to create a curve. Follow the contour of the subject as you do so. Make sure the path runs a little bit inside the subject. This way you avoid a gray background edge on the cutout, and you won't get messy fringes. For straight sections, a simple click is enough. For curves, it's best to drag while holding the mouse button. This is painstaking work, during which you can work well with music. A half-hour effort is worthwhile, because the result is precise and fully controllable.

Step 7: Correct mistakes and move points
If you misclick, undo the last step with Ctrl+Z. When setting a point, hold down the mouse button and press the spacebar. This lets you move the point and place it exactly on the contour, as long as the mouse button has not been released. Never press the Escape key, because otherwise the path will be interrupted. In particularly difficult spots, it's fine not to place every point perfectly. What matters is that the overall contour is correct in the end.

Step 8: Trace the hair roughly with the path
Hair seems intimidating to many people, but the first step is simple. Go along the edge of the hair and ignore the fine strands at first. You can refine the contour later in Refine Edge. Make sure you always orient yourself along the contour and don't pull the path outward unnecessarily. The path then adjusts automatically when you move individual points. This way you get through the area quickly.

Step 9: Convert the path into a selection
In the Paths panel, right-click the path and choose Make Selection. In the dialog, set the radius. A value of 1 to 2 pixels usually looks natural, since absolutely hard edges rarely occur in photos. With 0 pixels, the result often looks unrealistic. Then confirm with OK. Afterwards, invert the selection with Ctrl+Shift+I so that the subject is selected.

Step 10: Save the selection
Before you continue, save the selection via the Select menu and Save Selection. Assign a clear name, for example Cutout Base. If you accidentally deselect or something goes wrong, you can reload it at any time. This is a simple safeguard that saves a lot of frustration.

Step 11: Add further paths for belts and folds
Not every area belongs to the subject. With the Pen tool, draw a new path around belts, glove folds, or other areas that are not part of the figure. You then need to subtract these paths from the existing selection. To do this, create a selection again via the context menu and choose the option Subtract from Selection. With a bit of practice, this step goes quite quickly. This way you work your way piece by piece toward the perfect selection.

Step 12: Refine the hair in Refine Edge
Switch to the Refine Edge mode to refine the hair. To do so, select the Refine tool and paint over the critical areas with the brush tip. Photoshop then recalculates the fine hairs and displays them again. In very low-contrast areas, however, this only works to a limited extent. Don't overdo it there. If the very fine hairs become visible later anyway with an overlay technique, a rough result is sufficient.

Step 13: Copy the cutout to a new layer
Save the final selection again so you can reuse it at any time. Then copy the subject to a new layer with Ctrl+J. You now have a clean cutout that you can freely move over a new background. An overlay technique with soft light helps make fine hairs and the transition to the background look natural. Feel free to hide and show the cutout once to check whether the hair is still visible.

Summary ??? Cutting Out in Photoshop with the Pen Tool
Cutting out in Photoshop takes patience, but with the Pen Tool you achieve the best control. Quick Selection and Focus Area selection are useful for simple subjects or background figures, but quickly reach their limits with fine contours. Prepare your subject thoroughly, trace the path cleanly, refine the hair using Refine Edge, and save your selection regularly. This way you get a cutout you can reliably build your image with.
FAQ
When is the Quick Selection Tool worthwhile?It is suitable for subjects with hard contours and clear contrast, especially when the edge is not the focus, such as with figures in the background.
Why do you prefer working with the path rather than selection tools?The path offers full control over every point of the contour and delivers clean edges that can be adjusted at any time afterwards.
What do I do if I place a point incorrectly while drawing the path?With Ctrl+Z you undo the last step. In addition, hold down the mouse button and use the space bar to move the point.
Why should I retouch before cutting out?If you still change shapes after cutting out, the original layer underneath may become visible. Therefore, make all corrections beforehand.
Which radius should I choose when creating a selection?A value of 1 to 2 pixels usually looks natural. A radius of 0 pixels often produces an edge that is too hard.
What does the Focus Area selection offer for difficult images?It only works well with a clear difference in sharpness and good contrast. With difficult images, it usually only provides a base that you have to refine.
How do I save my selection so that nothing gets lost?Save the selection via the menu Select and Save Selection. Later you can call it up again via Load Selection.

