

A subject only looks convincing when it is embedded in a coherent environment. That is exactly what this part of the series is about. First you organize your layers, check the color mood of the background, and then add fog, clouds, light sources, and lightning. In the end, a loose collection of layers turns into a cohesive image with depth and atmosphere.
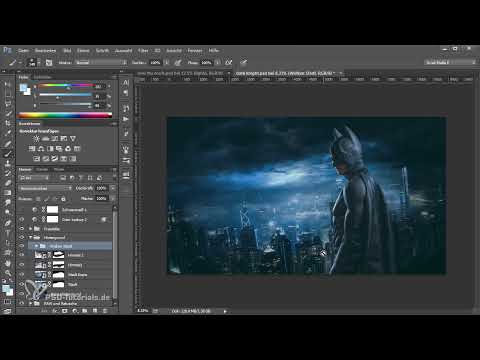
The video is only loaded from YouTube when you play it – data (including your IP address) is then transmitted to YouTube/Google. More in the privacy policy
The tutorial is aimed at image editors who already work with layers, masks, and brushes. So you should already be familiar with basics such as creating a mask.
Key Takeaways
- With a clean layer structure using groups, you keep an overview even with many elements.
- A Color Lookup serves as a quick test of whether the subject and background go together.
- Atmosphere is best created with soft, light brush strokes on a separate layer with reduced opacity.
- Masks allow you to scale elements back at any time instead of deleting them permanently.
- Light sources and lightning look believable when you adapt them to the brightness, direction, and size of the surroundings.
- A black-and-white layer shows you where brightness and contrast are still not right.
Step-by-Step Guide
Structure layers and organize them into groups
Before you work on the atmosphere, bring order to your document. Create a group for all retouching layers and name it something like "Retusche". Combine the background layers in a group called "Hintergrund", and the cutout subject in its own group. To do this, select the relevant layers while holding down the Ctrl key and then press Ctrl+G. Give layers meaningful names, for example "Himmel 2", instead of leaving them as "Ebene 7". This seems unspectacular, but it prevents searching and mix-ups later on.

Use Color Lookup as a quick test
Place a Color Lookup over the entire composition to test the direction. Try the look over the image and observe whether the subject and background work together. If the colors don't harmonize even now, you know that you will have to correct the background in a targeted way later. Feel free to click through several looks, because the preview often shows surprisingly quickly which mood suits the subject.

Select a suitable color mood
In this example, the Siena Blue look stands out. It slightly desaturates the image and gives it a comic-like character that suits the subject well. However, don't rely on the first choice. The look initially serves only as a rough orientation and will be adjusted in the next step.

Fine-tune the look
The look is usually too strong. Reduce its opacity until the effect remains subtle. Then you can brighten the shadows a little so that details are preserved, and slightly pull back the highlights. A layer mask allows you to exclude certain areas. Test regularly whether the difference from the original image is still appropriate. If the change is barely visible anymore, go back a bit with the shadows.

Check with a black-and-white layer
Place a black-and-white layer on top to assess the brightness distribution independently of color. Here it becomes apparent that the main subject still does not stand out enough from the background. Keep switching the layer on and off to check, so that you can follow your progress.

Build up brightness in the background in a targeted way
Don't draw the background up over the base layer, but link the brightness directly to the atmosphere. This gives you more control because you can steer each effect individually. To do this, create a new layer within the "Hintergrund" group.
Add atmosphere with fog brushes
Load your fog brushes in Photoshop and choose a brush with a soft, cloudy structure. Hard edges are unsuitable because they look artificial. Use the eyedropper to pick up a light color from the background so that the fog matches the surroundings. Initially set the opacity high to see the effect, and then paint carefully over the desired areas. Darker zones benefit especially if you brighten them a little.

Adjusting brush, size and angle
A flat brush is well suited for long, drawn-out wisps of fog. Rotate the angle until the shape fits the perspective, and change the size until the clouds look natural. As soon as the effect becomes too strong, reduce the opacity of the layer. Place the clouds sparingly so that the impression of a uniform veil doesn't arise.
Working with masks instead of erasing
Not every cloud belongs in the desired spot. Therefore, add a layer mask and paint over the disruptive areas again with a soft black brush. This way everything remains reversible. Pay particular attention to elements that should be in the foreground, such as towers. You mask these out at full opacity so that they don't disappear in the fog.
Grouping clouds and enhancing city lights
Group the cloud layers under a meaningful name such as "Clouds" so that the structure stays clear. Afterwards, you can emphasize the lights of the city. Instead of brightening all the windows individually with the brush, you select them via the color range. To do this, show only the relevant layer, choose Color Range under "Select" and adjust the tolerance until only the lights are selected. You then create a new layer with this selection.


Retouching lights with a soft brush
Hide the selection with Ctrl+H so that you see the image without selection lines. Now choose a bright, slightly yellowish color and a large, soft brush. Paint over the areas where more light is desired. Set the layer mode to "Overlay". The light immediately begins to glow more strongly, but at the same time looks more natural than in normal mode.

Creating glow with a smart filter
Convert the light layer into a smart object. This way you can adjust the filter at any time later. Apply the Gaussian Blur and choose a radius that creates a slight glow without blurring the structures. Then reduce the opacity of the layer to about 20 percent. With a black brush, you partially mask out the glow in the background so that the distance effect remains subdued. If the effect looks too strong, simply lower the opacity further.


Selecting and placing lightning bolts
Now load the lightning files from your folder into the document. The lightning bolts initially look inconspicuous because they are often in grayscale. Tint them using an adjustment layer so that they match the lighting mood. Drag the first lightning bolt into a corner of the image and transform it until it blends into the composition. A lightning bolt behind the main subject often looks especially harmonious because it emphasizes the silhouette. Therefore, hide part of the lightning bolt behind the figure and reduce its opacity.


Adding a second lightning bolt and refining masks
A second lightning bolt adds dynamics. Choose a lightning bolt with a different shape so that the image doesn't look like a copy. Enlarge it and set it somewhat steeper until it fits the perspective. Mask the edges that look too harsh, and work especially on the transitions to the cloud layer. There, the lightning should appear to come out of the fog.


Setting a light spot and integrating it with Soft Light
Where the lightning is meant to end on the clouds, you place a bright light spot. Paint it with a soft brush at 100 percent opacity on its own layer. Distort the spot slightly so that it resembles a light source. Set the mode to "Soft Light". You can then duplicate the layer and enlarge it until the effect looks believable. Afterwards, adjust the mask and reduce the opacity if the spot appears too dominant.

Additional Lightning and Fine-Tuning
A small, delicate bolt of lightning in the background adds further life to the scene. Choose a filigree one, make it smaller, and place it above the lights. If the shape is too straight, replace it with a more winding bolt. Make sure the lightning appears to originate from the surroundings and does not float freely in space. A final mask on the house facade in the foreground ensures that the lightning really appears behind the building.


Overall Check and Corrections to the Foreground
To finish, turn the Color Lookup and the black-and-white layer back on. This way you can check whether all the corrections work together harmoniously. Make some small adjustments to the foreground, such as contrast and sharpness, so that the subject remains clearly separated from the background. At the end, compare the result with the original image to evaluate the progress.

Summary ??? Inserting a Background in Photoshop: Creating Realistic Fog, Clouds and Lightning
In this tutorial, you have learned how to structure background elements cleanly, fine-tune the color mood via Color Lookups, and create atmosphere with soft fog brushes. You have also specifically enhanced lights using color range selections, created glow effects with smart filters, and integrated lightning convincingly into the image using masks and layer modes. The key is to keep every adjustment reversible and to check regularly with the black-and-white layer.
FAQ
How can I tell whether the subject and background match?A Color Lookup over the entire composition quickly shows you whether colors and brightness harmonize. If the subject still looks detached, a black-and-white layer helps to check the brightness distribution.
Why should I edit fog with masks instead of the eraser?Masks can be undone at any time and allow you to create fine transitions. If you delete pixels permanently, you lack flexibility later.
Which layer mode do I use for light spots?The Soft Light mode is well suited because it enhances bright areas without harshly overexposing the background. If the effect is too strong, simply reduce the layer's opacity.
Why do I work with a smart object for lights?A smart object allows you to adjust filters such as the Gaussian Blur at any time afterwards. This way you don't have to start over with every change.
How do I prevent lightning from looking artificial?Pay attention to a suitable color, realistic size, and soft transitions via masks. Lightning looks especially convincing when it seems to emerge from the fog or from behind the subject.

