

Before you assemble subjects into a scene, it is worth taking a close look at the raw material. Already in Adobe Camera Raw it is decided whether an image can later be cleanly integrated into a composite. In this tutorial, you follow Jurek through his workflow: He shows which sliders he moves first, what he pays attention to with highlights and shadows, and when he deliberately stops. This is not about a finished look, but about a solid foundation that you can freely edit further later on.
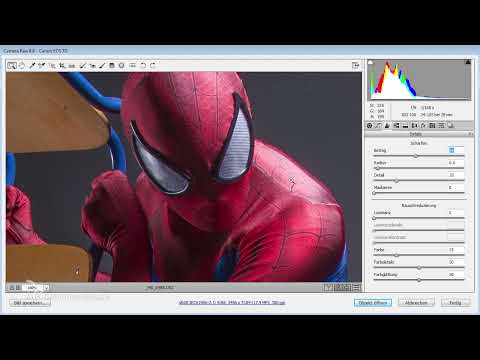
The video is only loaded from YouTube when you play it – data (including your IP address) is then transmitted to YouTube/Google. More in the privacy policy
Key Takeaways
- In compositing, RAW development serves to optimize the base material, not to already finish designing the image.
- The Highlights and Shadows sliders are the most important tools for bringing back detail in bright and dark areas.
- The Alt key on the slider shows you where areas are overexposed or underexposed.
- You should use sharpening, clarity, and vibrance in moderation so that the image does not look artificial.
- A Smart Object allows you to switch back to Camera Raw at any time later.
Step-by-Step Guide
Step 1: Decide how far you want to go
Before you start, clarify for yourself what the image should accomplish in your composite. Jurek distinguishes between two approaches: Either you only optimize the base material, or you develop a completely finished photo. Color looks, gradient filters, or split toning belong to the second category for him. For a composite, it is usually enough to correct a few basic values and give the image a clean foundation. If you stick to this principle, you avoid struggling later with colors and contrasts that you can no longer adjust cleanly.

Step 2: Choose a crop and find the bright areas
At the beginning, zoom in on a smaller section with the main subject. This way you can directly see what effects your changes have. After that, Jurek always begins with the Highlights and Shadows sliders. If you pull the Highlights slider down, only the bright parts of the image lose brightness. With the subject shown, glossy spots on the shoulder or on the refrigerator become calmer. Pull the slider until details become visible again in all bright areas, such as the pattern in the highlights.

Step 3: Check the overexposure with the Alt key
You can't always tell with the naked eye whether an area is blown out. Therefore, hold down the Alt key while moving the Highlights slider. Camera Raw then shows the areas where detail is lost. You don't have to rescue every pixel. A few small red spots are unproblematic as long as there is still detail in the image overall. Pay particular attention to the important areas of your subject. If the image becomes too dark overall due to excessive lowering, you may raise the exposure a bit again.

Step 4: Bring detail back into the shadows
With the Shadows slider, you work in the opposite direction. If you pull it down, the shadows become even darker. If you pull it up, the shadows brighten, and detail becomes visible again. Here too, you can check with the Alt key held down where very dark areas remain. Zoom in closer to judge whether the details in the shadows have actually returned. A comparison with the original image quickly shows you how much the image has changed through the sliders.

Step 5: Adjust exposure and white balance
After highlights and shadows are corrected, the image often still looks too dark. Jurek therefore usually raises the exposure by half a stop. Afterwards, he checks the white balance. If the image is too warm, you move the Temperature slider into the cooler range. Make sure you don't overdo it. A subtle step is enough to change the mood without making the subject look unnatural.

Step 6: Use clarity and vibrance in moderation
Clarity enhances micro-contrast and makes structures stand out. Jurek increases it only slightly, because a value that is too high creates an unpleasant sharpening effect. Vibrance works differently: It primarily boosts less saturated colors without changing all colors uniformly. A value around +14 already brings out the colors noticeably without the image looking oversaturated. Don't confuse vibrance with saturation, which boosts all colors uniformly.

Step 7: Give the image a basic sharpening
To sharpen, zoom to 100% and work with two sliders in the Details section. The Amount determines the strength of the sharpening, the Radius the width of the effect. For fine sharpening, choose a low radius, around 0.6 to 0.7. Raise the Amount until the edges look clearer, without the image feeling grainy. Pay particular attention to the Masking, because that is where the noise shows up most clearly.

Step 8: Remove distracting color fringes
With high contrasts, chromatic aberrations often occur, meaning colored edges along hard edges. In the example shown, they are purple fringes on the chair leg. Enable the option to remove chromatic aberration and check the result when zoomed in. In the green areas, the problem is usually less pronounced. Once the effect has practically disappeared, the correction is sufficient.

Step 9: Open the image as a Smart Object
Before you hand the image over to Photoshop, check the option to open the image as a Smart Object. This keeps the RAW development editable later. Double-clicking the Smart Object takes you back to Camera Raw at any time. Without this checkmark, you only get a normal layer, and the Camera Raw filter can no longer be adjusted as conveniently. Jurek demonstrates this by opening the image once without and once with the checkmark.

Step 10: Adjust the image in Photoshop as needed
With the Smart Object, you can still make adjustments in Photoshop as well. Jurek, for example, places a Color Lookup on top, which makes the image darker and cooler. If the result looks too dark, you open the Camera Raw settings again by double-clicking and raise the exposure slightly. This keeps the development flexible, and you can correct changes without losing quality.

Step 11: Work with extreme highlights on the second image
In the second example, you are dealing with a highly reflective helmet. Very bright specular highlights meet deep shadows here. First, use the Highlights slider in the range that still shows overexposure. The highlights cannot be eliminated completely, and that is not necessary either. What matters is that you bring back the detail in the shadows. Therefore, pull the Shadows slider up strongly until the dark area becomes visible.

Step 12: Plan the highlights for the composite
The fact that the highlights are still bright after development is not a mistake in this case. In the later composite, you can determine where a backlight or another light source is located and align the brightness accordingly. What matters is that you are aware of this situation and act accordingly. With this mindset, you avoid misjudging details in the image.

Step 13: Keep the color mood restrained
With this subject, the image is too warm in development. Jurek shifts the white balance toward blue but stays restrained. Normally, he hardly intervenes in the colors during RAW development and keeps the image neutral. He only determines the final color mood later. Also check whether the chromatic aberration is even still visible at this point. In this image it was barely present, so further correction was unnecessary.

Step 14: Balance Clarity, Saturation, and Black against each other
You increase the Clarity significantly here, because the subject consists almost entirely of black, gray, and white. Vibrance does little in an image like this, because there are hardly any colors. You should change the white balance only minimally, as otherwise you will already introduce color casts. You lower the Saturation slightly so that the image does not look too strongly blue. With the Blacks slider, it is best to stay at zero, because lowering it quickly makes the image look flat. You can lower the Whites slider minimally to calm the highlights a bit.

Step 15: Compare the Original Image and the Development
Finally, you compare the original image with your development. In the original, many areas look too dark, and the detail has been lost. In the developed version, the details of the tank's armor come out clearly. For the composite, such an image is a good foundation, because you can still design freely later on. Keep this comparison as a reference for your own developments.

Summary ??? RAW Development as the Foundation for Your Composite
RAW development is the first step in preparing an image for a composite. You bring back detail in the highlights and shadows, check overexposure with the Alt key, adjust exposure and white balance subtly, and use clarity, vibrance, and sharpness in moderation. With a smart object, your development stays flexible, and you can readjust at any time. Keep the color mood restrained so that you can control it deliberately in the composite.
FAQ
Do I have to fully develop every image for a composite?No, a basic optimization is usually enough for a composite. You can apply color looks and gradients later in Photoshop.
What does the Alt key do with the slider?If you hold down the Alt key and move the slider, Camera Raw shows where areas are overexposed or underexposed.
Are a few red spots in the overexposure a problem?No, as long as there is still detail in the image overall, a few small spots are unproblematic.
What is the difference between vibrance and saturation?Saturation intensifies all colors evenly. Vibrance mainly intensifies the less saturated colors and spares those that are already strong.
Which sharpening values are suitable for basic sharpening?For fine sharpening, a radius between 0.6 and 0.7 is a good choice. You increase the amount until the edges look clearer.
Why should I open the image as a smart object?That way you can reopen and adjust the RAW development at any time later by double-clicking.
What do I do about chromatic aberrations?Enable the chromatic aberration correction in Camera Raw and check the result by zooming in on hard edges.

