

A costume rarely fits perfectly, and this is exactly where retouching comes in. In the second section of the project, the goal is to adjust the model's figure, remove details, and refine the shape of the suit. You will work with the Liquify filter, the Patch tool, the Spot Healing Brush, and frequency separation. The tutorial follows the video step by step, so you can follow each measure and apply it to your own images.
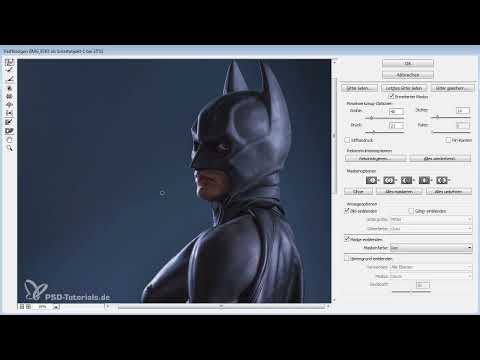
The video is only loaded from YouTube when you play it – data (including your IP address) is then transmitted to YouTube/Google. More in the privacy policy
Key Takeaways
- Before you start retouching, mark the problem areas on a separate layer. This way you keep an overview without altering the original image.
- The Liquify filter works on a copy of the layer. This gives you the freedom to repeat or discard steps.
- With the "Forward Warp" tool, you gently shape contours. Low pressure and low density prevent unnatural distortions.
- At the edge of the image, the Liquify filter loses pixels. Here you need to counteract this and work especially carefully.
- The Patch tool reliably removes details such as the nipple or emblem if you select a clean area as the source.
- Smaller imperfections such as wrinkles and stains are treated with the Spot Healing Brush or frequency separation. Don't overdo it, so that the structure of the fabric is preserved.
Step-by-Step Guide
Step 1: Mark Problem Areas
Before moving on to the actual retouching, you analyze the image. To do this, create a new layer above the model and take a brush in a bold color that stands out well from the subject. Use it to mark all the areas that bother you: areas of the suit that are too tight or too loose, conspicuous details, and inconsistencies in the silhouette. Go through the entire image calmly before you change anything. The markings stay on their own layer and can easily be hidden or deleted at the end.

Step 2: Remove the Chest Area and Emblem
The first intervention concerns the chest area. The mask is not part of the original suit, and the suit itself has no nipple at this spot. Therefore, you remove the nipple on the retouching layer. Just as distracting is the small emblem that peeks out at the chest. This detail is also removed. Work on a separate layer so that you can correct the changes at any time.


Step 3: Adjust the Chin Area of the Mask
Next, you fit the mask more tightly to the chin. In the Liquify filter, you gently pull the transition toward the chin until the shape looks coherent. An area that sits too far from the face makes the mask look artificial. This step is done quickly, but it requires a good eye.

Step 4: Adjust the Corner of the Mouth
The model's facial expression should match the character. The corner of the mouth looks too smiling in the original image. Therefore, pull it down slightly so that the character appears grimmer and more serious. Make sure to perform only small movements so that the face stays natural.

Step 5: Give the Cape Volume
The cape looks flat in some places. Gently pull it out to create more volume. Afterwards, you can work out a few small folds so that the fabric looks livelier. The dynamic comes from the shape of the cape, so you shouldn't overdo it here. The silhouette should support, not dominate.

Step 6: Duplicate and Rasterize the Layer
Before you apply the Liquify filter, create a copy of the main layer. To do this, press Ctrl+J (Windows) or Cmd+J (Mac). This way the copy remains untouched in case you need to fall back on the original later. Then you rasterize the layer so that you can edit it. Hide the retouching layer so that you apply the filter independently of it.
Step 7: Refine Musculature and Curvature
Now open the filter via Filter > Liquify. Start with the "Push Left" tool to change the contours in the area of the upper body. Alter the muscles carefully and pay attention to how the surrounding area deforms along with them. Improve the roundness of the figure in several small passes. Work with low pressure and low density so that the change looks fine and even. Strong individual movements quickly create artifacts.


Step 8: Editing the Cape in the Filter
In the next section you edit the cape. Use the "Push Left" tool again and pull the fabric out only slightly. Too much deformation quickly looks unnatural. Special care is needed at the edge of the image, because the filter lacks pixels there, and the deformation can cause errors. Correct such areas with the "Push Left" tool or the Forward Warp tool until the transition looks clean.


Step 9: Use the Before/After Comparison
Before you continue, confirm the filter and compare the result with the original. The "Before/After" option in the dialog helps you see progress and spot errors early. Only when the comparison is convincing do you move on to the next step.
Step 10: Retouching the Face and Chin in the Filter
Open the Liquify filter again to edit the face. Pull the corner of the mouth down a little with the Forward Warp tool. You can also lower the chin slightly. Then you fit the mask more tightly with the "Push Left" tool. Be careful not to accidentally change the chin. Work evenly from both sides and stop as soon as the shape looks right. Small corrections at the edge prevent distortions in the pixel area.


Step 11: Checking the Filter Result
Confirm the filter and check the result in the before/after comparison. Also look at the image from a bit of a distance. If the figure looks coherent as a whole, the liquify work is complete. If anything looks off, it is best to correct the filter again right away.

Step 12: Removing the Nipple and Emblem with the Patch Tool
Now you return to the retouching layer and remove the nipple with the Patch tool. Mark the spot and drag the selection to a clean area of the suit so that Photoshop picks up the structure. At first, this method does not always seem to work perfectly. But check the result carefully, because in many cases it is already sufficient. You remove the emblem in the same way by dragging it to a clean area. If the result doesn't fit, you repeat the process with a slightly different selection.

Step 13: Smoothing Wrinkles with Frequency Separation or the Patch Tool
The wrinkles in the fabric disturb the overall effect. You can edit them via frequency separation, which treats brightness and structure separately. Alternatively, try the Patch tool, which works well depending on the subject. In the video, the Healing Brush is also used. Alt-click to pick up a new structure from a neighboring area and then paint over the wrinkle until it disappears. Repeat the process several times if necessary. Always pay attention to the natural flow of the fabric.

Step 14: Cleaning Up Stains and Dark Areas
Finally, you remove stains and minor irregularities in the dark areas. The Patch tool is well suited for this. For small things, decide for yourself whether they are distracting. Don't overdo it, because too much intervention takes away the fabric's structure. Concentrate on the major issues and leave fine details in place.

Step 15: Finishing the Overall Image
To finish, check the entire image and compare it with the original once more. The Batman costume should look well-kept, but not artificial. If all corrections are satisfactory, the retouching is complete. This means you are ready for the next step, the cutout.


Summary ??? Photoshop Retouching on a Model: Liquify and Patch Step by Step
With this guide, you retouch a model in Photoshop step by step. You begin by marking the problem areas on a separate layer and then remove distracting details such as the nipple and emblem. The Liquify filter allows you to finely shape the chin, corners of the mouth, cape, and musculature, always working with low pressure and keeping an eye on the edge of the image. Finally, you smooth out wrinkles and blemishes with the Patch tool, Healing Brush, or frequency separation, without destroying the structure of the fabric. With this sequence, you get a coherent result that you can use as the basis for the cutout.
FAQ
Why should I create a copy of the layer before retouching?The copy preserves the original unchanged. If a liquify attempt goes wrong, you can return to the original image at any time.
Why is the nipple removed if the costume doesn't show it?The mask is not part of the original suit, and the suit has no nipple at that spot. Removing it therefore results in a coherent figure.
How do I avoid unnatural distortions when using Liquify?Work with low pressure and low density, and make many small corrections instead of a few strong movements. Check the result regularly in a before-and-after comparison.
When do I use frequency separation instead of the Patch tool?Frequency separation is especially suitable when you want to edit brightness and texture separately. The Patch tool is faster but can be less precise with complex patterns.

