

A 3D object that is placed directly from SketchUp into a photo usually looks like a foreign body. The edges are too clean, the colors don't match the background, and there is no trace of light that seems to come from the scene. This is exactly where this tutorial comes in. You will learn how to embed two towers and a soldier into a believable mood using targeted light accents, color gradients, and filters: from the first light source to the finished look with a sunset and a touch of the end of the world.
The video is only loaded from YouTube when you play it – data (including your IP address) is then transmitted to YouTube/Google. More in the privacy policy
Key Takeaways
- First determine where the light comes from. All further decisions depend on it.
- Place light accents on separate layers with a soft edge and 100% opacity so that you can adjust them freely later.
- The blend modes "Linear Dodge (Add)" and "Soft Light" are the most important tools for building up brightness and contrast in a targeted way.
- Work non-destructively as long as you are refining the composition. Only at the end do you merge the layers.
- Before-and-after comparisons and a black-and-white control layer help you judge the contrast build-up objectively.
Step-by-Step Guide
Step 1: Determine the Light Source
Before you touch a brush, decide on a clear light direction. In this example, the light comes from the left side of the image, and the mood should lie somewhere between sunset and apocalypse. This guideline determines where your accents go and which colors you use. Briefly note down the direction, and you will keep it in mind throughout the entire compositing process.

Step 2: Place the First Light Accent
Create a new layer behind the front tower, that is, above the group of the rear tower. Choose a brush with a soft edge and 100% opacity. The soft edge is crucial, because only it produces a gradient that looks like real scattered light. Place a dot using a yellowish-orange color and then enlarge it with the transformation until it illuminates the desired area. Then set the blend mode to "Linear Dodge (Add)". The accent now brightens the scene abruptly, as if the towers were standing in backlight.
Step 3: Balance the Contrast
After this step, the contrast in the upper area is usually too strong. This is not a mistake, but a sign that you need to dose the brightness. Reduce the opacity of the layer until the transition looks harmonious. Check again and again whether the light spot is actually on the side from which your light is supposed to come. An accent in the wrong place destroys the entire logic of the scene.

Step 4: Integrate the Foreground and the Soldier
Now create another layer in the foreground in front of the large tower and again place a dot in the same color. Make it a bit smaller so that it doesn't become too dominant. Make sure that the light spot doesn't hit the soldier but lies behind him. This creates the impression that the soldier is standing in front of a backlight. Set this layer to "Linear Dodge (Add)" as well and move it until the position is right.

Step 5: Increase the Light Intensity
If the light still seems too weak to you, duplicate the layer and try out different blend modes. The "Soft Light" mode is suitable for subtle enhancements, "Linear Dodge (Add)" for stronger accents. After that, duplicate the layer one more time and scale the copy a bit larger. This creates a glow that fades softly into the surroundings and doesn't look like an applied effect.

Step 6: Set the Color Mood with a Color Lookup Table
Now you bring the overall look into play. Add a Color Lookup table over the entire image and choose an Amber preset that creates a warm glow. The effect is usually too strong at first, so you significantly lower the opacity of the layer. Then keep toggling the layer on and off to judge the change. A black-and-white control layer, which you activate in between, is helpful here. It shows you whether the contrast decreases cleanly from front to back.

Step 7: Creating Backlight on the Soldier
Create a new layer above the soldier and choose a radial gradient. Set the foreground color to transparent so that the gradient only adds light. Then place several spots with a lighter color. The spots may initially look too dark, so you switch to a lighter tone. Reduce the opacity until a soft glow is created. If the effect is too strong on the weapon, create a separate layer that you can selectively hide with a mask.

Step 8: Darkening the Foreground
To draw the eye into the image, the lower area needs more depth. Create a new layer, choose a dark color, and work along the edges with a soft brush. The effect is a vignette that takes away light from the edge toward the center. Set the layer to "Soft Light" and check the result. Often even a low opacity is enough to make the scene look noticeably more cohesive.

Step 9: Merging the Layers and Working Out Details
Once the composition is in place, you merge all visible layers onto a new layer. This way you can work on the details without losing the individual light layers. Then you apply the Topaz Detail 3 filter. It brings out structures from surfaces, such as from the textures of the towers. The calculation takes a moment, and a bit longer for large images. When reviewing the result, make sure the details are not overdone, because too much sharpening quickly makes a composite look artificial.

Step 10: Dosing the Details and Finalizing the Look
Zoom in so that you can accurately assess the effect of the details on edges and textures. It is often worth reducing the strength of individual detail levels. Then you create a merged layer again with 100% opacity and open the Detail Extractor from the Nik Collection (Color Efex Pro). Reduce the contrast slightly, increase the saturation moderately, and control the intensity via the layer's opacity. A value that looks extreme when viewed in isolation can be exactly right in the overall image.

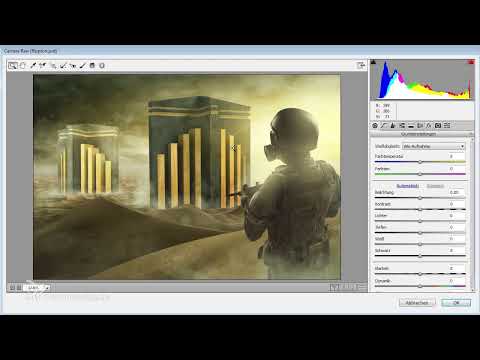
Step 11: Refining the Vignette in Camera Raw
With the Camera Raw filter, you can steer the mood even more precisely. Use the Radial Filter to place an area on the outside at the edge of the image and adjust the values so that the corners become darker. The center stays bright. Make sure the transition stays soft, otherwise visible edges will appear. The before-and-after comparison clearly shows how much calm the vignette brings to the image.

Step 12: Tinting the Light Area Golden
Place another Radial Filter in the interior of the image, that is, where the light should be strongest. Increase the brightness and clarity slightly and then tint the area golden. The result begins to glow and gives the subject warmth. Then you add a Graduated Filter from the side, which you tint blue. The contrast between warm light and cool shadow noticeably enhances the depth of the scene.

Step 13: Enhancing the Fire with Red and Orange
For the apocalyptic part of the mood, you still need a reddish accent. Choose your orange, shift it slightly toward red, and place it with a soft edge on a new layer. You mark the spot where the light should burn particularly intensely with a transformation. Check the result on the overall image, because too much red can quickly make the scene look kitschy.

Step 14: Creating a Gradient with Noise and Randomize Parameters
For an unusual color gradient, you use a Gradient Map on a layer in "Soft Light" mode. Choose a gradient with the "Solid" option and set "Noise", setting the edge roughness to 0%. Switch to HSB mode and let the randomize parameters work until you like a variant. Save the best results so you can use them again later. The results can turn out very dark or too green, so it is worth adjusting the opacity.

Step 15: Add smoke plumes for atmosphere
Create a new layer, set the opacity to 100%, and add a smoke brush. Transform it so that it drifts into the image from the side. A reddish tint enhances the impression of heat and doomsday. Reduce the opacity if the smoke looks too prominent, and repeat the process in the lower area with a separate layer. More brushes are not automatically better, because they can quickly make the image look cluttered.

Step 16: Align the composition
Flipping the smoke horizontally can surprisingly improve the image. Check whether the lighting then fits the rest of the scene better. Pay attention to the direction of the shadows, because flipping must not destroy the logic of the light. Compare the result with the original before you decide.

Step 17: Check the 3D object back in SketchUp
Finally, it is worth taking a look at the 3D object itself. Open the front tower as a Smart Object to rework its textures and materials. The possibilities here are enormous, and in practice you could invest several hours in the model. For the composite, however, it is enough to master the basic principles: the tonal values become paler with increasing distance, the object blends with the ground, the light looks coherent and ties the objects together. Rotating or cropping the image can also improve the visual composition.

Summary ??? Light, color and atmosphere: How to integrate a 3D object in Photoshop
You have seen that a 3D object only becomes believable through light, color and atmosphere. It is important to proceed step by step: define the light source, set accents, balance contrasts, then refine colors and details. The black-and-white control layer and the regular before-and-after comparison are your most important helpers here. With this method, you can insert any object into an image and give it its own look.
FAQ
How do I find the right light direction for my composite?Look at the background, because that is usually where you see the light source. Align all accents accordingly.
Why should the brush edge be soft?A soft edge creates a natural gradient. Hard edges look like stuck-on blotches.
What does the blend mode "Screen" do?It brightens the image without distorting the colors. It is well suited for light accents.
When should I merge the layers?Only when the composition is final. As long as you are still experimenting, the layers remain flexible.
What is the black-and-white control layer for?It shows you the contrast structure without color. This lets you quickly see whether light and dark are distributed correctly.
How do I avoid the mood looking kitschy?Use colors and saturation sparingly. Compare the result regularly with the original.

