
If you have already textured landscapes, architecture quickly presents a new challenge: Houses only look believable if the perspective, proportions and light direction are right. This is exactly where a simple 3D base helps you. It provides you with the horizon, the vanishing lines and the shadows, while you do the actual work with photo textures in Photoshop. In this tutorial, I will guide you step by step through building a small city scene, from the preliminary model in SketchUp to the first fine-tuning of light and shadow.
The video is only loaded from YouTube when you play it – data (including your IP address) is then transmitted to YouTube/Google. More in the privacy policy
Key Takeaways
- A simple 3D preliminary model provides you with reliable perspectives, proportions and light directions.
- Reusable components, such as a modeled column with evenly spaced floors, save you a lot of time.
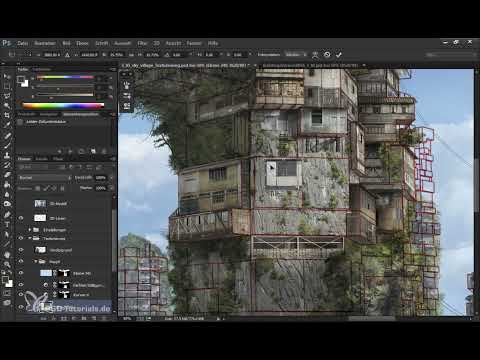
- Guide lines from the 3D model show you the correct alignment when texturing. A red tone is more visible than black.
- Photo textures do not have to be perfectly cut out. What matters is that you align them properly and adjust them in size and perspective.
- Colors should not be unified. It is precisely the variety that makes a city scene lively.
Step-by-Step Guide
Step 1: Defining the Template and Its Specifications
Before you insert textures, it is worth taking a look at the basic framework. In SketchUp, I first pre-modeled numerous simple blocks. The exact number is not decisive, because you do not have to commit at this point. Three things are important: the light direction, the proportions and the horizon with the perspective lines. A block in the foreground is therefore the same size as one in the background, but appears smaller due to the distance. These proportions should be right, then you will not have to guess later.

Step 2: Painting the Concept Image in Photoshop
You then import the 3D model into Photoshop, as I already discussed in Module 4. Behind it, you create your concept image. First paint with landscape colors and rough lighting; the lines from the model serve only as an orientation aid. This concept image is your guideline for mood and color scheme. However, you do not have to follow it slavishly, and may deviate from it later if it looks better.

Step 3: Building a Modular Column with Evenly Spaced Floors
For the houses, you use a six-sided column as the basic shape. Draw it with the polygon tool, pull it up with Push and Pull, and then divide the edges into even sections. In my example, I defined 20 floors. This is a bit tedious, but the result is precise. With the line tool, you can snap to midpoints and endpoints so that the subdivisions sit exactly.

Step 4: Saving the Column as a Component
Once you have created all the floors, select the entire column with a triple click and create a component from it. Save it under a meaningful name. The big advantage shows when placing it: you take the component from the Components window and place it in the scene as often as you like, even far in the background. The floors always remain clearly defined. If you want to edit individual columns, you explode the component back into individual parts. However, make sure the floor height is correct, because it determines the effect of the entire building.

Step 5: Exporting the Line Image
Once the scene is set up, you export it as a line image and additionally with the shadows. You insert these layers into Photoshop and edit them as you learned in Module 4. The lines remain as a red guide layer and are later your most important tool when texturing. Make sure to put the guide lines in their own folder so that you can access them at any time.

Step 6: Preparing the Workspace
Now open the file at original size and work with a reduced layer structure. I greatly reduced the number of layers and kept only the background, foreground and the main area that I want to texture. I keep the originals in a separate folder for emergencies. Hide the adjustment layers at first so that the shadow gradient from the 3D model does not distort your result right away. A tip: with the Shift key held down, click on the layer mask to see what was underneath. This way you can recreate the model in a targeted manner.

Step 7: Isolating and fitting photo textures
Now it's time for the actual texturing. You open a photo texture and roughly isolate it with the Lasso tool. Long, precise selections are not necessary, since you will adjust the texture later anyway. Drag the texture into your document and scale it to fit with Ctrl+T. By holding down the Shift and Alt keys, you scale it down uniformly. A texture that shows only one floor is usually only shown at half size if the building is meant to have two floors. Feel free to let it extend a bit beyond the edge so that you can crop it cleanly later.

Step 8: Cutting out a corrugated metal roof with Color Range
For the roof, you use a corrugated metal structure. To do this, choose the Color Range command and click on the background. Pay attention to which area you pick with the eyedropper, because you usually want the opposite. With Ctrl+Shift+I you invert the selection and then drag the texture into your document. Then you adjust the position and size until it matches the line of the roof. You correct minor frayed edges later with the Eraser or with a mask.

Step 9: The order of the layers and blending
With houses in a frontal view, the distortions are slight, and you make quick progress. The order of the layers is important. Place the texture that should be further forward above the other. With the Eraser you can soften transitions so that the roof and facade blend into each other. Chance plays a role here, and that's fine. Don't tweak the colors too early, but let the different tones of your photo textures remain. This is precisely what brings life to the image, because a uniform brown tint quickly looks boring.

Step 10: Varying window details and facades
If you repeat the same textures too often, the image quickly looks monotonous. That's why you should vary facades. A practical trick: copy a section of a wall onto a new layer with Ctrl+J, move and transform it, and then merge the layers. For a new surface, you can, for example, lay wooden slats over the facade and limit them with a clipping mask. You hide the windows by selecting them with the Rectangular Marquee tool and creating a layer mask. With the mask, you can undo the texture again at any time later.

Step 11: Adjusting side walls and roofs in perspective
Side walls are the big challenge, because perspective plays a role here. Use the guides from the 3D model to align the texture. Holding down the Ctrl key, you drag the corners individually in the right direction. The transformation mode shows you via the cursor what is happening: if the pointer is white, you can transform freely. If a black arrow appears, you move the element. You specifically darken a side wall that is too bright with Ctrl+M so that it stands out from the front view. You add a wooden roof in the same way. Keep in mind that roofs don't always have to logically consist of wood or sheet metal. What matters is the effect in the overall picture.

Step 12: Arranging layers and cleaning up contours
The layers are often in the wrong order. A metal roof, for example, must lie above the side wall so that it properly covers the transition. Therefore, rearrange the layers again and again. You remove protruding edges with the Lasso tool and a click on Delete. If something is missing in one spot, you simply copy a suitable piece from another texture. Especially at the edges, it's worth paying close attention to the guides.

Step 13: Hiding guides and preparing the light
Once the texture is roughly finished, you hide the guides. You show the settings again, that is, color, tonal values, and the shadows from the SketchUp model. This makes the image look much more coherent already. A color adjustment is not necessary at this stage, because the result often already fits. The next step is about cleanly working out the overlays, refining the shadows, and achieving more liveliness with dodging and burning, the so-called Dodge & Burn.


Summary ??? Texturing Houses with a 3D Template: Perspective and Light in Photoshop
With a simple 3D template from SketchUp, you gain reliable perspectives, proportions, and light directions. Modular components speed up the construction of an entire city scene. In Photoshop, you place photo textures using the guide lines, adapt them to the perspective, and vary facades so the image doesn't look monotonous. Finally, you work out light, shadows, and overlays cleanly. What always matters here is the overall picture, not an exact copy of the lines.
FAQ
Do I have to recreate the 3D template exactly?No. The lines serve as orientation. You can freely design heights and roofs as long as the effect remains coherent.
Do I need a separate texture for each facade?Not necessarily. You can use the same texture, but you should vary it through crops, mirroring, or other textures so that repetitions aren't noticeable.
Why shouldn't I adjust the colors too much?Different colors make the scene lively. Strong uniformity quickly looks boring and artificial.
How many layers should I use?Multiple layers help when blending textures. After texturing, you can reduce the file again to make further work easier.
Where can I find free photo textures?Many textures come from Google SketchUp. With a free account, you can download a few megabytes per day, which is usually enough for one scene.


