
The brushes that come with Photoshop are solid, but in matte painting they quickly look interchangeable. Custom brush tips solve this. You build them from simple grayscale shapes, save them as a preset, and finally put together a small, well-organized set.
The video is only loaded from YouTube when you play it – data (including your IP address) is then transmitted to YouTube/Google. More in the privacy policy
In this tutorial you will create three brushes: one for clouds, one for rocks, and one for plants. You don't need photo templates or additional software for this. Everything is created directly in Photoshop.
Key Takeaways
- For the brush, brightness is what counts: black paints, white stays invisible, gray produces gradations.
- Generous brush tips deliver calmer results than very fine templates.
- The real work lies in the brush settings: shape dynamics, scattering, transfer, and color dynamics.
- A brush only becomes truly useful once you save it and test it directly in an image.
Step-by-Step Guide
Step 1: Prepare the Document
First, create a new file measuring 800 by 600 pixels. This size is entirely sufficient for experimenting. The white background is a good starting point, because white is not painted by the brush later on.

Step 2: Understand the Basic Principle of Grayscale
Here lies the most important idea of the entire tutorial. With a brush, black produces full opacity, white has no effect, and shades of gray produce intermediate values. So you draw the shape of the brush tip in black and gray. To keep an overview, close all panels you don't currently need.

Step 3: Draw the Cloud Shape
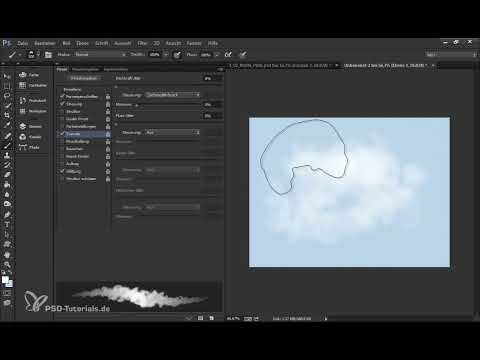
Choose a soft round brush, set the color to black, and set the opacity control to pen pressure. Then draw irregular arcs and blotches. Make sure that no clearly recognizable circles appear, because they would later make the cloud look artificial. Light areas within the dark surfaces prevent the shape from looking like just a uniform surface. A slight glow on top rounds everything off. At first the template looks muddy, and that is exactly normal, because a cloud ultimately consists of many small differences in brightness.

Step 4: Define the Area as a Brush Preset
Take the Rectangular Marquee tool and select the area containing your shape. Then choose the "Define Brush Preset" command from the "Edit" menu and give it a name such as "Cloud". Afterwards the tip appears in the brush picker. However, it is not yet optimized for use, which is why you adjust the properties in the next step.

Step 5: Set the Size of the Tip
Open the brush settings and set the size to about 600 pixels. Fine templates may look impressive in detail, but they often create too much structure when painting. The spacing, on the other hand, can safely stay low.
Step 6: Fine-Tune the Shape Dynamics
In the shape dynamics, you control the size jitter via pen pressure so that pressure changes the tip. Set the angle jitter strongly. Control via direction is also important, because this way the tip rotates automatically with your movement. Use roundness only sparingly, otherwise you will destroy the shape.

Step 7: Add Scattering and Transfer
Scattering is at about 70 percent and is not controlled via the pen. For transfer, you also set the opacity control to pen pressure, and you control the flow via the pen as well. With small brush sizes, the result quickly looks too structured. If you keep the brush large, on the other hand, everything blends together harmoniously.

Step 8: Test and Save the Cloud
Create a new layer above a sky and paint a few clouds with white. The structure should be recognizable but not look overloaded. When you are satisfied, save the tip via "New Brush Preset". Remove unwanted presets with a right-click in the brush picker.

Step 9: Fill the Rock Brush with Structure
Create a new, empty layer and take a hard brush in black. Draw in various shapes, directions, and stroke widths, with individual dots and white gaps in between. The goal is a surface that is as varied as possible, with many details that can be built up quickly. If the first results still seem disorganized, that's fine, because the settings will bring order to the brush.

Step 10: The Basic Settings of the Rock Brush
Select the template with the rectangular marquee and save it as a brush preset with the name "Felsen". Then fill the area with white again. Set the size to about 100 pixels, because rocks need smaller tips. Increase the spacing significantly so that the details don't merge into each other.

Step 11: Set Up Shape Dynamics and Flip
In Shape Dynamics, set the Size Jitter to about 90 percent. Control is set via Direction, and you leave the angle off. Increase the Roundness to about 50 percent. Then you activate random flipping in both directions so that no repetitions stand out.
Step 12: Scattering for More Structure
Now comes the scattering. It is at about 50 percent on both axes and is controlled via the pen. This creates the desired unevenness that characterizes real rocks.
Step 13: Using the Dual Brush
The dual brush is the decisive step. Choose a hard, small brush for this and lower the spacing slightly. Additionally, increase the scattering a little. The preview initially still looks unstructured, but with each step the result gets closer to the desired rock image.

Step 14: Using Color Dynamics for Variety
A small adjustment is worthwhile with Color Dynamics. If you vary hue, saturation, and brightness by about 2 percent each, every stroke gets a minimal individuality. Then you reduce the spacing a bit more so that the brush stroke becomes denser and livelier.

Step 15: Test the Rock Brush in an Image
Open an image, create a new layer, and select the brush tip "Felsen". The brush shows its effect as soon as you use it in a real scene. You will see that the tip rotates depending on the direction and varies in size.

Step 16: Create the Plant Brush as a Structure
For the plant brush, you choose a small, round, hard brush in black. Draw individual twigs and small leaves, in some places also somewhat denser. This isn't about botanical precision, but about the structure that takes effect when stamping later. Then save the template as a brush preset with the name "Pflanze" and fill the area with white again.
Step 17: The Settings of the Plant Brush
The actual work here also begins with the settings. The spacing is at about 25 percent. Shape Dynamics slightly increases the Size Jitter, with control via Direction. For angle and roundness: better to dose carefully. For Transfer, you set the opacity control to the pen so that pressure determines the strength. With these values, entire tufts can be drawn quickly from above.
Step 18: Save the Plant Brush
Save the settings as the preset "Pflanze". When painting, the brush shows only small tufts, but it only unfolds its effect in the stamp tool on a texture. Therefore it makes sense to test it exactly there.

Step 19: Organize the Brushes in the Preset Manager
Open the Preset Manager to clean up your collection. Select the desired brushes by clicking the first one, holding the Shift key, and clicking the last one. Remove all remaining default brushes. They can be restored at any time, so this is harmless.

Step 20: Setting up the Big Softy
Enlarge the round, soft brush to about 300 pixels. The shape dynamics stay on the pen so that you can quickly intervene if needed. You control the transfer opacity via the pen, because you rarely want to reach full opacity. Finally, name the brush "Big Softy".

Step 21: Configuring the small detail brush
For fine work you need a small, hard brush with maximum hardness and very little spacing. The pen controls the size, so that you switch between thick and thin lines with pressure. You remove the opacity control completely. This combination results in a sketchy detail brush that you will be able to use well over time.

Step 22: Saving the set and resetting the interface
Finally, you save the six brushes as a shared set. You can pass this file on or back it up for future projects. Then reset the workspace so that Photoshop appears in the familiar layout again. Your brush selection is now compact and clear, and you can keep using it directly in the next image.

Summary ??? Creating your own brush tips in Photoshop: clouds, rocks and plants
You have learned how to build your own brush tips in Photoshop from simple grayscale shapes. The cloud brush thrives on generous size, shape dynamics and fine opacity transitions. The rock brush gains structure through scattering, flipping and the dual brush. The plant brush only unfolds its effect in the Clone Stamp tool. In the end, you have a clear set and a way of working at your disposal with which you can create your matte paintings quickly and versatilely.
FAQ
Why do I have to draw the brush tip in grayscale?Photoshop interprets the brightness of a brush tip as opacity. Black paints fully, white remains invisible and gray produces gradations.
Why should the brush tip be as large as possible?Fine templates often produce too much structure when painting. Generous templates deliver calmer and more natural-looking results.
How do I save my own brush tip?Select the area with the Rectangular Marquee tool, choose Edit and then Define Brush Preset, and assign a name. After that, the tip is available in the brush picker.
How do I remove a brush preset again?In the brush picker, right-click the preset and choose the command to delete it.
How do I create my own brush set?Arrange the desired brushes in the Preset Manager, select them and then save them as a set. You can pass this file on at any time.
Why does my cloud template look muddy at first?That is normal, because clouds consist of many small differences in brightness. The effect only shows when you test the tip on a sky.
How do I reset the interface after sorting?In the Window menu, choose the workspace and reset it to the default layout using the reset command.


