

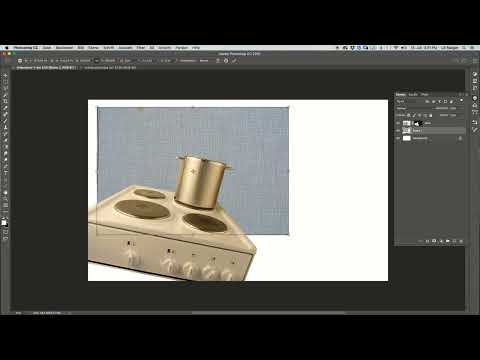
A kitchen run only looks real when all surfaces match the same perspective. A countertop that sits slanted or warped next to the stove gives away the composite immediately. This is exactly the problem you solve with Photoshop's Distort mode. You will learn how to insert a work surface as a layer, place it under the stove, and adjust it to the stove's vanishing lines with just a few moves.
The video is only loaded from YouTube when you play it – data (including your IP address) is then transmitted to YouTube/Google. More in the privacy policy
Key Takeaways
- A work surface does not have to be photographed. A simple structure from above is enough as a base, as long as you adjust its perspective later.
- The layer with the work surface sits below the stove layer so that the edge of the stove covers it cleanly.
- In Edit > Transform > Distort mode, you move the corner points individually and align them to lines that you can see in the stove.
- The edges must form a continuous straight line. A kink immediately reveals that the perspective is wrong.
- A small overhang is not a problem as long as the surface is large enough and the pattern runs consistently.
Step-by-Step Guide
Step 1: Drag the work surface into the document
Open the file with the work surface. It is a JPEG and looks like a breakfast board with a typical pattern. This doesn't matter for the composite, because the structure is what counts. Drag the file onto your document via drag and drop, in this example "unbenannt 1". Give the document a meaningful name later and save it so that you don't lose your progress.

Step 2: Place the layer under the stove
Drag the new layer in the Layers panel below the layer with the stove. The work surface is thus in the background, and the stove edge covers the surface where they touch. This way you don't have to work exactly at the edge, but can make the surface generously sized.

Step 3: Call up the Distort mode
Activate the layer with the work surface. Then open the Edit menu, select Transform, and choose the Distort mode. This mode is the most flexible for perspective corrections because you can move each corner point independently. However, it requires a certain feel for perspective, because you decide for each point where it belongs.


Step 4: Set the bottom left corner
Grab the bottom left corner of the work surface and drag it as far outward as possible, until it sits roughly where the countertop is later supposed to end. You don't have to place this point to the millimeter. Only the direction matters, as it later serves as orientation for the remaining points.

Step 5: Align the bottom right corner
Next, drag the bottom right corner into the appropriate position, which roughly corresponds to the course of the stove edge. Make sure that both lower points together form a line that runs parallel to the depth of the kitchen run. This line forms the foundation for the perspective.
Step 6: Make the top edge a straight line
Now comes the decisive step. Move the top point upward until the edge of the work surface forms a continuous straight line. You can tell you've succeeded when no kink is visible anymore. A clean straight line shows you that the surface now lies in the same plane as the stove edge and the vanishing lines match.

Step 7: Fine-tune the upper points
Afterwards, drag the top point down a little, but not too far. If you set it too low, the surface warps, and the impression of a slope arises again. Work in small steps and check after each movement whether the surface looks like a countertop lying level on the base unit.
Step 8: Align the countertop with the edge of the stove
Now extend the work surface so that it ends roughly at the edge of the stove. Checking is especially important here, because the eye notices inconsistencies at exactly this spot. If the edge of the surface and the edge of the stove form a common line, the composite looks convincing.

Step 9: Accept the overhang
The countertop may extend a bit past the stove on the right side. A small overhang is realistic and isn't disruptive, as long as the surface remains large enough. Make sure you don't pull the layer too far, because otherwise the perspective will tilt again. If necessary, pull it back a little until the lines look consistent again.

Step 10: Check the pattern and confirm the transformation
Finally, check whether the pattern of the surface fits at the spot where the countertop is visible. If everything is right, confirm the transformation with the Enter key or via the checkmark in the options bar. The left part of the work surface is now in place, and you can apply the same method to the right side of the stove.
Summary – Fitting a countertop in perspective in Photoshop: How to achieve the distortion next to the stove
You have learned how to insert a simple work surface into a Photoshop document via drag and drop, place it beneath the stove layer, and adjust it to the perspective using the Distort mode. What matters is aligning the edges into a continuous straight line and matching it with the edge of the stove. A small overhang is not a problem here. With this method, you can also complete the right side of the stove.
FAQ
Do I need a photo of the countertop for the composite to work?No, a simple texture from above is enough. You then adjust it to the perspective of the stove using the Distort mode.
Why is the work surface under the stove?This way the edge of the stove covers the surface at the point of contact. You don't have to cut out the transition exactly and can make the surface generously sized.
How do I know the perspective is right?The edge of the work surface must form a continuous straight line, without a kink. It should also end evenly at the edge of the stove.
What do I do if the work surface looks tilted?The top point is usually placed too high. Pull it down step by step and check the result after each movement.
May the work surface extend beyond the stove?Yes, a small overhang looks realistic. Just make sure the perspective doesn't tilt as a result.
How do I confirm the transformation?Press the Enter key or click the checkmark in the options bar.

