

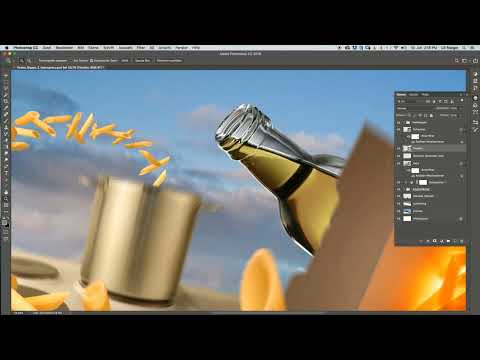
Opaque glass quickly looks like ceramic in a composition, even though the blue sky behind it should show through. This is exactly the problem the following tutorial solves. You photograph an oil bottle in front of a monitor, place it as a smart object in your image, and make it transparent using the Hard Light blend mode. Then you selectively reduce the effect with a layer copy and a mask wherever it looks too strong. The technique is shorter than it looks at first glance and can be applied to any other glass object.
The video is only loaded from YouTube when you play it – data (including your IP address) is then transmitted to YouTube/Google. More in the privacy policy
Key Takeaways
- It is best to combine related layers in a group. This keeps your Layers panel clear and organized.
- A placed smart object can be scaled and rotated without any loss of image quality.
- The Hard Light blend mode makes glass see-through, but it often looks too bright.
- A layer copy with a black layer mask allows you to apply the effect selectively with a soft brush.
Step-by-Step Guide
Step 1: Tidy Up the Layers Panel
Before you insert the bottle, you should organize your Layers panel. Select the group numbered five, hold down the Shift key, and click on group one with the Curves adjustment layer above it. Then go to the menu and choose the command New Group from Layers. All selected layers now end up in a single group, which you can name, for example, Pasta Arch. This makes the panel look much less cluttered, and you can show or hide the entire arch with one click.

Step 2: Place the Bottle as a Smart Object
Now only the oil bottle is missing. To add it, choose the command Place Embedded from the File menu and select the photographed file. Photoshop places the bottle as a smart object directly above the layer stack. This form of placement is important because you can later scale and rotate the object without losing detail. The bottle is already almost the right size on import, but it still needs to be moved into position.

Step 3: Set the Position Behind the Box
Now move the bottle to the spot where it should ultimately stand. It should not pour into the pot, but sit behind the box. Make sure it sits in the image layer between the box and the background, that is, in the right place within the layer order. Take your time moving the bottle until the composition looks coherent.

Step 4: Adjust Size and Tilt
With the keyboard shortcut Command+T (Ctrl+T on Windows), you activate Free Transform. Since the bottle is a smart object, you can shrink it without any loss of quality. In its original size, the bottle looks too thick and large, so you shrink it a little so that it looks better in the background. Then you can tilt it slightly so that it looks as if it is standing securely on the surface and will not fall over. Confirm the transformation with the Enter key.

Step 5: Recognize the Problem with the Glass
Look closely at the result. In its current form, the glass looks opaque and more like ceramic. A transparent bottle, on the other hand, should let the sky show through. The solution does not lie in a filter, but in a clever blending of two layers. For this, you first need a copy of the bottle.

Step 6: Duplicate the Bottle
Select the bottle in the Layers panel and press Command+J (Ctrl+J on Windows). The copy appears immediately above the original. You will work with this copy in the next step, while the original takes care of the actual transparency. You will see in a moment why you need both layers.
Step 7: Hide the Copy with a Black Layer Mask
Now hide the copy by holding down the Alt key and clicking the Layer Mask icon in the Layers panel. Photoshop creates a black mask, and the copy disappears completely. This is intentional: the copy will later serve as a template for targeted corrections, but it is not visible at first. Then make the original visible again so that the bottle appears in the image.

Step 8: Apply the Hard Light blending mode
In the Layers panel, select the Hard Light blend mode for the original layer that you made visible. Suddenly you can see through the glass, and the blue sky shines through the bottle, exactly as you want it. Feel free to try other blending modes as well. In this case, however, Hard Light turned out to be the right choice.

Step 9: Correct areas that are too bright with a soft brush
The effect now looks too bright in some places. For this, you use the layer mask. Choose a soft brush with a low opacity of about 20 percent and paint with white over the areas where the bottle is lightened too much. Work in several light strokes so that you make the transition smooth. With each stroke, you build up the effect step by step instead of applying it all at once.
Step 10: Partially bring back the reflection
At the end, you can selectively darken individual areas again. In the places where the bottle looks too bright, apply some dark yellow olive oil as a color. You can also bring back a little of the original reflection at the top and along the edges. The rule here is: better several subtle corrections than one big change. When everything looks coherent, the bottle is cleanly inserted into the image.

Summary – Making a bottle transparent in Photoshop: How to make glass glow with Hard Light
You have learned how to bundle layers in a group, place a bottle as a Smart Object, and create transparency with the Hard Light blend mode. The layer copy with a black mask and a soft brush at 20 percent opacity give you control over the effect. This method also works for any other glass subject that should look transparent in the image.
FAQ
Question: Why should I place the bottle as a Smart Object?Answer: A Smart Object can be scaled and rotated multiple times without reducing image quality.
Question: Why do I hide the copy first?Answer: The copy serves as a template for targeted corrections via the layer mask, but should not be visible at first.
Question: Do I absolutely have to use Hard Light?Answer: No, you can also test other blending modes. In the example, Hard Light delivered the best transparency.
Question: Why do I work with a brush with only 20 percent opacity?Answer: This way you apply the effect in several fine layers and avoid harsh transitions.
Question: What do I do if the bottle still looks too bright after editing?Answer: Apply further subtle corrections with the brush and bring back the original reflection in individual places.

