
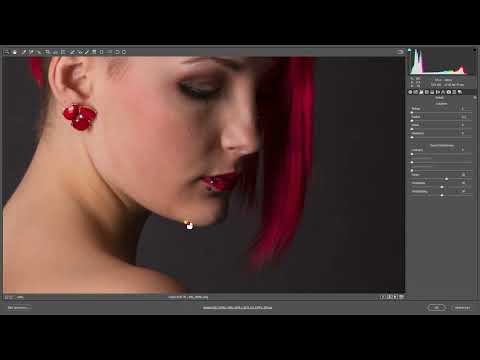
Before you fine-tune skin areas, contours or colors in retouching, you lay the foundation with the raw development. If exposure, contrast and color temperature are right, every further editing step becomes easier. In this tutorial, I show you how to develop an image in Photoshop with the Camera Raw filter before you retouch it. You work non-destructively and can compare the result with the original at any time.
The video is only loaded from YouTube when you play it – data (including your IP address) is then transmitted to YouTube/Google. More in the privacy policy
Key Takeaways
- You work non-destructively by duplicating the layer beforehand as a Smart Object.
- You gently brighten the shadows and pull back the highlights so that color and structure become visible.
- You set brightness, clarity and color temperature in small steps so that the image looks natural.
- When sharpening, you work with Amount, Radius and Detail and mask out the background.
- A before-and-after comparison shows you at the end whether the development has actually improved the image.
Step 1: Duplicate the layer and convert it into a Smart Object
Before you turn any sliders, you secure your original image. To do this, create a copy of the background layer. Then you convert the copy into a Smart Object. The advantage: The Camera Raw filter remains as an editable filter, and you can go back at any time. In addition, the effect can later be easily compared with the original, which helps you with checking.

Step 2: Open the Camera Raw filter
By double-clicking the Smart Object, you go directly into the Camera Raw filter. There you will find all the sliders you need for the basic development. Keep in mind that at this stage you are not retouching, but only defining the basic mood of the image.

Step 3: Carefully brighten the shadows
Start with the shadows. Raise the dark areas of the image slightly until more color and structure become visible. Make sure you don't overdo it, because otherwise the image quickly looks flat and washed out. A moderate value is usually enough to bring back details in the shadows.

Step 4: Pull back the highlights
Next, you take care of the brightest areas. Pull the highlights back a little so that detail and surfaces are preserved. These sliders only affect the bright areas; the midtones and shadows remain largely untouched. While doing so, check that highlights such as reflections or areas of sky are not blown out.

Step 5: Adjust exposure and clarity
In the next step, you brighten the overall image. A value of about 0.4 stops is a good starting point, which you adjust if necessary. Then you increase the clarity slightly, by about 10 percent. Clarity enhances the micro-contrast, that is, the transitions between light and dark areas. Stick to gentle values, otherwise hard edges and an artificial impression will result.

Step 6: Determine the color temperature
The color temperature determines whether the image looks cooler or warmer. Move the slider until the mood suits the subject. In this example, a slight shift toward warmer looks nicer. Take care not to let skin tones become too orange, because they are often the most sensitive area of a portrait.
Step 7: Zoom to 100 percent and set the sharpening
So that you work precisely when sharpening, you zoom into the image. You can do this via the 100 percent view or by double-clicking the Zoom tool. Now hold down the Alt key and click on the Amount slider. This way you can see directly in the image how the sharpening takes effect. In the example, the Amount is about 60.

Step 8: Choose the Radius and avoid edges
With the Alt key held down on the Radius slider, you determine how wide the sharpened edges are. A Radius that is too high produces visible, bright lines along contours. Therefore, stay rather restrained and check the edges when zoomed in. If the effect seems too harsh to you, reduce the value again.

Step 9: Emphasize details and mask the background
With the Details slider, you can additionally emphasize fine structures. Here too, it's best to work moderately. In the example, the value is 25. Then you activate the sharpening mask by holding down the Alt key and clicking the Masking slider. White areas in the mask are sharpened, while black areas are left out. This prevents backgrounds or smooth surfaces from getting unnecessary noise and grain.

Step 10: Check noise and adjust the view
With this shot, you don't need to apply noise reduction because it was taken at ISO 100. Still, check while zoomed in whether any unwanted noise appears. Then adjust the view back to fit the window by double-clicking the Hand tool, so that you have the whole image in view.

Step 11: Use the before-and-after comparison
Finally, you compare the result with the original. The development should make the image noticeably more radiant and luminous without looking artificial. Only when you like this state do you begin the actual retouching. Then you have a clean, well-balanced foundation on which every further correction builds.

Summary – Raw development in Photoshop: How to prepare images for retouching
Raw development is the foundation of every clean retouch. You duplicate the layer and convert it into a Smart Object so that you can work non-destructively. In the Camera Raw filter, you carefully brighten the shadows, pull back the highlights, and adjust exposure, clarity, and color temperature in small steps. When sharpening, you set the amount, radius, and details and mask backgrounds so that they are not sharpened unnecessarily. Finally, you check the result in the before-and-after comparison. If you take the time for this development, the subsequent retouching becomes much easier.
FAQ
Do I always have to duplicate the layer as a Smart Object?No, you don't have to, but it is recommended. This way the Camera Raw filter remains editable, and you can adjust the development at any time or compare it with the original.
How do I know if I'm overdoing it when brightening the shadows?If colors look pale, contrasts become flat, or the image appears gray, you've gone too far. Then reduce the value until the structure is visible without the image losing depth.
Why should I only increase clarity slightly?Too much clarity creates harsh transitions and can make skin tones and fine structures look unnatural. Moderate values of around 10 percent give more impact without an artificial impression.
What does the mask do when sharpening?The mask prevents smooth or unimportant areas such as backgrounds from being sharpened. This way you emphasize only the relevant details and avoid unnecessary noise.
Do I always have to apply noise reduction?No. With low ISO values such as ISO 100, noise reduction is usually not necessary. Still, check while zoomed in whether disturbing noise is visible before you decide.
Why should I only retouch after the raw development?A clean basic development ensures balanced exposure and harmonious colors. If you retouch beforehand, you often have to readjust later, which costs more time and can worsen the results.


