
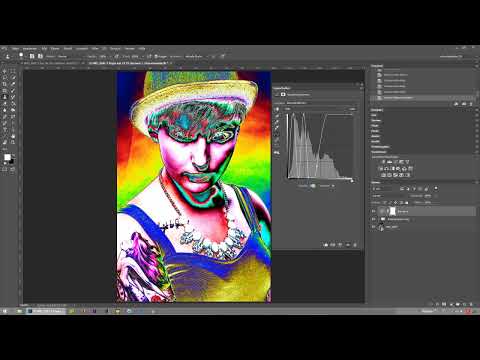
Have you ever edited a portrait and still overlooked a hair running across the cheek or a light edge in the background that is distracting? Such details often go completely unnoticed in the normal image until you discover a problem afterwards. With the so-called rainbow check layer, you make these spots visible before you retouch them. It is a tone curve that breaks your image down into many colored bands. Every difference in color and brightness thereby becomes clearly recognizable.
The video is only loaded from YouTube when you play it – data (including your IP address) is then transmitted to YouTube/Google. More in the privacy policy
In this tutorial, I will show you how to build the curve, how to save it as a preset, and how to use the results for further retouching. The tutorial is particularly suitable as a complement to frequency separation, in which you edit the color and texture of your image separately.
Key Takeaways
The rainbow check layer is a tone curve with an extreme zigzag course that makes brightness differences visible as colored bands.
The curve is set alternately to 255 and 0, which clearly separates each tonal value from the others.
Layers that you create outside the group or folder remain unaffected by existing settings and can be checked reliably.
You can save the curve as a preset and reuse it for later images.
You use the insights gained for targeted post-processing, such as removing hairs, edges, and dark spots.
Step-by-Step Guide
Step 1: Create the Tone Curve and Place It Correctly
Open your image in Photoshop and create a new tone curve. Make sure the layer is outside your folder, so not in the group in which you are already retouching. This way, the check layer does not affect your other layers and remains available as an independent tool. You can show and hide it at any time later.

Step 2: Build the Zigzag Curve
Now comes the actual trick. You deliberately set the curve to extremes by placing points alternately at the output value 255 and 0. Start at an input value of 20 with the output value 255. Then go down to the input value 40 with the output value 0 and back up to 60 with 255. You continue this pattern until you reach the top right.

You don't have to hit the points exactly. All that matters is that the curve alternates between top and bottom and the bands are evenly distributed. If you are at roughly 20 and don't place the point quite precisely, that's not a problem. The zigzag course creates the color bands, and that is exactly what matters.
Step 3: Keep Setting Points Consistently
Continue the zigzag by working at 80 at the bottom with 0 and at 100 at the top with 255. After that come 120, 140, 160, 180, 200, 220, and 240 in the same alternation. At the end, you set the last point at 255 with the output value 255. At first glance, the curve looks unusual and almost chaotic, but that is intended.

Step 4: Save the Curve as a Preset
You don't have to rebuild this layer for every image. In the tone curve properties, go to the option for saving the curve preset. Give it a meaningful name, for example "Rainbow Check", and save the preset. For the next project, you simply load it again and have the check layer available in a few seconds.

Step 5: Zoom Into the Image and Read the Color Bands
Now it gets exciting. Zoom into your image and look closely at the colored areas. Even surfaces, such as a patch of skin or a background, should also appear even. If an area with a different hue or transition shows up here, you have found a spot that deserves attention.
An example: You spot a slightly darker spot that you barely notice in the normal image. In the rainbow check layer, it shows up as its own color area that clearly deviates from the surrounding bands. In this way, you find irregularities that would otherwise escape you.

Also take a close look at the transitions between the colors. A hard jump from turquoise to a blue shadow tells you that there is an edge or a shadow area there that may still need to be adjusted.

Step 6: Recognizing Typical Blemishes
With the control layer, various disturbances can be reliably detected. In the background, for example, fine lines appear, such as on a back wall, which are barely noticeable in the original image. You can then fix these lines in a targeted way.

Individual hairs running across the image also become visible. They stand out from the uniform surroundings and can therefore be marked precisely. The same applies to light edges, that is, transitions between bright and dark areas that look somewhat abrupt. You can then see where a bright light falls on the subject at the top and where the shadow already begins at the bottom.


Step 7: Using the Findings for Retouching
The real benefit of the rainbow check layer lies in the further work. Once you have found all the spots, you return to your retouching tools and edit the marked areas in a targeted way. You can activate the control layer again and again to check whether the correction was done cleanly. When you have fixed a spot, the disturbing color area disappears in the control view. That way you know immediately whether you need to keep working.

Summary – Rainbow Check Layer in Photoshop: Making Blemishes Visible
The rainbow check layer is a simple but very effective tool for detecting blemishes in your image. You create a curves adjustment layer outside your folder and set the points in a zigzag between 255 and 0. This creates colored bands that clearly show differences in brightness and color. Save the curve as a preset so you can quickly use it again in every project. Then zoom into your image and look for uneven areas, hairs, edges, and fine lines. With these findings, you go into retouching in a targeted way and repeatedly check your result with the control layer.
FAQ
Does the rainbow check layer have to be on its own layer?Yes, create it as a curves adjustment layer on its own layer, preferably outside your retouching folder, so that it does not change your other layers.
Do I have to set the points exactly to the values?No, you do not have to hit the values exactly. What matters is that the curve alternates in a zigzag between top and bottom.
Can I reuse the curve for other images?Yes, save the curve as a curve preset. Then you can load it again in a few seconds for every new image.
Which blemishes can be detected with this layer?Among other things, you can see individual hairs, light edges, dark spots, shadows, and fine lines in the background.
Does the rainbow check layer replace the actual retouching?No, it serves as a control tool. You carry out the actual correction with your retouching tools.


