
If you want to incorporate an eagle into a composite, the wings determine the credibility of the entire scene. In this tutorial, you will learn how to cleanly cut them out, reconstruct missing parts, and match them to the background with shadows and light.
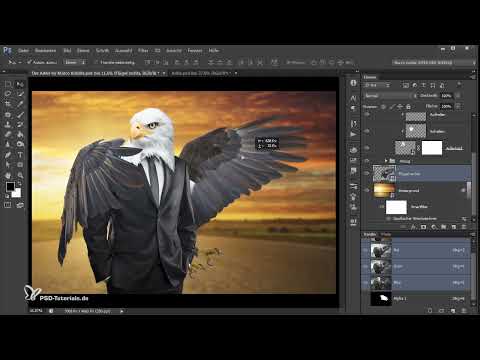
The video is only loaded from YouTube when you play it – data (including your IP address) is then transmitted to YouTube/Google. More in the privacy policy
Introduction
The eagle is flying in front of a light blue sky, and that is exactly what makes the cutout pleasantly straightforward. The real work begins afterwards: the bird's body will later disappear in the image, while the wings remain visible. You therefore first work on two separate wing layers, adjust them to the new position, and then give them shadows and highlights so that they truly belong to the scene.
Key Takeaways
- A high-contrast source image makes cutting out considerably easier.
- Missing areas, such as the head area behind the wing, can be retouched with a duplicated and rotated layer as well as a layer mask.
- With smart objects, you can scale and rotate wings as you like without losing quality.
- Shadows are created on a layer as a clipping mask. Soft brushes and reduced opacity ensure a natural gradient.
- Highlights on the wings reinforce the impression that the scene is lit by the same light source.
Step-by-Step Guide
Step 1: Open and Check the Source Image
Start with File > Open and choose a photo in which the eagle is flying in front of a background that is as uniform as possible. The light blue sky is ideal because the edges of the feathers later stand out clearly from the background. Take a look at the channels: a high-contrast image with clear contours saves you a lot of time when masking.

Step 2: Roughly Cut Out the Eagle
Next, cut out the eagle, just as you already know from the previous videos. It is important that you create an auxiliary layer as a background. This way you can immediately see whether any pixels of the original sky are still stuck in the cut-out area.

Step 3: Reconstruct Missing Parts in the Head Area
Part of the head is covered by the wing, and exactly this area will later remain partially visible. Therefore, duplicate the layer by holding down the Alt key and dragging the layer onto itself. With Ctrl+T, rotate the copy so that its structure fills the gap. Then confirm with the Enter key and zoom in closer on the area.

Step 4: Refine the Retouching with a Layer Mask
Reduce the opacity of the rotated layer so that you can check how well it matches the original. Once the position fits, set the opacity back to 100 percent. Then create a layer mask by holding down the Alt key and clicking on the mask icon. The black mask hides the copy. With a white brush, you now paint back in the areas you actually need. You don't have to retouch the head completely, because only part of it remains visible in the final image. Finally, lower the opacity slightly so that the retouching doesn't look artificial.

Step 5: Match the Color and Brightness of the Retouching
Next, place a color correction layer as a clipping mask over the retouching. This way, the adjustment only affects the layer beneath it. Trim the correction in the appropriate places until the transition looks harmonious. You can also fine-tune with small shifts using the arrow keys or a slight rotation.

Step 6: Cut Out the Left Wing Separately
To get the left wing as an independent layer, deactivate the background layer. Then create a merged layer of all visible layers with Ctrl+Alt+Shift+E. You edit this floating layer in masking mode. With black as the foreground color and full opacity, paint out the areas that do not belong to the wing. In transparent zones you can work roughly, since they won't be visible later anyway. It becomes more difficult where the wing overlaps with the body. Here you need more patience.

Step 7: Editing Fine Edges and Frayed Feathers
The feather tips are often frayed, so you reduce the brush tip size for these areas. Switch between foreground and background color with the X key if you have masked too much and want to reveal the area again. For larger areas, you increase the brush tip size again. Once you have masked the entire wing, click on the Load Selection icon and then on the mask icon. This gives you a free-floating, cleanly cut-out wing.

Step 8: Saving the Wing as a Smart Object
Convert the cut-out wing into a Smart Object and give the layer a clear name, such as "Left Wing". Then hide the layer and repeat the process for the right wing: Select the layer, create a floating layer again with Ctrl+Shift+Alt+E, convert it into a Smart Object, and name it "Right Wing". Smart Objects offer you the advantage that you can scale and rotate them multiple times without losing image quality.

Step 9: Placing the Wings in the Composite
Drag both Smart Objects into your main image. With Ctrl+T, you scale them to the desired size and rotate them in the right direction. The left wing sits above the suit, while the right wing is made somewhat smaller and placed lower, behind the suit. Keep comparing the proportions with the rest of the image until the perspective is right.
The eagle's body will no longer be visible later, but a bit of it may still show through at the edges. Remove these remnants with a layer mask: Simply paint the unwanted areas black. The result doesn't have to be perfect, as long as the body disappears behind the suit.

Step 10: Casting the Body's Shadow onto the Wing
The right wing receives shadow from the body. Select the layer and create a new layer above it, which you set up as a clipping mask. Take a soft brush with black foreground color and paint the shadow along the edges facing the body. Start with a low opacity and then adjust it until the shadow looks subtle.

Step 11: Diffuse Shadows for Evening Light
For the wing's shadow on the body, you create another layer, which you name "Shadow from Wing". Here too, paint with black color and a soft brush. The shadow can be quite diffuse, because the evening sun casts soft shadows. To keep the effect from being too harsh, you reduce the opacity. Compare before and after to check the effect.

Step 12: Placing the Wing's Shadow on the Head
The wing also casts a small shadow on the eagle's head. To do this, create a new clipping mask layer above the head and paint a faint, soft shadow at the appropriate spot. Make sure the shadow doesn't look too dominant, because the head is closer to the viewer than the wing.

Step 13: Adding Highlights with Blending Options
Finally, you add light. Select the left wing and create a new empty layer above it as a clipping mask. Choose white as the foreground color and paint with a soft brush over the areas that receive light. Reduce the opacity to about 5 percent so you can work more precisely.
Then open the layer options by double-clicking on the empty area next to the layer name. Drag the "Underlying Layer" slider to the right so that the dark pixels of the lower layer become visible again. Hold down the Alt key and click on the slider to split it. This way the wing stays slightly brightened but doesn't turn completely white. Repeat this step for the right wing.

With these highlights, the scene looks more coherent. If the intensity seems too high to you, you can readjust the opacity of each individual layer at any time.

Summary ??? Cutting out wings and inserting them realistically into the eagle composing
You have learned how to separate an eagle from its background, reconstruct missing parts of the head, and place two wings as smart objects in the composite. Afterwards, you used clipping masks, soft shadows, and highlights to make sure the wings blend in with the scene. With this workflow, you can also precisely cut out other animals or objects and insert them into complex image worlds.
FAQ
How can I tell whether remnants of the background are still left over after cutting out?Show a helper layer with a high-contrast color as the background. Then remnants of the sky are immediately noticeable.
Why should I use smart objects?Smart objects can be scaled and rotated multiple times without any loss of image quality. This is very helpful when placing wings.
Do I have to retouch the eagle's head completely?No. You only retouch the areas that actually remain visible in the finished image.
How do I create a realistic shadow?Use a clipping mask layer, a soft brush with black color, and a reduced opacity. A diffuse gradient looks especially natural.
What does the "Underlying Layer" slider do?It controls which brightness ranges of the layer below remain visible. By holding down the Alt key, you split the slider so that smooth transitions are created.


