

A picture rarely comes into being in one go. It often begins with a few rough lines and an idea that only takes shape while drawing. This is exactly the path Tobias shows in his workshop on the elf amazon. The video was recorded live, so without any reconstruction afterwards. Missteps and spontaneous decisions are therefore included, and that is exactly what makes the process so instructive.
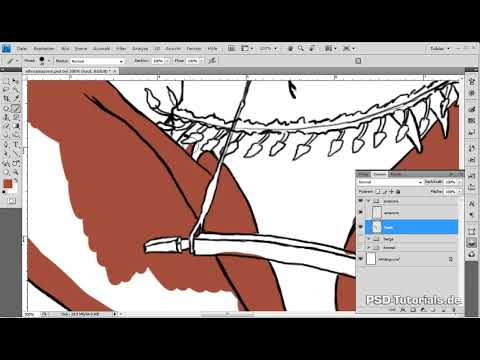
The video is only loaded from YouTube when you play it – data (including your IP address) is then transmitted to YouTube/Google. More in the privacy policy
This guide takes you through the first part of the tutorial: the basic structure with outlines, the organization of layers into groups, and the creation of the base colors. You will need a graphics tablet and solid Photoshop basics, especially in working with layers, layer groups, and clipping masks.
Key Takeaways
- The "Ink Brush 4" brush is a standard brush with a few adjustments. With a little patience, it can be recreated exactly.
- Every image element sits on its own layer. Layers are combined into groups, in a logical order from back to front.
- Base colors are deliberately chosen as a mid-tone so that you can later work into light and dark values.
- Contours are traced with the brush instead of using the Magic Wand. This preserves the form and your feel for the subject.
- The order of the layers may change during the process. Mistakes are corrected as soon as they are noticed.
Step-by-Step Guide
Step 1: The Reference and the Outlines
Tobias uses a stock photo purely as a reference for the body posture. The original photo is not edited; the figure is created completely from scratch. The outlines have already been set up on separate layers: mountains, bow, arrow, head, and leg. It is important that the lines for the mountains are left out in the places where the amazon will later stand. The sky is deliberately kept rough so that there is room left open for designing the clouds.
When sketching, take care not to define too much. Only this way do you keep the freedom to react flexibly later.

Step 2: Setting Up the Ink Brush 4
The outlines are created with a custom-adjusted brush that Tobias calls "Ink Brush 4" because it behaves like a fineliner. The tip size is four pixels. The hardness is at 100 percent so that the lines stay clear and hard. Opacity and flow are also set to 100 percent.
In the brush presets, you activate the shape dynamics. The size jitter is controlled via pen pressure. As a result, the ends of the strokes taper to a point, which is easy to see in the preview. You set the minimum roundness to 25 percent, and you switch on smoothing.
Test the brush on a new layer. Gentle pressure produces fine lines, firm pressure produces stronger ones. Tobias uses exactly this effect for his sketches, for example for the hair.

Step 3: Separating and Grouping the Layers
Already in the sketching phase, Tobias separates the individual image elements. Ear and head belong together and therefore sit on one layer. Bow and arrow also get their own layers. The complete figure is kept on a single layer so that it can be edited cleanly later.
After that, you create a separate layer group from each of these groups: one for the amazon, one for the sky, and one for the mountains. You edit these groups individually at first. This keeps the file well organized and prevents you from losing track.

Step 4: Filling in the Mountains
For the mountains, you create a new layer below the outlines, because the shape should follow the lines. Tobias first increases the diameter of the Ink Brush 4 because the area is large. With a brown tone, he first simply fills in the rough area.
After that, you zoom in closer on difficult spots and switch to a finer brush. Tobias traces the contours first. You then select the rest of the area with the Lasso and fill it via "Edit" and "Fill". You don't have to correct messy strokes on the leg perfectly, because the amazon will cover this area later anyway. At the edge to the sky, however, you should work precisely.
For the mountain on the left side of the picture, you use the same color, since it is at roughly the same distance. The mountain in the background gets a slightly lighter color and its own layer so that you can work it out separately later.

Step 5: Correcting the Order and Creating the Sky
While filling in, you notice that the order of the layers is wrong, because the mountains should be in front of the sky. Move the mountains up in the layers palette until they are in front of the sky. Corrections like this are part of the process and are not a step backward.
The sky gets its own base color layer behind the outlines. Tobias chooses a relatively dark shade of blue and drags out a selection rectangle, which he then fills. Whether the color is final is still open. You can take this just as calmly: the color can be adjusted at any time later.

Step 6: Defining the Skin Color
For the figure, Tobias chooses a dark base tone that lies between brown and beige. The reason is the planned scene: the Amazon is leaping over a fire source, so she is lit by reddish light. The skin color already anticipates this warm tone.
With all base colors, make sure that you still have room for shadows and highlights later. So choose a mid-value. Lighter and darker tones will be added later.
To fill the area without any gaps, you deliberately work with the brush instead of the paint bucket or magic wand. The outlines are often not completely closed, and tracing the contours also helps you understand the shape better. Hide the other groups so that you can concentrate on the current work.

Step 7: Leaving Out the Eyes and Creating the Hair
Tobias leaves out the eyes because they will later get their own layer beneath. Once the skin is finished, a new layer for the hair follows. He chooses a red tone that matches the skin well in terms of color temperature. The hairstyle and hair color of the face model play no role here; Tobias deliberately wanted something different from the usual black or blonde elf hair.
He initially leaves out the strands, since he continues to work with Ink Brush 4. So all lines keep 100 percent opacity. The fine hairs at the edge will only be added later during the detailed refinement, and different opacities are needed for that.

Step 8: Clothing and Fur in a Logical Order
Tobias builds up the figure from the inside out. At the very bottom is the skin layer, above it the hair, then the clothing. The darker fur of the bikini is partly covered by the lighter fur, which is why it lies on top. This order is not realistic, but clear. With many layers, it helps you keep track.
The fur of the bikini gets a brown tone that is based on the red of the hair.

Step 9: Metal Parts, Straps, and Details
The straps on the chest lacing, the shoulder straps, on the leg, on the foot cuff, and on the belt are fine lines. They serve to show the direction of movement. If you were to orient them downward, the figure would look as if she were jumping upward, which does not match the body posture.
The bracelets get a slightly golden base color so that you can later work with shine over it. Above that follows a layer for the straps in a somewhat browner tone. The metal hinges get a simple gray. You color the teeth subtly in a vanilla tone so that they stand out a little.
The so-called lizard tails hang down from the clothing. They are above all visual elements that bring tension and direction into the picture. For the connecting links, it is worth using a separate color so that the elements can be clearly distinguished from each other. At the end, you use curves under "Image" and "Adjustments" to check that the parts have not turned out too dark.

Step 10: Final Touches and Saving
For the light fur of the two-piece, Tobias first chooses a pink, but discards it in favor of a simple light gray. An important principle applies here: pure white or black should be avoided if possible, as they quickly create harsh contrasts and make the image look flat.
You then fill the eyes with a solid white. At first glance this seems contradictory, but it makes sense because the eyes will be shaded later. On another layer above it, the green pupils are created, which match the hair well. You also still need to adjust the color of the moon in the sky, as it would otherwise take on a cheesy tone.
Finally, remember: save your file regularly.

Summary ??? Digitally Painting an Elf Amazon: From Outline to Base Color
Tobias shows how an image is created step by step: with a customized Ink Brush 4, cleanly separated layers, layer groups, and base colors as a midtone. Outlines are traced by hand, layers are rearranged as needed, and colors can be adjusted at any time. The process thrives on reacting flexibly to mistakes and new ideas. The shading and details follow in the next part.
FAQ
How do I create the Ink Brush 4?You choose a standard brush, set the tip size to four pixels, hardness, opacity, and flow to 100 percent, activate the shape dynamics with pen pressure as the control for the size jitter, set the minimum roundness to 25 percent, and activate smoothing.
Why doesn't Tobias use a magic wand to fill?The outlines are often not completely closed, so the magic wand is unreliable. In addition, tracing the outlines helps you understand the details better and develop new ideas.
Why are the base colors chosen as a midtone?This leaves enough room to later incorporate both lighter and darker values for shadows and highlights.
Why are the eyes initially left out?The eyes get their own layer beneath the skin so that they can be worked on separately later.
Why should you avoid pure white and black?These tones create harsh contrasts and quickly make images look flat. Exceptions are possible, but you should usually avoid them.
Why is the layer order in the character built from the inside out?The order of skin, hair, clothing, and fur is clear and logical. This makes working easier when many layers are created.
What is the purpose of the ribbons and lizard tails?They show the direction of movement of the character and thus support the dynamics of the image.

