
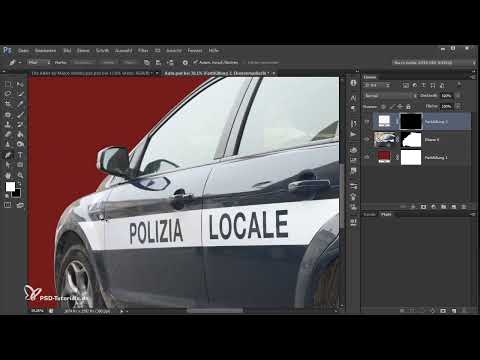
A police car in a composite only looks credible if it is cleanly cut out, appropriately sharpened and color-matched to the scene. That is exactly what this tutorial is about. You will learn how to separate the vehicle from the background using a mask, the Pen tool and paths, how to insert an eagle logo, how to create a natural depth of field blur, and how to integrate the car into the overall look using color layers.
The video is only loaded from YouTube when you play it – data (including your IP address) is then transmitted to YouTube/Google. More in the privacy policy
Key Takeaways
- The Channels panel is of little help with this subject because there is too little contrast between the car and the background.
- Quick Mask mode offers the most control, since you can flexibly switch between soft and sharp edges using soft and hard brushes.
- The Pen tool is suitable for technical objects with clear, hard contours, but it creates unnatural transitions in blurry areas of the image.
- A logo looks more credible if you distort it to match the perspective and slightly wear it down with a texture brush.
- Shadows, color layers and targeted blur with a Smart Filter connect the car with the later background.
Step 1: Open and analyze the police car
Start by loading the image with the police car via "File > Open". Before you begin cutting it out, it is worth taking a close look at the channels. Look at the Channels panel and check whether individual channels show a sufficiently strong brightness difference between the car and the background. Unfortunately, this is not the case with this subject, because the structures in the image provide too little contrast. So you will only waste time here if you rely on the channels for too long.

Step 2: Activate Quick Mask mode and work with a soft brush
Quick Mask mode is the central method in this tutorial. Choose black as the foreground color and first set a relatively hard brush. Use it to paint roughly along the contours. You will quickly notice that hard brush tips look out of place on the blurry areas of the photo. You should therefore make the brush softer so that it adapts to the existing blur. This approach takes a little more time than some other methods, but it works reliably. With the brush's size, hardness and opacity, you retain control at all times.

Step 3: Set precise paths with the Pen tool
In the next step, I'll show you the Pen tool. Select the tool and set a first anchor point. While dragging, hold down the mouse button to create Bézier handles with which you shape the curve. With the Ctrl key held down, you can edit these handles afterwards. This creates smooth curves that follow a rounded body.
As soon as a corner comes up, switch to the "Convert Anchor Point" tool and click on the point to remove the handles. Then you use the Pen tool again. This combination of setting and converting is the basic principle of path drawing.

Don't rush when working with the Pen tool. A path that encloses a section of the car is easy to test. Close it by returning to the starting point.

Step 4: Convert the path into a selection
Once the path is closed, you will find it in the Paths panel under "Window > Paths". Click on the path thumbnail with the Ctrl key held down, and the selection is loaded. For a partial area of the car, this works excellently. The drawback remains, however: the Pen tool creates hard contours, and that is exactly what doesn't fit the blurry areas in the photo. That is why Quick Mask mode is the better choice for this subject. You use the Pen tool selectively where clear edges exist, for example on bumpers or edges of the body.

Step 5: Cut out the car completely
Now it's time to tackle the complete vehicle. Whether you continue working with Quick Mask mode depends on the area. Use soft brushes for blurry transitions and hard brushes for sharp edges. This way the selection can be adjusted flexibly. After cutting it out, you can check in the mask whether all areas have been captured cleanly.

Step 6: Coloring the Background of the Car
So that the logo can be recognized more easily later, you first hide the existing lettering. To do this, create a new adjustment layer of the type Solid Color. Choose an icy blue tone with the values Red 243, Green 247, and Blue 250. On your screen, this tone may look almost white, depending on brightness and profile.
Then click on the layer mask, press Ctrl and I to invert it, and thereby hide the color. Now you can use the Pen tool to precisely trace the area around the lettering and mask this area. If the area contains too many curves that you don't need, correct them with the "Convert Anchor Point" tool.


Step 7: Refining the Mask and Adding Shadows in the Door Area
The lettering has now disappeared. The mask shows a uniform, continuous area. To make the transition softer, you paint a gentle gradient with a soft brush and add the grooves of the door, since they are also present at this spot.
The area still looks a bit too bright. Therefore, create a new layer as a clipping mask and paint with a black foreground color and a soft brush at the bottom of the area. The opacity is about 30 percent. This doesn't have to be perfect at the beginning, because the later evening color mood will additionally blend the elements together.


Step 8: Isolating and Preparing the Eagle Logo
For the logo, you open a graphics file with an eagle symbol. You can find such a motif at stock agencies, or you can design your own. Since the graphic is on a white background, you select the RGB channel while holding down the Ctrl key. With Ctrl, Shift, and I, you invert the selection so that everything black is selected. From this you create a mask.
Then fill the image layer with black. To do this, use Alt and Backspace, which applies the foreground color. Convert the layer into a Smart Object and name it something like "Eagle Emblem". Drag it onto the car. This directly creates a clipping mask. If you don't want it, you can release it again with Alt between the layers.

Step 9: Adjusting the Logo's Perspective
With "Edit", "Transform", "Distort" you adjust the size and position. Drag the anchors until the eagle's head sits between the doors. Pay attention to the perspective of the vehicle. If necessary, distort the logo so that it follows the contour of the door, because doors are rarely completely straight, but slightly curved.


Step 10: Slightly Wearing Down the Logo with a Texture Brush
So that the logo doesn't look freshly printed, you work with a mask and a texture brush. These brushes are available online both free and paid, or you can create your own. Click with it at individual spots over the logo. This creates small signs of wear that make the motif more realistic.

Step 11: Saving the Finished Car as a File and Placing It in the Composing
The car is now prepared. Save it as a separate image file and place it in the actual composite via "File", "Place". Adjust the size and orientation to the scene. You may rotate the vehicle slightly so that it matches the viewing direction. Consider how far back in the background the car should stand.

Step 12: Adding a Realistic Shadow
The car is still floating, and that's exactly what you need to correct. Create a new layer below the car and paint a shadow with a soft, black brush. Make it a bit larger so that it convincingly covers the ground.
Then zoom in closer, reduce the size of the brush, and apply a harder shadow directly beneath the tires. The distance to the ground is smallest there, so the shadow looks sharper. With an opacity of about 80 to 90 percent, the result looks natural.


Step 13: Integrating the Car in Terms of Color
So that the vehicle blends more harmoniously into the image, create a color fill layer above the car layer. Choose an orange tone with the values 158 for red and 78 for green, and set the blue value to match. Change the layer mode to "Color" and reduce the opacity.
Hold Ctrl and click on the RGB channel to load the brightness of the image as a selection. Then activate the color fill layer, click on its mask, and fill the selection with black accordingly. Since the layer is set up as a clipping mask, the effect only applies to the car. With an opacity of about 60 percent, the effect becomes subtle, and the car looks much better integrated.

Step 14: Creating the Depth of Field Blur on the Car
The background of the photo is blurred, so the car should also receive a matching blur gradient. Select the car layer. Since it is a Smart Object, you can apply filters non-destructively. Go to "Filter", "Blur Filters", "Gaussian Blur" and choose a radius of about 15 pixels. The entire car now looks blurred.
In the Smart Filter area, take the mask and, using a soft brush with black as the foreground color, paint the sharpness back in at the places where the car should stay sharp. Keep comparing with and without the mask until the transition looks consistent.


Summary – Cutting Out the Police Car and Preparing It for the Photoshop Composing
You have cut out the police car, edited it precisely with Quick Mask mode, the Pen tool, and paths, inserted an eagle logo with perspective, and aged it with a texture brush. Afterwards, you added shadows, integrated the car in terms of color, and created a suitable depth of field blur. The vehicle is now ready to be used in the composing.
FAQ
Why is the Channels panel not helpful for this subject?Because the structures in the image provide too little contrast between the car and the background, so no clear selection results.
When is Quick Mask mode better than the Pen tool?Whenever you have to switch between soft and hard edges, since the brush lets you respond more flexibly to blurry areas.
What is the Pen tool suited for?It is ideal for technical objects with clear, hard contours, but with blurry photos it quickly creates unnatural transitions.
How do I load a path as a selection?Hold down the Ctrl key and click on the path thumbnail in the Paths panel, and the selection is active.
Why should the eagle logo be distorted?Because surfaces on the car are usually curved in perspective, and a logo only looks believable when it follows this curvature.
Why is a shadow under the tires drawn harder?The distance to the ground is smallest there, so the shadow looks sharper there than further away.
Why do you work with Smart Objects?This way, filters such as Gaussian Blur remain non-destructive and can be readjusted at any time via the Smart Filter mask.


