

Anyone who has ever cut out a person with flyaway hair from a busy background knows how much patience it takes. This is exactly where the Photoshop CC 2020 update comes in. The new features are modest, but very useful in everyday work: hair selection has been improved with AI support, patterns can now be rotated at an angle, missing fonts are loaded automatically, and the Camera Raw interface has been completely redesigned. In this tutorial, I will guide you step by step through all the features and show you where the limits of the new tools lie.
The video is only loaded from YouTube when you play it – data (including your IP address) is then transmitted to YouTube/Google. More in the privacy policy
Key Takeaways
- The "Select Subject" tool detects fine hair much better than earlier versions, but it is not error-free with difficult subjects.
- With "Select and Mask" you can refine the edge in a targeted way and remove color remnants from the background.
- Patterns can be freely rotated as a pattern overlay or via the layer style, without changing the original.
- Missing fonts are automatically loaded when opening other people's documents, provided they are available from Adobe.
- Camera Raw now presents the controls clearly arranged one below the other instead of in tabs.
Step 1: Capture the subject with AI selection
Start with the object you want to cut out. Select the selection tool in the toolbar and then click "Select Subject" in the menu. Photoshop analyzes the image and automatically marks the main subject, including many fine strands of hair. In this example you can see the difference from earlier versions immediately, even if it does not look spectacular at first glance.

Step 2: Check the result with a layer mask
At first glance the result often looks good, but for a proper assessment you should create the selection as a layer mask. Then create a new layer with a solid black fill underneath. That way you can immediately see whether light remnants of the original background are still hanging between the hairs. In this example the finest hairs are cut out well, but the edge looks a bit mushy in places.

Step 3: Improve the mask with "Select and Mask"
To refine the edge, click on the layer mask and choose "Select and Mask". There, first reduce the transparency of the view so that you do not constantly see the image underneath. Then work with the "Refine Edge" tool. A somewhat larger brush works well for gently tracing the hair edges. You can also increase the contrast using the sliders, which separates the hair more clearly from the background. The result then looks significantly cleaner than the automatic selection alone.

Step 4: Remove green cast from grass and vegetation
It gets trickier when the background consists of grass. The selection then usually also includes green reflections that settle in the hair. So choose "Select Subject" again, create a mask, and check the result by setting the transparency to zero. In the "Select and Mask" area you will find the option "Decontaminate Colors" under Output. Activate it, and Photoshop adjusts the green cast to the actual color of the hair. If grass still remains in the image, you can help out with the selection tool and the subtract option, or raise the contrast directly in the mask.


Step 5: Test backgrounds with fine structures
Not every shot delivers a perfect result, and that is exactly why it is worth looking at difficult cases. With an image in which parts of the background are hanging in the hair, click "Select Subject" again. Do not expect magic, because even the AI eventually reaches its limits. In this example the result is convincing anyway, as the hair is largely cleanly separated from the background. For particularly demanding subjects, you should still rework with a mask and Refine Edge.

Step 6: Defining a Pattern as a Pattern
The second major new feature concerns patterns. First, select the area where the pattern should be, or the entire pattern itself. Then go to "Edit" in the menu and choose "Define Pattern". Name the pattern, for example "Wood", so you can find it again quickly later. The pattern is now available in the pattern library and can be applied to any document.

Step 7: Rotating a Pattern as a Pattern Overlay
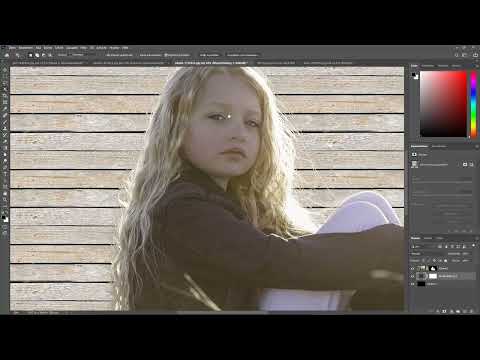
Now return to your image and add a pattern overlay to the layer. Select the wood pattern you saved earlier. What's new is that you can now set an angle. This causes the pattern to be displayed at a slant, which looks more realistic especially with wood or fabric textures. The isolated hair remains clearly visible, because the pattern only lies over the subject and does not cover the edges.

You can also find the same option by right-clicking in the "Blending Options" dialog. There you can likewise choose the pattern overlay and adjust the angle. If the pattern overlaps your subject too much, simply move the layer down. By double-clicking the pattern overlay, you can reopen the settings at any time and change the angle afterwards.

Step 8: Finding and Downloading a Suitable Font
There is also an improvement with fonts. If you want to recreate a font from an image, start the "Find Fonts" function. Photoshop suggests suitable alternatives. If a font is not yet installed on your system, you can recognize it by the cloud icon. A double-click downloads it, and it is then immediately available. This way you can recreate the text without having to search laboriously for the font first.


Note, however, that the suggested font does not always match the original exactly. In this example, you still need to adjust the tracking, size, and weight before the text truly matches the model.
Step 9: Automatically Loading Missing Fonts for Documents from Others
A new feature that often prevents annoyance in everyday work concerns documents from other computers. If you open a PSD file that uses fonts missing on your system, Photoshop automatically downloads them in the background. The prerequisite is that the font is available from Adobe. So you no longer have to search manually or get annoyed by error messages about incorrectly displayed text.

Step 10: Working with the New Interface in Camera Raw
Finally, let's look at Camera Raw. To do this, convert your image into a Smart Object and open it in Camera Raw. The most striking change is the new arrangement of the panels: The previous tabs are now stacked one below the other, similar to the iPad version of Lightroom. This looks tidier and more modern and makes it easier to access individual areas.

When editing, you benefit from shorter paths. One click is enough to adjust color settings directly, for example, without having to switch between tabs. Especially if you work with Camera Raw often, you will quickly come to appreciate the fresher look.

Summary ??? Photoshop CC 2020: Isolating Hair, Rotating Patterns, Camera Raw
Photoshop CC 2020 brings no revolution, but several improvements that are noticeable in the daily workflow. The AI-assisted selection recognizes hair significantly better, but with difficult backgrounds it still requires rework with "Select and Mask". Pattern overlays can now be rotated by an angle, which expands creative design possibilities. You download missing fonts with a double-click or receive them automatically when opening documents from others. Finally, the revised interface of Camera Raw provides clearer operation.
FAQ
How do I improve hair isolation in Photoshop CC 2020?Use the "Select Subject" tool in the Select menu and then refine the result with "Select and Mask" and the "Refine Edge" tool.
Why does a green tint remain in the hair when there is grass in the background?In the "Select and Mask" area, under Output, activate the "Decontaminate Colors" option so that the color adapts to the hair.
How do I rotate a pattern in Photoshop CC 2020?Add a pattern overlay to the layer, select your pattern, and set the desired angle in the dialog.
Can I also rotate patterns via the right mouse button?Yes, in the context menu you will find the "Blending Options" option. There you can likewise select the pattern overlay with an angle.
What happens if a font is missing in a document from someone else?Photoshop automatically downloads the appropriate font in the background, provided it is available from Adobe.
How do I find a font from an image?Use the "Find Fonts" function, select a suggested font, and download it by double-clicking the cloud icon.
How does the new Camera Raw interface differ from the old one?The previous tabs are now arranged one below the other, which makes operation clearer and more modern.

