

A dragon flying over a ship and breathing fire can now be created in Photoshop with just a few words. The beta version of Photoshop 2024 comes with several new tools built on the Adobe Firefly 3 AI model. In this guide, you will get to know the most important new features: the extended font management, image generation with reference images, the adjustment brush, creating similar images, generating backgrounds, and improving details.
The video is only loaded from YouTube when you play it – data (including your IP address) is then transmitted to YouTube/Google. More in the privacy policy
Key Takeaways
- The font management displays fonts clearly and loads additional fonts directly from the Adobe Cloud.
- Firefly 3 also creates images without a template, and with reference images you can specify the style or the subject in a targeted way.
- The adjustment brush applies image corrections only to the areas you paint and automatically creates a mask for this.
- The functions "Generate Similar," "Remove Background," and "Generate Background" work directly on your images.
- English inputs often deliver better results than German ones.
- New features are only available in the beta. The results may still vary.
Step-by-Step Guide
Selecting and switching fonts clearly
The font management is a new feature that is already available in the full version. To replace a font in an existing document, select the Type tool and highlight the desired text. Then open the Character or Paragraph panel if it is not visible, and select the new font there. The list is now sorted by categories, so you can quickly find handwriting fonts, for example. When you hover over a font, you see the effect immediately in the document, without having to click the font first.

If the installed fonts are not enough for you, you can access fonts from Adobe directly via the font area. The selection reportedly includes over 25,000 fonts. While loading, your computer may noticeably work harder because many fonts are transferred at the same time. The advantage: you do not have to install any font separately. It is only available for this document.

Installing the beta version
You get the new AI features through the beta version. To do so, open the Creative Cloud desktop app and select the application in the list of your programs. At the top center, you will find the "Beta" tab. There you can install the beta version of most Adobe programs, for example Photoshop, Illustrator, or After Effects. The beta contains features that often only appear in the full version half a year or a full year later. Adobe does not call it an alpha version, since the features already run quite stably. You can use both versions in parallel and decide for yourself which one you work with.

Checking the news via the Help section
In the "Help" menu, under "What's New," you will find a clear list of all new features. The first entry is Adobe Firefly 3, the image model. There you learn that the model uses better algorithms and can therefore produce more realistic images of people or entire scenes. Take a moment to read this list before you start generating images.

Generating an image from scratch
To create an image, first create a document in any format via "File" and "New." Photoshop then suggests that you generate an image directly. A new dialog opens in which you describe your idea in text form. This now also works in German, although English is often more precise. In the example, you enter "Ein Drache fliegt über ein Schiff und speit Feuer" ("A dragon flies over a ship and breathes fire"). Then you choose the style, such as artistic or photorealistic. You can also select additional effects such as "painted" or "hyperrealistic." Then click "Generate."

The AI suggests three variations. Look at all of them closely, because not every variation meets your specification. In the example, the dragon at first does not really breathe fire, and one object looks more like a meteorite flying into the water. The first variation is best suited as a starting point.

Adding Image Elements Selectively
You can add more elements at any time by selecting an area and entering a description. In the example, a moon is to be added. Entering the term in German doesn't work reliably. Instead, write the term in English ("Moon"), and it works immediately. This is because the AI model was trained predominantly on English terms. So if the result isn't convincing right away, try an English wording.

Using the Adjustment Brush
The Adjustment Brush is located in the toolbar with the brushes. It offers the same adjustments as the adjustment layers, such as Hue/Saturation. The difference lies in how it's applied: instead of changing the entire image, you paint only the areas that should change. Photoshop automatically creates a layer and the appropriate mask. To do this, select the desired adjustment, set the brush size, and paint over the areas you want to change. Areas outside your brush stroke remain untouched. There is still one weakness: the AI doesn't automatically recognize that only the dragon should be changed and not the background. In this case, you must first isolate the subject.


Working with Reference Images
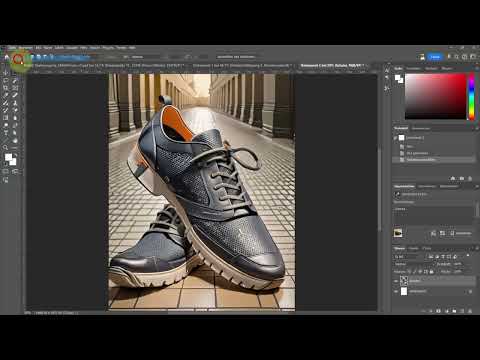
Reference images help you make newly generated images resemble a model. In the "Generate Image" dialog, you'll find the "Reference Images" option. There you can choose preset subjects, for example a unicorn, or upload your own photo. In the example, a photo of shoes of your own is used. The input is deliberately kept short with "Generate shoes". The result clearly resembles the original, even if the style turns out rather illustrative. Brands like Sketchers disappear in the process, which is quite handy for preliminary design studies.


Also try combinations. An additional term like "flowery" doesn't lead to the desired result in the example, as the shoes are partly missing entirely. Phrase the input more precisely, such as "shoes with a floral pattern", and test several variants before giving up.
Generating Similar Images
If you open an already created image and scroll down in the Properties panel, you'll find the suggestions. Via the three dots, you can choose "Generate Similar". The new variants are then created based on the existing image. This is useful if you basically like a subject but want to compare different versions.

Removing and Regenerating the Background
With the "Remove Background" function, you isolate the main subject with one click. Photoshop merely creates a mask, which you can show and hide at any time. Some remnants may remain at the edge. You remove these with further mask editing. Afterwards, you can describe a scene via "Generate Background", for example "by the river with mountains in the background". The AI takes the perspective and shadow of the foreground subject into account. In practice, the results sometimes look very convincing, but with other variants the size of the object doesn't fit. Therefore, check each option critically.


Improving Details
Generated images sometimes look blurry. You'll find the "Improve Details" option at the top left in the Properties area as soon as an image has been generated. It often sharpens details significantly. However, it doesn't work with all elements. If the message appears that an area is too small, the only remedy is to generate the element larger and apply the function again. In the example, this succeeds with the Berlin TV Tower, and the difference before and after applying it is clearly visible.


Summary – Photoshop Beta 2024: Firefly 3, Reference Images, and Adjustment Brush
The beta version of Photoshop 2024 offers you many practical tools for image editing and AI-assisted design. You find fonts faster, images can be controlled with references, and the Adjustment Brush saves you the tedious masking. You generate backgrounds that match the perspective, and details can be sharpened afterwards. The functions are not yet perfect, but the progress is noticeable. Test them at your leisure and also try English inputs if the result doesn't fit at first.
FAQ
How do I install the beta version of Photoshop?Open the Creative Cloud desktop app, select the application, and click the "Beta" tab at the top center. There you can install Photoshop in the beta version.
Do I need to install a font before I use it?No. Fonts from the Adobe Cloud can be selected directly and apply to the current document, without you having to install them separately.
Why does image generation in German sometimes deliver worse results?The AI model was trained predominantly on English terms. So try an English wording if the result doesn't fit right away.
How do I make sure that only a specific area is changed?Use the Adjustment Brush. It applies the correction only to the areas you paint over and automatically creates a mask for this.
Why is a message sometimes displayed with "Improve Details"?The message appears when the selected element is too small. Generate the subject larger and then apply the function again.
Can I use my own photo as a reference image?Yes. In the "Generate Image" dialog, you can upload your own photo under "Reference Images". The result will then be based on your template.

