

An update with so many new features is rare. Photoshop CC 2021 brings several tools that can save you a lot of time in everyday editing: you swap the sky in a photo, smooth skin with AI support, refine hair edges when cutting out subjects, and find help and assets faster than before. In this tutorial, I walk you through the key new features from the video. You will learn where to find the functions, how to use them, and where their limits lie.
The video is only loaded from YouTube when you play it – data (including your IP address) is then transmitted to YouTube/Google. More in the privacy policy
Key Takeaways
- With the "Replace Sky" function, you replace the sky in just a few steps and adjust the brightness, warmth, and size of the clouds.
- The Neural Filters use AI to edit portraits in seconds, for example with skin smoothing. Some filters are still in the beta phase.
- The "Object Aware" option significantly improves the selection of hair and fur on complex backgrounds.
- The Shape tool allows you to set the corner rounding directly in the Properties panel.
- The Content-Aware Tracing tool must be enabled in the Technology Previews.
- Smart object transformations can be reset via the Properties panel.
- Searching in the Assets panels and in the Help magnifying glass speeds up your work considerably.
- You can make Cloud documents permanently available offline.
Step-by-Step Guide
Replace Sky
A boring, cloudless sky can be replaced in Photoshop CC 2021 within a few minutes. To do this, open your photo and choose the "Replace Sky" entry in the "Edit" menu. Photoshop immediately offers you a selection of cloud motifs from the Adobe library. Browse through the preview until a motif appeals to you.

The default clouds are a good starting point, but you can also use your own motifs. To do so, create a folder, for example named "My Clouds", and import your images there. They will then be available to you in the selection.


In the dialog, you can also load a new image via the folder icon. You see the newly inserted sky immediately in the preview. The settings also give you the option to correct brightness, warmth, and coolness, scale the clouds, or flip them. Move the edge if the transition does not look clean in some spot.

When confirming, pay attention to the "Output To" option. Choose "New Layer" so that the sky ends up as its own layer in a group. That way you can hide it at any time or refine it with layer masks.

Neural Filters and Skin Smoothing
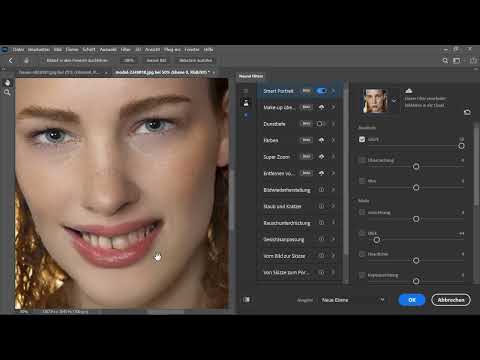
The Neural Filters are one of the most striking new features. You find them in the "Filter" menu. Start the "Skin Smoothing" filter by enabling the option. Photoshop briefly uploads the image to the cloud, calculates the change, and returns the result. Depending on your computer and internet connection, the calculation can take a few seconds.


With the switch in the lower left corner, you toggle between "Before" and "After". Then drag the slider for smoothing. Pay attention to the results at higher values, because too much smoothing quickly looks artificial. If needed, you can reduce the blur slider to preserve skin texture.

Each application of a filter is saved in its own menu. That way you can see at any time which filters you have applied, and you can correct individual steps.
Gaze Direction and Smile with the Beta Filters
Among the experimental beta filters you will find further options. With the gaze direction filter, for example, you can turn a person's eyes to the left or right. One click is enough to produce the result. In the video this works surprisingly well, but in some places you have to touch up with layer masks and the brush tool.

The smile filter is more of a fun tool. At stronger settings, facial features quickly look distorted. For professional portraits, you should therefore use it with caution.

The slider for hair density, on the other hand, is versatile. Here too, however, the following applies: at extreme values, the result looks artificial. Therefore, proceed step by step and assess the image in comparison with the original each time.

Pattern preview for seamless patterns
If you create wallpapers or tiles, the new pattern preview is a great help. Activate it via "View" and then "Pattern Preview". Your image now visibly repeats, so you can check the transition at the edges.

You can hide the blue frame with "Ctrl + H" if it bothers you. When zooming out, you can see how the pattern works as wallpaper. If you edit the motif, you see the changes live in the repetition. This also applies to rotations or shifts of individual layers.

You will quickly notice offset edges in this view. Move the affected element with the Move tool until the edge disappears. Especially with purchased patterns, this check is worthwhile before you continue using the pattern.

Refining hair with "Object Aware"
Masking out hair used to be one of the most laborious tasks. The new "Object Aware" option brings a noticeable improvement here. First, select the main object via "Select Subject". Then open "Select and Mask". You already know the color-based selection, but the result is often not sufficient for hair.

Therefore, click the "Object Aware" button. When you hover over it with the mouse, Photoshop displays what it considers the best choice for hair or fur. On complex backgrounds, this method delivers clearly better edges in the video. You make fine adjustments via "Refine Edge".

Finally, confirm with "OK". The mask is automatically applied to the layer, so you can see the new background image directly beneath it. For the example shown, Photoshop needs only a few seconds.

Rounded shapes with the Shape tool
The control of corner rounding for shapes is also new. Similar to Illustrator, when creating a triangle or rectangle you can directly specify how round the corners should be. You will find the setting in the Properties panel.

If you enter the value 0, you get hard edges. If you drag the slider to the right, the corners become increasingly rounded. The option works equally for triangles, rectangles and other shapes, so you can create soft design elements without detours.

Activating content-aware tracing
The content-aware tracing tool is a technology preview and must be enabled first. To do this, press "Ctrl + K" to open the preferences. Switch to the "Technology Previews" section there and check "Enable Content-Aware Tracing Tool". Then restart Photoshop.


In the toolbar, you will now find the tool in the drawing area. Photoshop detects contrasts and places points along the edges. With single clicks, quick lines are created this way. However, the accuracy is still limited, which is why you usually have to rework the results. The tool is therefore an aid and not a replacement for careful drawing.

Resetting Smart Object Transformation
If you have distorted a Smart Object and want to undo the change, the new option in the Properties panel will help you. To do this, select the layer with the Smart Object. At the top of the panel you will find the "Reset Transform" icon. One click is enough, and the distortion disappears.

This function is especially useful for mockups, for example when you place a logo on a mug and need to adjust the shape later. The logo remains a Smart Object, so you do not lose any quality.
Search in the Help Binoculars and Discover Area
At the top right of the interface you will find a binoculars icon. Enter a term here, for example "Brush Tool", and Photoshop will show you matching help articles, workshops and tutorials. With the "Video" entry you also get hints about the video functions. When you click on a tutorial, Photoshop starts a guided walkthrough directly in the program.


Making Cloud Documents Available Offline
If you often work on the go, cloud documents are especially practical. Open the cloud documents area and click the three dots next to the desired file. Select "Always make available offline" there. A green checkmark shows you that the file is available even without an internet connection.

This way you do not have to wait for the file to load, and you are on the safe side even with poor reception.
Search in the Assets Panels
Many panels now offer a search function. For example, open the Brushes panel and enter "round" in the search field. You immediately get all round brushes with a preview. This is especially helpful if you have many brushes installed. The search works equally well for gradients, patterns and swatches. In the Gradients panel, for example, you can search for "blue" and get all blue gradients.


Managing Plugins
The menu command for plugins has been revised. Management is now clearer, and Photoshop can be connected to services such as Slack or Trello. Use the plugin management to install, update or deactivate extensions.

Summary ??? Photoshop CC 2021: The Most Important New Features Step by Step
Photoshop CC 2021 extends your workflow in many places. The sky replacement, the Neural Filters and the "Object-based" option for hair selection are the most striking new features. The Shape tool with adjustable corner rounding, the Smart Object reset and the search in the panels make everyday work easier. The beta functions such as content-aware tracing and some Neural Filters are not yet mature, but show where development is heading. Try out the functions on your own images, and you will quickly see where they really help you.
FAQ
How do I replace the sky in Photoshop CC 2021?Open your photo, select the Replace Sky entry in the Edit menu, choose a cloud motif and confirm with New Layer as the output.
Can I use my own cloud images?Yes, create a folder, import your images there via the folder icon in the dialog and then select them as the new sky.
Which Neural Filters are shown in the video?Skin smoothing, gaze direction, smile and hair thickness are shown, although some of these filters are still experimental.
Why are some Neural Filters marked as beta?The beta filters are still in development and deliver different results depending on the image, which is why they are not yet suitable for all applications.
How does the pattern preview work?Activate it via View and Pattern Preview, and you will see your motif as a repetition. With Ctrl + H you hide the frame.
What does the Object-based option in the selection offer?It significantly improves the selection of hair and fur on complex backgrounds, as Photoshop automatically suggests the appropriate method.
How do I activate the content-aware tracing tool?Press Ctrl + K, switch to the Technology Previews, activate the tool and then restart Photoshop.
How do I reset a Smart Object distortion?Select the layer, open the Properties panel and click the Reset Transform icon at the top.
How do I make a cloud document available offline?In the cloud documents area, click the three dots and select Always make available offline. A green checkmark indicates the status.
How do I quickly find help in Photoshop?Use the binoculars at the top right, enter a term and then select matching articles, workshops or tutorials.
