

Anyone who retouches regularly knows the problem: a healing brush places a clean spot, but the transition to the surroundings looks harsh and gives away the editing. With the November 2015 update of Photoshop CC 2015.1, you get a new tool for this. The Diffusion option controls how soft or hard the transition of a retouch turns out. In addition, the popular Oil Paint filter has returned, and Photoshop can now open and place SVG files. This guide takes you through all three new features, from the basics of Diffusion through the settings of the Oil Paint filter to working with SVG graphics.
The video is only loaded from YouTube when you play it – data (including your IP address) is then transmitted to YouTube/Google. More in the privacy policy
Key Takeaways
- The Diffusion option is located in the options bar of the Spot Healing Brush, the Healing Brush, and the Patch tool (in Normal mode).
- A low Diffusion value (around 1) produces hard transitions and is suitable for fine details such as skin pores. A high value (around 7) produces soft transitions and is suitable for soft image areas.
- The Oil Paint filter is back under Filter > Stylize > Oil Paint. It only works in 8-bit mode, in RGB color mode, and with graphics processor support enabled.
- With Stylization, Cleanliness, Scale, Bristle Detail, Angular Shine, and Lighting, you control the painterly look. Lighting must be enabled for Scale and Bristle Detail to take effect.
- SVG files have to be rasterized when opened in Photoshop. If you place them instead as an embedded Smart Object, they remain scalable.
Step-by-Step Guide
Part 1: The New Diffusion Option in Retouching
Step 1: Finding Diffusion in the Spot Healing Brush
Diffusion is a new setting for retouching tools and determines how soft the transition is between the retouched spot and its surroundings. You will find it first in the Spot Healing Brush. Note that it only offers Diffusion if you are working in Proximity Match mode rather than Content-Aware mode. The entry Diffusion then appears in the status bar at the bottom edge of the image.

Step 2: Using Diffusion with the Healing Brush and Patch Tool
The regular Healing Brush also offers Diffusion, in the status bar at the top at the end of the bar. With the Patch tool, the option only appears if you choose Normal mode instead of Content-Aware. All three tools work with the same logic, so once you have understood the setting, you can apply it everywhere.

Step 3: Understanding the Value Range from 1 to 7
Diffusion can be set between 1 and 7. Previously, the tools worked with a fixed value of about 6. Before you start retouching, you should know the effects of the extreme values. To do this, set up the Healing Brush, zoom into the image, and sample a source area while holding the Alt key. Then you move the brush over the target spot.

Step 4: Recognizing Hard Transitions with Low Diffusion
Set Diffusion to a low value such as 1. After painting, you will see clearly visible edges at the borders of the retouched area. The transition area is exactly the area you can control with Diffusion. This effect is not a mistake, but exactly the behavior you need for structures with clear contours.

Step 5: Creating Soft Transitions with High Diffusion
Now set Diffusion to the highest value, 7, and retouch an area again. The edges are now barely visible, and the transition looks like a soft hem. The comparison between the values shows that with a value of 7 you get very soft transitions and with a value of 1 very hard ones.

Step 6: Using Diffusion Like a Brush with Varying Hardness
You can think of Diffusion like the hardness of a brush. A hard brush leaves a sharply cut-off stroke, while a soft brush fades out gently. So choose the value so that it suits your subject. For structures with many details, such as hard edges, a low value works particularly well. With it, you can cleanly remove distracting spots, for example.

Step 7: Choosing the Right Value for Details and Soft Areas
For fine details, precision is important. A low diffusion value keeps the retouching clean, for example with skin pores or hard textures. A high value, on the other hand, quickly looks smudged and mushy, especially if you do a lot of reworking. High values are therefore suitable for images with soft image areas, where inaccuracies are hardly noticeable.

Part 2: The Oil Paint Filter
Step 8: Finding the Returned Filter
In the last Photoshop version, the popular Oil Paint filter was missing. Now it's back, but in a new location. You'll find it under Filter > Stylize > Oil Paint. Previously, it was located between Liquify and Vanishing Point. With it, you give photos a painting-like look.

Step 9: Checking the Requirements if the Filter Is Grayed Out
If the filter is grayed out, there are usually one of four reasons. It only works in 8-bit mode, which you set under Image > Mode > 8 Bits/Channel. It also requires the RGB color mode. In addition, your graphics card must support the filter. Finally, in the Preferences under Performance, you enable the checkmark for Use Graphics Processor. Under the advanced settings, Use OpenCL must also be checked.

Step 10: Opening the Filter and Using the Preview
Once you have met all the requirements, open the filter again. It immediately shows you a small preview of the effect. This way you can see what the result looks like even before applying it, and you can adjust the settings before confirming with OK.

Step 11: Adjusting Stylization and Cleanliness
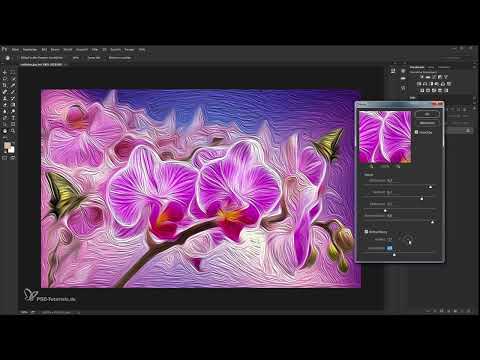
With the Stylization slider, you set the strength of the painting effect. The further you drag to the right, the stronger the effect becomes. The Cleanliness slider determines the type of brush strokes. If you drag it to the left, small strokes are created. To the right, the strokes become longer. With orchids, the oil paint effect looks especially beautiful.

Step 12: Adjusting Scale, Bristle Detail, and Shine Intensity
The Scale influences the size of the paint application and shows you more or less detail. With the Bristle Detail slider, you control how strongly the bristle marks between the strokes are visible. Dragging left removes them almost completely, dragging right intensifies them. The Shine Intensity creates a gloss that quickly tips into the metallic and makes the image look relief-like. Therefore, apply the shine carefully.

Step 13: Setting the Lighting Direction Correctly
The lighting is the prerequisite for Scale and Bristle Detail to have any effect at all. If the lighting is turned off, only Stylization and Cleanliness remain active. Therefore, set the lighting, usually from the top left or top right. If you then reduce the Shine Intensity a bit, you can also set the Bristle Detail and the Scale cleanly.

Step 14: Applying the Filter as a Smart Object
A particularly practical method is to convert the layer into a Smart Object beforehand. Then you open the filter and adjust the values. The effect remains editable. Later, you can turn it on and off via the Oil Paint entry in the Layers panel, or reopen and correct it with a double-click.

Part 3: Opening SVG Files in Photoshop
Step 15: Opening an SVG File and Understanding the Rasterize Dialog
SVG stands for Scalable Vector Graphics. These are vector-based files that many browsers can display and that can be scaled infinitely. Previously, you had to open them in Illustrator. Now you can open or place them directly in Photoshop. However, a dialog appears when opening, because Photoshop cannot process the pure SVG file as a vector graphic. The file must therefore be rasterized.

Step 16: Set size, resolution, and mode in the dialog
In the dialog, you set the width and height, that is, the size at which the file is rasterized. You also specify the resolution in pixels per inch or centimeter, as well as the mode, such as RGB Color, Grayscale, CMYK, or Lab. The Anti-aliased option smooths edges. The proportions are preserved if you leave the chain icon active. Then confirm with OK. Depending on the file size, rasterizing may take a while.
Step 17: Check the rasterized file at pixel level
Once the file is open, the display under Document Dimensions shows you the size in pixels, for example 5779 pixels. If you zoom in far enough, you can see the individual pixels. This shows that the paths have not been preserved. A file opened this way therefore cannot be enlarged at will without becoming blurry.

Step 18: Place the SVG file as a vector graphic
If you want to keep the vector quality, you place the file instead of opening it. To do this, choose the option Place Embedded or Place Linked when placing. You drag the file into the document and confirm with the Enter key. The file then lands in the document as a Smart Object, which you can scale as large as you like without jagged edges or blurriness.

Step 19: Edit the embedded Smart Object in Illustrator
Double-clicking the embedded Smart Object opens the file in Illustrator. There you can continue editing the graphic. If you save the changes in Illustrator, the Smart Object in Photoshop updates automatically. This way you can conveniently switch back and forth between both programs.

Step 20: Work with SVG files without Illustrator
If you don't have Illustrator installed, you can still open SVG files in Photoshop. However, the file must then be rasterized and thereby loses its vector properties. Therefore, plan this step deliberately before you use the graphic for large outputs.

Summary ??? Mastering Photoshop Diffusion: Retouching, Oil Paint, and SVG
You have learned how to control the transitions of your retouching with the new Diffusion. Low values are suited to fine details and hard edges, high values to soft image areas. You will find the Oil Paint filter again under Stylize filters, and with the right prerequisites such as 8-bit mode, RGB, and an enabled graphics processor, it can be applied cleanly. Finally, you can open SVG files or place them as a Smart Object to take advantage of their scalability. With these three new features, you noticeably expand your tools in Photoshop CC 2015.1.
FAQ
What does the Diffusion option do in retouching tools?It determines how soft or hard the transition is between the retouched area and its surroundings.
Which tools offer Diffusion?The Spot Healing Brush, the Healing Brush, and the Patch tool. With the Patch tool, it only appears in Normal mode.
Which value should I choose for fine details?A low value, such as 1. This keeps skin pores and hard structures cleanly preserved.
Why is the Oil Paint filter grayed out for me?Possible causes are a mode other than 8-bit, a color mode other than RGB, missing graphics processor support, or OpenCL being disabled in the advanced settings.
Where do I find the Oil Paint filter in Photoshop?Under Filter > Stylize > Oil Paint.
Why does an SVG file have to be rasterized when opening?Photoshop cannot process the pure SVG file as a vector graphic. That is why it is converted to pixels when opened.
How does an SVG file stay scalable?You place it as an embedded Smart Object instead of opening it.

