

Adobe has expanded Photoshop in the July update with several features that can noticeably make your daily work easier. The focus is on the new Selection Brush, which combines particularly well with Generative Fill. In addition, there is an improved bullet and numbering function in the Type tool as well as a revamped contextual taskbar for shapes. Finally, there is a look at an AI feature that will probably appear in a future version.
The video is only loaded from YouTube when you play it – data (including your IP address) is then transmitted to YouTube/Google. More in the privacy policy
In this tutorial, I will guide you step by step through all the new features. You will learn where to find the Selection Brush, how to configure it, and how to change colors and objects with just a few clicks. Afterwards, I will show you how to work with bullet lists in the Type tool and how to edit shapes.
Key Takeaways
The Selection Brush complements the Lasso and can be quickly adjusted via the toolbar. With it, you create selections with a brushstroke, which you can use directly for adjustment layers or Generative Fill. In the Type tool, you create bullet lists and numbered lists with a few settings in the Properties panel. The contextual taskbar for shapes offers you stroke, color, and stroke type directly on the object. The outlook shows an AI feature with which you can move objects and automatically adapt the surroundings.
Step-by-Step Guide
Step 1: Finding the Selection Brush
The Selection Brush is new in the toolbar and is usually located right next to the Lasso tools. If you don't see it immediately, click on the small icon with the three dots that shows the hidden tools of a group. There you will find it together with the other selection tools.

Step 2: Customizing the Toolbar to Your Needs
If you want to use the Selection Brush more often, it is worth taking a look at the toolbar. Via the "Window" menu and the "Customize Toolbar" item, you can access all available tools. Drag the Selection Brush to the position that suits you best, for example directly under the Lasso. That way, you will have it at hand with one click next time.

Step 3: Setting the Mode and Brush Settings
By default, the Selection Brush is set to "Add" with an opacity of 100 percent. Below that, you can set the brush size and hardness. Soft brushes are suitable for smooth transitions, hard ones for precise edges. Choose the settings the way you need them for your subject before you start painting.

Step 4: Quickly Changing Brush Size and Hardness
You don't have to switch to the menu every time. Hold down the Alt key and drag with the right mouse button. If you move the mouse to the left or right, you change the size of the brush. Moving up or down makes the brush edge softer or harder. This method speeds up your work enormously, especially with subjects that have details of different sizes.

Step 5: Creating a Selection and Using It as an Adjustment Layer
Now paint over the desired object, for example a lemon. The selection is created directly as you paint. Afterwards, you can specify in the Properties or the contextual bar whether you want to use the selection for a new adjustment layer. For example, choose "Hue/Saturation" to recolor the object. Drag the sliders for hue, saturation, and brightness until the result fits. With this method, you replace the lemon with a lime without changing the rest of the scene.

Step 6: Combining Generative Fill with the Selection Brush
The Selection Brush is also excellent for Generative Fill. Mark the object you want to change, and add to the selection with further strokes if necessary. Then enter in the input field what should appear in that spot. Make sure to choose the selection generously enough so that the AI has enough room to work with.

Step 7: Create the desired object with text prompts
In the example, you replace the lemon with an orange. To do this, enter the word "Orange" in the Generative Fill field. The result can vary: the color alone often produces only a hue, while the word "orange" combined with a description like "orange for eating" delivers more realistic suggestions. Try out several variants and choose the one that best fits your scene.

Step 8: Precisely recolor hair with the Selection Brush
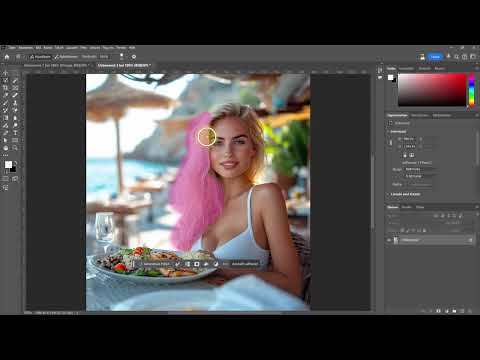
The tool is also well suited for hair. Choose the Selection Brush with a relatively soft brush and paint roughly over the hair. Reduce the brush size for details at the edge. Afterwards, you can use the selection for an adjustment layer as before or generate a new hair color, such as blue, using Generative Fill. Especially with the first selection, spots are often missing that you should add afterwards.

Step 9: Refine the results
Not every result is perfect right away. In the example, a white stripe remains visible at the edge. To fix this, create a new selection over the affected area and run Generative Fill over it without any input. The AI then removes the stripe and adjusts the surroundings. This is how you transform a blonde into a figure with blue hair without laboriously working with the lasso.

Step 10: Create bulleted lists in the Text tool
The second major innovation concerns the Text tool. Select it and drag out a text area. In the Properties panel, further down, you will find the options for bulleted and numbered lists. Activate the desired list type and type in your points. With the Enter key, you automatically create the next point. For existing texts, first select all paragraphs and then click the corresponding icon.

Step 11: Customize bullets and numbering
You can choose the bullet characters freely, for example a dash, a circle, or a square. For numbered lists, in addition to numbers, letters and Roman numerals are also available. This selection is practical for outlines, checklists, or step-by-step instructions like this one.
Step 12: Edit shapes via the Contextual Task Bar
Create a new document and draw an ellipse. Now the Contextual Task Bar appears directly at the object. There you can change the stroke color, adjust the stroke weight, or set the stroke type. This saves the trip to the Properties panel, even though not every setting is available there. A look at the top menu therefore remains worthwhile.

Step 13: Understand the preview of the future AI feature
To conclude, the video shows a feature that may appear in a future Photoshop version. You move an object, such as a palm tree, and the AI automatically adjusts reflections, shadows, and the surroundings. Transparent areas that arise when moving are also filled. The speaker suspects that this feature could be presented at Adobe MAX in October. However, there is no official confirmation of this yet.

Step 14: Evaluate the results of the preview feature
The examples in the video show how impressive the results are. An orange that is moved to the front blends visually into the scene. When lifting the lion's head, the AI generates the missing areas. Only in a few spots do small errors remain visible. Keep an eye on this feature, as it could considerably simplify the editing of complex scenes.

Summary ??? Mastering the Photoshop Selection Brush: Overview of the New July Features
With the Selection Brush, you create precise selections with a brushstroke and use them for adjustment layers or Generative Fill. The Text tool now offers you bulleted and numbered lists in various forms. The Contextual Task Bar makes editing shapes directly on the object easier. The announced AI feature for moving objects with automatic adjustment of the surroundings remains exciting, but is not yet officially available. Try out the tools on your own projects, and you will quickly notice how much time you can save with them.
FAQ
Where do I find the Selection Brush in Photoshop?You can find it in the toolbar with the Lasso tools, which you can open via the dot icon.
Can I add the Selection Brush to my toolbar?Yes, via Window and "Customize Toolbar" you drag it to the desired position.
How do I change the brush size quickly?Hold down the Alt key and drag left or right with the right mouse button.
Can adjustment layers also be created with the Selection Brush?Yes, after painting the selection you can directly create an adjustment layer such as Hue/Saturation.
Does the Selection Brush also work with Generative Fill?Yes, you mark the area and then specify in the input field what should appear in that spot.
How do I create a bulleted list in the Text tool?Drag out a text area, select the bulleted list in the Properties panel, and type in your points.
Can I also use letters for numbered lists?Yes, in addition to numbers, letters and Roman numerals are also available to you.
Where do I find the stroke options for shapes?The contextual taskbar right at the object offers stroke color, stroke width, and stroke type.
Is the AI function for moving objects already available?No, according to the video it is a preview of a possible future feature; it has not yet been officially confirmed.

