
Imagine you had to cut out the sky of a rendering by hand. That easily takes an hour, and the result still looks messy. With the channels that Cinema 4D delivers along with the render, you can do the same task in a few seconds. In this tutorial, I'll show you how to find alpha and object channels in Photoshop's Channels palette, how to select individual image elements precisely, and why you absolutely have to be careful when transforming.
The video is only loaded from YouTube when you play it – data (including your IP address) is then transmitted to YouTube/Google. More in the privacy policy
Key Takeaways
The alpha channel is a black-and-white image that controls visibility. White areas can be selected, black ones cannot.
Object channels cleanly separate individual elements from one another. You don't have to laboriously mask with tools; you simply load the appropriate channel as a selection.
Channels can be found faster via the view than via the name. Showing the channel immediately tells you which element it contains.
Channels are not automatically scaled along when transforming. If you distort the entire image, you have to transform all channels separately, otherwise they are unusable.
Step 1: Finding the Channels in Photoshop
The alpha channel and the object channels are not located with the layers, but in the Channels palette. Switch to the "Channels" tab there. You will see the alpha channel as the first entry, and below it the individual object channels that Cinema 4D generated during export. The alpha channel is particularly important because you can use it to cut out the entire scenery.

Step 2: Loading the Alpha Channel as a Selection
Now it's time for the actual cutout. The alpha channel is a black-and-white image. Everything black is not activated, everything white can be selected. Hold down the Ctrl key and click on the thumbnail of the alpha channel. Photoshop then loads all white areas as a selection.
Afterwards, return to the Layers palette and select the layer with the rendering. Now all elements that are white in the alpha channel are selected.
Step 3: Selecting and Removing the Sky
Since you want to remove the sky, you have to invert the selection. To do this, press Ctrl + Shift + I so that Photoshop inverts the selection. The selection lines, the so-called marching ants, now run around the sky. With the Delete key, you delete the selected sky.

It may seem at first as if nothing happened. That's because the original image is still visible. Hide it, and you'll see the result. Then you deselect with Ctrl + D.
The advantage of this method is enormous. If you had to do the same cutout by hand with paths or brushes, you would need many times as much time. With the alpha channel, it was a fraction of that. This applies especially to 3D elements, where the edges are otherwise difficult to hit cleanly.

Step 4: Using Individual Object Channels Selectively
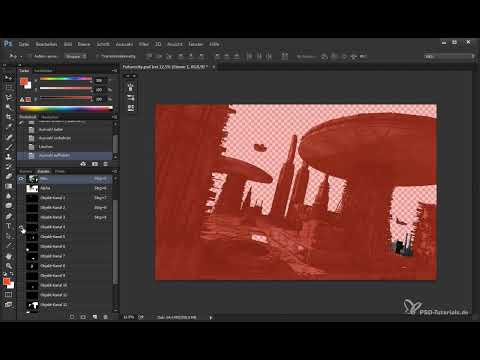
Besides the alpha channel, the Channels palette contains the object channels. Clicking on the name of an object channel is not always sufficient here, because the names are often not unambiguous. A better way is to show the channel's eye. The channel then appears overlaid in red. The red area is what is not selected. The places without a red overlay are the elements you can select with this channel.

This way you can, for example, selectively select the spaceships, the power plant, the mushrooms, or foreground elements. Especially if you want to place atmosphere between elements to separate them from one another, this is enormously helpful. You don't have to mark everything by hand; you simply load the right channel.

Step 5: Cleaning Up Empty Channels
You will probably discover empty, black channels in the palette. They arise when a render instance that was not exported along with the rest was selected in Cinema 4D. The elements are then simply located in other channels. You can delete such empty channels so that the palette stays more organized.
Make sure you pick the right entry. If you delete the layer, the entire image disappears. Instead, select the object channel, right-click, and choose "Delete Channel". Alternatively, you can simply drag the channel onto the trash can icon.
Step 6: Adjusting the Image Format
An important note concerns the format. The rendering here has a 16:10 aspect ratio. If you want a cinematic image, you may need 16:9 or even the cinema format 2.35:1. Squeezing the image is only possible to a limited extent. If you want the image to be wider, you should ideally set this in Cinema 4D in the render options.
I recommend creating a new file that is 6000 pixels wide and 3375 pixels high. This corresponds to 16:9. Then drag the rendering into this new document. Hold down the Shift key while doing so, so the image is placed centered. Reduce the opacity of the layer so you can see how the proportions fit together.

Step 7: Transforming All Layers
Now select all layers by holding down the Shift key and clicking the layers. Then activate Transform mode with Ctrl + T. Drag the image at a corner while holding down the Shift and Alt keys simultaneously. This scales proportionally from the center. The guides help you work precisely. Confirm the transformation with Enter.

You will notice that Photoshop calculates for a moment. This is normal with large amounts of data.
Step 8: The Most Important Point – Transforming the Channels
Here comes the crucial point. When you transform the entire image, the layers are correctly carried along, but the channels are not. The alpha channel and the object channels remain at the old size and are therefore no longer usable. This is the trap you can easily fall into, and it can be very frustrating.

The solution: Transform the channels separately. To do this, first hide the layers and select all channels while holding the Shift key. Unfortunately, the channels cannot all be selected at once with Shift-click; you have to click each channel individually. Then go to Transform via the Edit menu. The shortcut Ctrl + T works here as well. Now transform the channels in exactly the same way as the image.

Afterwards, hide the channels again. The channels are now freshly transformed and fit the image again. This way you can continue working without losing the selections you laboriously created.
Step 9: Creating the Cinema Look with Black Bars
Finally, you can give the image a cinema look. To do this, drag the white layer in at the bottom and fill it with black. This creates the typical black bars at the top and bottom. If they are too thin for you, simply enlarge the canvas with the "Canvas Size" command and fill the new area with black again. Try out the size until you like it.

By the way, I use this step early in the process. This way you can see the final result before the image is finished and can better judge the mood. The fine details such as lights come later. At the beginning, the atmosphere is what matters most.
Summary – Using Alpha Channels and Object Channels from Cinema 4D in Photoshop
The channels from Cinema 4D are a powerful tool that saves you a lot of work in Photoshop. With the alpha channel, you remove backgrounds in seconds, and with the object channels, you select individual elements precisely. When transforming, be sure to edit the channels separately from the layers, otherwise you will lose your selections. If you master these steps, you will save a lot of time in future projects.
FAQ
What is the difference between an alpha channel and an object channel?The alpha channel controls the visibility of the entire image, while each object channel contains a single element from the scene.
Why does my channel become unusable after transforming?When scaling the image, Photoshop transforms the layers but not the channels. You therefore have to select the channels separately and transform them as well.
How do I load a channel as a selection?Hold down the Ctrl key and click on the thumbnail of the channel in the Channels panel.
How do I remove empty channels?Select the channel, right-click, and choose "Delete Channel". Make sure not to delete the layer.
How do I create a cinema look with black bars?Fill a lower layer with black and, if necessary, enlarge the canvas to adjust the bars.


