
A long exposure taken during the day often looks flat, cool and cluttered in its raw state. This is exactly where this tutorial comes in. You will learn step by step how to turn a blue-tinted shot of a row of houses and calm water into a reduced, almost abstract image. The editing takes place entirely in Lightroom, and you only need a few minutes once you have the basics down.
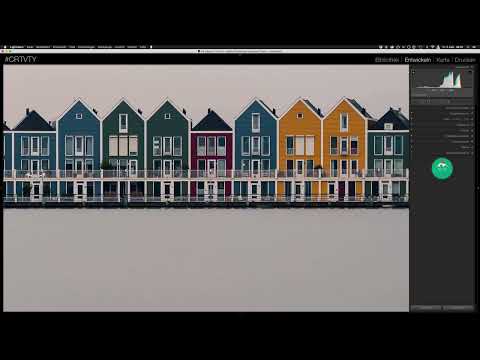
The video is only loaded from YouTube when you play it – data (including your IP address) is then transmitted to YouTube/Google. More in the privacy policy
Important to note beforehand: The results depend heavily on whether you shot in RAW format. Only then do you have enough headroom for white balance, tonal values and color corrections without the image losing quality.
Key Takeaways
The key takeaways at a glance:
- Lens correction should always come first, so that all further steps build on a clean foundation.
- White balance is set with the eyedropper on a neutral area. The value should be as equal as possible across all three percentage figures.
- You set the white and black points while holding down the Alt key. This way you immediately see where details are lost.
- With the tone curve and the HSL panel, you control contrast and individual colors in a targeted way.
- Sharpening with masking sharpens only the edges of the subject, not the calm water or the sky.
- Linear and radial filters direct the viewer's gaze specifically to the houses.
- A white vignette quickly looks artificial in this subject and draws attention to the edges.
Step-by-Step Guide
Step 1: Lens Correction as the Foundation
Open your image in the Develop module. I almost always start with the lens correction, because it automatically compensates for typical distortions and flaws of the lens. To do this, activate the two checkboxes for profile correction and removal of chromatic aberration. Lightroom usually recognizes the camera and lens on its own. If that doesn't work, you adjust distortion and vignetting manually. With this subject the difference is modest, since the 70-200 mm lens distorts very little. Even so, afterwards you know for sure that all lens flaws have been eliminated.

Step 2: Straighten the Horizon and Adjust the Format
Switch to the Crop module. Level water is the foundation for a calm image. To do this, click on the angle icon; a spirit level opens. While holding down the left mouse button, draw a line along the water's edge and release. Lightroom rotates the image slightly and straightens it.
Then you change the aspect ratio to 16:9. This makes the image more dynamic and cuts off part of the unnecessarily large area of water in the foreground. Make sure that enough water still remains at the front, because it is precisely this calm area that gives the image its abstract effect.


Step 3: Correct the White Balance with the Eyedropper
In the original, the white balance is clearly too blue. Select the eyedropper in the Basic panel. Ideally, you look for a neutral area where the three percentage values below the color field are as equal as possible. With this subject you will hardly find a perfectly neutral point, and the areas that should actually be white are not. That is why you click on the window shutters. They are not completely neutral, but they should look bright and white in the finished image. After one click, the white balance shifts clearly in a neutral direction. You can continue working with that.


Step 4: Set the White and Black Points
The histogram in this image sits very much in the middle, so the contrast can still increase significantly. Hold down the Alt key and drag the Whites slider to the right until the first white areas flash up on the image at the top. The display shows you where highlights are blowing out. The value here is roughly 80. Do the same with the Blacks slider, but into the negative range, until the first spots turn black.
The image then looks more dramatic right away, possibly too much so. In that case you can pull the white point back a little so that the image doesn't become too bright. Values around 20 for Clarity or Contrast have proven useful as fine-tuning.

Step 5: Fine-tuning Saturation and Contrast
Saturation is particularly important in this shot because the houses are the actual subject of the image. I set it to about 35 here. If you don't set the contrast correctly right away, you can fine-tune it later using the tone curve. The curve gives you more control than the simple contrast slider.

Step 6: Controlling Tonal Values with the Tone Curve
In the tone curve, you will find parametric sliders for four tonal ranges: shadows, dark midtones, light midtones, and highlights. Pull the shadows down so the dark areas become stronger. Raise the light midtones slightly. Lower the highlights slightly so that nothing gets blown out. This creates more contrast, but in a more sensitive way than with the coarse contrast slider.

Step 7: Adjusting Individual Colors in the HSL Panel
In the HSL panel, you modify individual hues in a targeted way. The luminance slider is particularly interesting here. The red houses initially look too dark, so you increase the red luminance significantly. For yellow, a smaller increase is enough. You should only change blue carefully, because otherwise the sky becomes too bright. Magenta can safely stay bright so that the houses get more color. Green hardly plays a role here.
A tip: With the small icon at the top left in the HSL sliders, you activate the targeted adjustment tool. If you move it over the image, you can see which slider affects which area of the image. The facade looks green at first glance, but consists mainly of blue.

Step 8: Split Toning for Warm Highlights and Cool Shadows
With split toning, you create atmospheric color effects. For the highlights, you choose a warm, medium hue from the presets and set the saturation to about 15 to 22. For the shadows, you take a very light blue tone with a saturation of around 10 to 20. The result is a warm light on the houses and a slightly cool overall tone that supports the sky. In the before and after comparison, the difference is clear.

Step 9: Sharpening with Masking
Set the sharpening amount to about 100 and leave the other values unchanged for now. The masking is crucial. Hold down the Alt key while dragging the masking slider. Then you will see the areas that will be sharpened in white and those that remain untouched in black. Drag the slider until only the houses are white. The water and the sky then remain untouched. When zooming in, you will see crisp sharpness with fewer image artifacts.

Step 10: Use a Vignette Deliberately or Leave It Out
Under the effects, you will find the vignette and dehaze. For this image, I would do without a vignette, because the edges are bright anyway. A vignette added afterwards would therefore quickly look artificial. You should generally avoid a white vignette, because bright edges draw the eye away from the subject. If you want to darken, it is better to use a dark vignette, but make sure the effect is subtle.

Step 11: Remove Distracting Elements with the Healing Brush
In the image, the shadow of the wind power plant is distracting. Select the healing brush and make sure it is set to Heal. Adjust the size of the brush by moving the mouse up or down while holding the button. Choose a brush that roughly fits the spot and click on it. Lightroom automatically finds a suitable source area. If necessary, you repeat the process at another spot until the wheel in the background has disappeared.

Step 12: Setting Light Accents with Linear and Radial Filters
With a linear filter, you direct the eye away from the foreground. Drag the gradient from bottom to top and make the front area a little darker, but only slightly. You also reduce the sharpness so that the foreground looks softer. A slight red tint at the bottom edge makes for a more pleasant look. You should keep the transitions subtle so that they do not look artificial.

Next, you place a radial filter over the row of houses. Drag it out narrow and wide so that it captures only the houses. Don't increase the exposure too much with this filter. Instead, use the Highlights slider, as it more precisely affects only the areas that are already bright. There you can also apply clarity, sharpness, and saturation to the houses only. The effect is subtle, but it brings the houses forward noticeably more.

Step 13: Check the result and final touches
Finally, compare your result with the original. You will see how a flat shot with a blue cast has turned into a punchy, minimalist image. Editing in Lightroom doesn't take long, but it brings out that last bit of quality.

Summary ??? Daytime shot in Lightroom: From blue cast to minimalist work of art
You have seen how a long exposure taken during the day becomes a reduced image with a clear workflow in Lightroom. Start with the lens correction and straighten the image. Then set the white balance, define the white and black points, and fine-tune contrast and tonal values. With the HSL panel, split toning, and sharpening with masking, you gain control over colors and details. Finally, you set light accents with linear and radial filters and remove distracting elements with the healing brush. Remember to shoot in RAW format, because only there can such corrections be made without loss of quality.
FAQ
Question: Why should I shoot in RAW format?Answer: In RAW format, significantly more image information is retained, so you can correct white balance, tonal values, and colors without visible loss of quality.
Question: Why do I start with the lens correction?Answer: It removes distortions and lens flaws, so that all following editing steps build on a clean foundation.
Question: How do I find a neutral point for the white balance?Answer: Use the eyedropper and click on an area where the three percentage values are as equal as possible. If there is no perfectly neutral point, choose an area that should appear white in the image.
Question: What is the Alt key used for with the white and black points?Answer: While you hold down the Alt key, Lightroom shows where highlights are blown out or shadows turn completely black.
Question: Why should sharpening be masked?Answer: Masking ensures that only the edges of the subjects are sharpened. Busy areas such as water or sky therefore stay clean.
Question: Why do I skip a vignette for this subject?Answer: The bright edges would make a vignette added afterward look artificial very quickly, and bright edges draw the eye away from the subject.
Question: When is the healing brush suitable?Answer: It is suitable for distracting elements such as power lines, shadows, or objects that Lightroom can automatically replace based on surrounding image areas.
Question: What effect do linear and radial filters have?Answer: They direct the eye specifically to an area of the image by darkening foregrounds or by selectively brightening and emphasizing subjects such as the row of houses.


