
Imagine your portrait suddenly looking striking, expressive, and almost cinematic. You can achieve exactly this result with a black-and-white look that puts the personality of the person portrayed front and center. In this tutorial, I will guide you through the complete workflow in Lightroom that turns a RAW file into a rugged character portrait. One principle applies here: the person should shine, not the editing. Every step is therefore deliberately restrained, and you will see how often very little is enough.
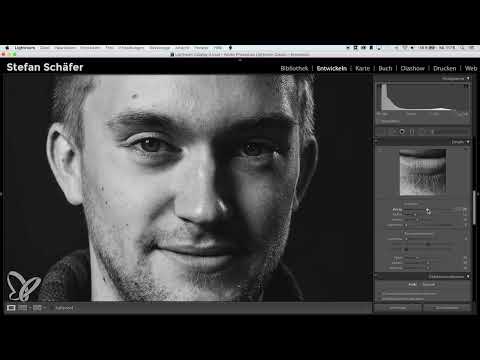
The video is only loaded from YouTube when you play it – data (including your IP address) is then transmitted to YouTube/Google. More in the privacy policy
Key Takeaways
- Camera calibration with the "Camera Monochrome" profile often delivers more contrast than the simple black-and-white switch.
- You should set shadows, highlights, white point, and black point by feel rather than by technical perfection. A face must not blow out.
- Clarity is the most important tool for a rugged look, but it should be used in moderation.
- With the tone curve, you can create a matte look by raising the black values and slightly darkening the white values.
- The radial filter brightens the eyes in a targeted way. If you overdo it, the result quickly looks unnatural.
Step 1: Black-and-white conversion via camera calibration
The first step concerns the conversion to black and white. In Lightroom, you have several options: In the Basic panel, you can click directly on "Black & White". Alternatively, you can remove the saturation from all color channels in the HSL panel. The third way is the most convincing. Open the camera calibration and select the "Camera Monochrome" profile there. The image is converted to black and white and gets noticeably more contrast than with the other variants. Feel free to compare the results yourself before you commit.

Step 2: Balancing shadows and highlights
In the next step, you bring the tonal values into a balanced form. The shadows in the face look too harsh in the initial state. Therefore, drag the shadows slider to the right, to a value of around +60. This lifts the dark areas, and the face gets more detail. Then you lower the highlights slightly, for example to about -15. This combination ensures that the bright areas don't blow out, without making the image look flat.

Step 3: Setting the white point and black point
Now you define the endpoints of the tonal range. You shouldn't set the white point to the brightest spot at 100 percent white. Otherwise, the skin quickly blows out and loses its texture. A value of around +25 is a good starting point for many portraits, which you adjust by eye. You can first pull the black point slightly into the negative, for example to -5. This gives the image depth. Aligning with the visual impression of the image is more important here than any technical guideline.
Step 4: Using clarity for the rugged look
Clarity is the tool that gives your portrait character. It strengthens edges and structures, such as stubble, wrinkles, or the contours of the face. Therefore, pull the slider up noticeably, for example to about +40. When zooming in, pay attention to whether areas of skin look coarse or grainy. If so, reduce the value a little again. For a rugged portrait of a man, however, you can be a bit bolder than with soft portraits.

Step 5: Readjusting the shadows and raising the black point
On closer inspection, you notice that the shadows in the face are still too dark after applying clarity. Therefore, lift the shadows a bit further. You can also move the black point from negative values into the positive range, for example to +10. As a result, the black no longer looks like a deep hole but gets a pleasantly velvety feel. Afterwards, feel free to step out of the detail view once more and look at the overall picture.

Step 6: Fine-tuning exposure and contrast
Now it's about the overall brightness. Increase the exposure only minimally, by about +0.3 stops. More would usually be too much. In addition, you can increase the contrast a little until the image clearly gains presence. Afterwards, keep checking the skin areas so that they don't blow out. A portrait thrives on nuances, and each slider should only make a small step.

Step 7: Create a matte look with the tone curve
The tone curve is perfect for giving your image a distinctive look. For a slightly matte effect, you raise the black point of the curve a little and lower the white point slightly. This makes the darkest tones grayer, and the image looks like an analog print photograph. To do this, carefully grab the curve at the ends and move it only a little. If you don't yet feel confident with the tone curve, it's worth watching a detailed tutorial on this topic on the instructor's YouTube channel, which explains the tool in even more detail.

Step 8: Emphasize midtones selectively
To build additional contrast, you set points in the tone curve deliberately. A point in the shadow area pulls the dark tones down a bit, while a point in the highlights lifts the bright tones. This pulls the tonal values further apart, and the image gains dynamics. Don't overdo it, because even small shifts have a strong effect. In the end, the portrait should look powerful, but not harsh.

Step 9: Apply sharpening and lens corrections
Even if your photo is already sharp, targeted sharpening is worthwhile. In the Details panel, you use an Amount of 80 as the default value. While holding down the Alt key, you display the mask and adjust it so that only the important edges are emphasized, for example the contours of the face and the eyes. The skin areas, on the other hand, should remain as smooth as possible. For lens corrections, you generally don't need to apply the profile correction. The correction of chromatic aberration, on the other hand, you can activate by default, since it has hardly any downsides.

Step 10: Add vignette and dehaze
A subtle vignette draws the eye to the face. In the Effects panel, you pull the vignette slider to a value around -20. This slightly darkens the corners of the image without creating an unnatural frame. Additionally, you can increase the Dehaze slider a little. This brings even more contrast into the image and supports the rugged character you want to achieve with your portrait.

Step 11: Crop the photo to a square
Square images are particularly well suited for portraits and profile pictures, for example for social media platforms. To do this, switch to the Crop tool and select the 1:1 aspect ratio from the menu. Since the ratio is fixed, you can simply grab the corners of the crop and adjust the framing to your liking. You don't need the Shift key for this. Make sure the head isn't awkwardly cut off. A zoom can enhance the effect, but shouldn't be too tight. Then confirm the crop with "Done".

Step 12: Brighten the eyes with the radial filter
The eyes are the focal point of a portrait. To brighten them selectively, you use the radial filter. Draw an oval shape over one eye and make sure it fits the eye well. The feather should be set to 100 percent so that the transition remains invisible. Then increase the exposure only minimally, by about 0.3 stops. With a right-click, you duplicate the mask and drag it onto the second eye. Don't overdo it, because too strong a shine quickly looks unnatural. A small catchlight is usually completely sufficient.

Step 13: Compare before and after
Finally, a comparison with the original image is worthwhile. In comparison, the raw file usually looks flat and colorless, while the edited portrait has gained contrast, texture, and expression. This effect is especially strong with rugged male portraits. Not every photo is suited to this editing, so it's worth experimenting with your own shots. Try out clarity, the tone curve, and the eye editing until you have found the look that suits your subject.

Summary ??? Black-and-white character portrait in Lightroom: Step-by-step guide
You have seen how to turn a RAW file into a gritty black-and-white character portrait in Lightroom. The workflow begins with camera calibration, moves through the tonal values and clarity to the tone curve, and ends with sharpening, cropping, and selectively brightening the eyes. Keep reminding yourself that the person should be the focus. If you use the sliders sparingly, your portrait will stay natural and expressive.
FAQ
What is the best way to convert a color photo to black and white in Lightroom?The best way is through camera calibration with the "Camera Monochrome" profile, as it delivers more contrast than the simple black-and-white switch.
How much clarity makes sense for a portrait of a man?A value of around +40 is a good starting point, but it should always be checked against the skin texture so that no coarse grain appears.
Why shouldn't the white point be set to 100 percent white?At a value of 100 percent white, the skin quickly blows out and loses texture and detail.
What is the Alt key used for when sharpening?With the Alt key held down, the mask is displayed so that you can see which areas are being sharpened and which are not.
How much should I brighten the eyes with the radial filter?An exposure increase of about 0.3 stops is usually enough, as otherwise an unnatural shine appears.


