

You can find gray concrete walls almost everywhere: on office buildings, parking garages, backyards or train stations. Many photographers overlook them, yet their neutral, calm surface and clear structure can be used excellently for business portraits. In this tutorial, I'll show you how to turn a sober environment into a likeable, professional portrait with a flash, simple posing tips and a few tricks.
The video is only loaded from YouTube when you play it – data (including your IP address) is then transmitted to YouTube/Google. More in the privacy policy
Key Takeaways
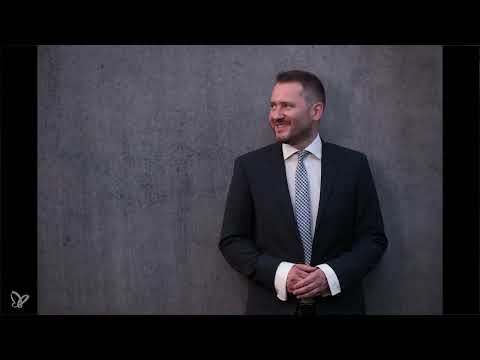
A second, more relaxed photo is a sensible complement to the formal portrait. The concrete wall serves as a neutral background. With the flash as fill light, you remove harsh shadows under the nose and chin. Autofocus is switched off when the position is fixed, so you can concentrate on the person's expression. As for clothing: no tie, top button open, smooth out the shirt. And if you want to extend the background later, take an empty shot.
Step-by-Step Guide
Step 1: Plan the second photo as a deliberate contrast
After you have taken the formal photo, a second round with relaxed rules is worthwhile. The idea behind it: you show the person as more open and approachable. Possible adjustments include an open jacket-buttons variant, omitting the tie, or a posture that arises from the situation. Decide spontaneously what suits your model.

Step 2: Place the gray wall as the background
Position the person in front of the concrete wall so that the surface lies calm and even behind them. The wall looks neutral and doesn't distract from the face. Make sure that no disturbing elements such as signs or edges appear directly at the head. After that, you can experiment with body posture and light.

Step 3: Check the available light
Before you add light, analyze the starting situation. Look at the light meter and assess the ambient light. In this example, the ISO value was 400, and the light was already usable. It would have been enough to use the available light. Nevertheless, fill light is worthwhile if you want a friendlier result.

Step 4: Use the flash to add targeted fill light
Deliberately use the flash as fill light, not as the main light. Keep it at low power and place it a bit lower so that the light falls into the eyes and softly fills the shadows under the nose and chin. The main light in this setup comes from the sun, which is behind the subject. The flash direction should therefore match the natural light direction, so that both light sources support each other rather than interfere with each other.

Step 5: Compare the result with the first photo
Look at the shots directly side by side. In the first photo, the eyes look darker and the shadows on the face are more pronounced. With the fill light, the image looks noticeably friendlier, and the subject no longer appears so stern. This comparison shows you how much a small impulse of light can change the mood.

Step 6: Align the camera and take a test shot
Before you start the shoot, check the camera's alignment and take a test shot. Check the framing, sharpness and exposure on the display. Only when everything is right do you continue. A test shot saves you a lot of correction work later.

Step 7: Deliberately switch off the autofocus
With a fixed position and a subject that doesn't move from the spot, you can deactivate the autofocus. You then don't have to refocus with every shutter release, and that saves time. On some cameras, the autofocus can also be assigned to a separate button on the back. This way you keep control while you communicate with the model.

Step 8: Working with the model and steering the mood
A good portrait comes about above all through communication. Give clear instructions on head position, hands, and shoulders. For example: the hands are brought together in a relaxed way in front of the body, and the head stays straight. Keep the conversation casual, because a relaxed facial expression is more convincing than a staged pose. Small conversation topics such as a beer garden or an after-work beer noticeably loosen up the atmosphere.

Step 9: Removing the tie and straightening the collar
For the casual look, you take off the tie and open the top shirt button. Make sure the collar lies neatly. Quickly pull the shirt straight so that nothing looks messy. An important note: casual business looks don't mean that everything looks careless. Tie off, top button open, otherwise everything stays tidy.

Step 10: Hiding the sleeves and correcting posture
Push the sleeves back a little or hide them discreetly so that they don't look distracting. Ask the person to pull their stomach in slightly and not to push their chest out too much. An upright but relaxed posture looks confident. Afterwards, check whether the shirt fits smoothly and shows no wrinkles on the body.

Step 11: Adjusting settings when the light fades
After some time, the ambient light often gets darker. In this case, increase the ISO value so that you maintain the desired exposure. Then check the result again. You should also regularly check whether all shots were triggered successfully, because not every shot works out on the first try.

Step 12: Capturing natural moments
The best photos often come about between the planned poses. When a genuine smile appears because the person is laughing at a joke, shoot immediately. Feel free to zoom in a bit closer to check the facial expression, and then decide which shots you want to keep using.

Step 13: Taking an empty shot for the background
If you want to extend the background later, take an empty shot without the person. With solid-color or black-and-white backgrounds, extending is unproblematic. With patterns or textures, it makes sense to photograph the surface in one piece so that you can insert parts cleanly later.

Step 14: Reviewing the results on the computer
Transfer the shots to your computer and compare them at your leisure. Sort the photos by expression, sharpness, and lighting mood. Often it only becomes apparent on the large screen which shot is truly convincing.

Summary ??? Business portraits in front of a gray concrete wall: Casual photo with fill flash
With a gray concrete wall, you gain a calm, neutral background for business portraits. The flash gently fills in shadows without overpowering the existing light. Manual focus saves time, and good communication with the model ensures a relaxed demeanor. Casual clothing such as omitting the tie adds variety to your portfolio, and an empty shot gives you flexibility later during editing.
FAQ
Why should I take a second, more casual photo?A second photo shows the person in a more approachable light and is suitable for social network profiles or private purposes.
Is a gray concrete wall suitable for portraits?Yes, an even gray surface looks neutral and calm and doesn't distract from the face.
Do I always need a flash for a business portrait?No, with enough daylight the available light is often sufficient. However, a flash works well for filling in shadows.
Why should I turn off autofocus?With a fixed position and a subject that hardly moves, manual focus prevents repeated refocusing and saves time.
How do I bring out a natural facial expression in the model?Hold casual conversations during the shoot and also take photos between the planned poses when genuine reactions arise.
What is an empty shot and what is it used for?An empty shot is a photo of the background without a person. It helps you extend the background later if needed.

