

Under trees, light often falls on the face harshly, in patches, and is hard to control. This is exactly where off-camera flash helps, because you bring in the light you are missing and shape it so that both subject and surroundings look convincing. In this tutorial, you follow a forest shoot from choosing the background and the camera settings through to fine-tuning posture and expression. You will learn how natural light and flash work together, how aperture, ISO, and shutter speed relate to each other, and why even one meter of distance noticeably changes the image.
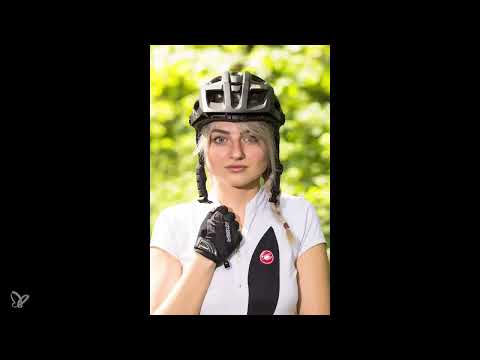
The video is only loaded from YouTube when you play it – data (including your IP address) is then transmitted to YouTube/Google. More in the privacy policy
Key Takeaways
- Choose the background deliberately. Darker areas emphasize the subject, while bright patches of light create atmosphere but must not look busy.
- Shoot without flash first to understand the existing lighting situation.
- The aperture controls background blur: at f/2.8 the surroundings become soft, while at f/5.6 more of the environment remains recognizable.
- A long focal length (135 mm) compresses the background, while a short focal length (35 mm) includes more of the surroundings in the image.
- The speedlight stands slightly to the side of the camera at head height and works in manual mode with reduced power, so that it fills in light without looking artificial.
- Posture, clothing, and details such as loose strands of hair determine whether the portrait looks believable.
Step-by-Step Guide
Step 1: Choose the Location and Background
Before you raise the camera, take your time looking around the location. In the video, different backgrounds are compared: darker areas that will later separate the subject, and brighter spots that give the image room to breathe. Pay particular attention to leaves lit by the sun. They look nice in the background, but if poorly positioned they can quickly look like blotches. So choose a place where the surroundings and the subject harmonize.

Step 2: Start with the Available Light
First, shoot without flash and with only the natural light. This way you can see where the sun hits the face and body and where harsh contrasts arise. Place your subject slightly in front of the background so that they do not merge directly with the patches of light. In the video, it quickly becomes clear that the sun only reaches the lower parts, which looks unbalanced without fill light.

Step 3: Optimize Your Position
Your position often matters more than any setting. Move your subject and yourself step by step until the face is evenly lit. In the example, moving just one meter further back is enough for the person to step into a shaded area. Always check the result on the display as you do this, because the sun moves, and a position that works right now may no longer fit after a few minutes.

Step 4: Roughly Set Up the Camera
Start with an aperture of f/5.6. This lets you directly compare the differences to other aperture values later. At a shutter speed of 1/125 second and ISO 200, the image in the shade is still too dark. So raise the ISO to about 800 and shorten the shutter speed slightly. The reason: at a 135 mm focal length, camera shake is more noticeable, so the shutter time should stay as short as possible. The 135 mm focal length also provides pleasant compression of the background and good separation of the subject.

Step 5: Prepare and Position the Flash
If the light is still unbalanced despite a suitable position, the flash helps. First, put the transmitter on the camera's hot shoe. It sends the trigger signal by radio to the speedlight. Then take the flash off the shoe and place it slightly to the side of the camera, at about head height. This position ensures that the light falls on the face from the front and side, and the shadows turn out soft and barely distracting. The goal is nearly shadow-free, natural-looking light.

Step 6: Set the Flash Power Manually
Set the flash to manual mode. The initial power in the video is too high; the image looks too bright and flat. So go down two stops to quarter power. Since the result is still too strong, reduce it further to one-eighth power. At the same time, lower the ISO to 400 so that the exposure of the ambient light and the flash match well. Start with low power and increase it only if needed. This keeps the flash light subtle and the background retains its mood.

Step 7: Posture and Posing
Posture determines whether the subject looks confident or tense. In the example, the person should stand in a sporty stance, with their weight distributed evenly on both legs. The shoulders are slightly lowered, the hands are placed on the hips, with the thumbs pointing backward. A second hand stays relaxed at the body or is raised slightly. Also pay attention to the chin: It should sit slightly higher so that the neck looks elongated. Keep the mouth closed, as this looks calmer and more relaxed.

Step 8: Adjusting Clothing, Helmet, and Hair
Small details make the difference between a snapshot and a portrait. Pull the shirt straight down so that it sits neatly. The helmet should sit straight on the head and, if necessary, be pulled down a bit lower so that it doesn't look too high. The chin strap can also stay open, which looks more natural. Pull individual strands of hair out at the sides so that they become visible and give the portrait liveliness. Always ask yourself whether the subject looks as if they had come straight from a tour. Then the scene works.

Step 9: Staging Exhaustion Convincingly
If the subject is supposed to look like they've just come off a strenuous ride, they can certainly look a little worn out. In the video, a water sprayer is used for this to lightly moisten the face and hair. Ask your subject beforehand to keep their eyes closed and their mouth shut. Spray carefully and not too much, so that the hairstyle doesn't get completely soaked. Afterwards, go through the scene once more, because water quickly shines and can reflect more strongly with the flash. Therefore, check whether the light reflections on the skin look pleasant.

Step 10: Deliberately Comparing Aperture and ISO
Now the influence of the aperture becomes apparent. At aperture 5.6 and ISO 400, a lot of the surroundings remain recognizable. If you open up to aperture 4, you halve the ISO to 200, since the exposure would otherwise be too bright. If you go further to aperture 2.8, you reduce the ISO to 100. The principle behind this: Each aperture stop lets through twice as much light, so you need correspondingly less ISO to keep the exposure constant. At aperture 2.8, the background becomes noticeably softer, and the subject stands out strongly.

Step 11: Including the Surroundings with a Short Focal Length
If you want to show more of the surroundings, you switch to a shorter focal length, in the example to 35 mm. The aperture stays at 2.8. Now you can recognize the path in the background and the forest as part of the story. The person can move a bit further back so that they fill the surroundings. Make sure that the subject nevertheless remains the main focal point and the background doesn't overwhelm it. The short focal length demands more deliberate image composition, but in return offers more room for composition.

Step 12: Fine-Tuning the Half-Length Portrait
Finally, you take care of the last details. The helmet is set minimally lower, the hand moves deliberately downward, and the gaze goes sideways to the hand or in another direction. The thumbs point backward again, and the shoulders are corrected once more. Ask the model to take a step back, because in the example a single meter is enough to change the framing significantly. This creates a half-length portrait that shows both the subject and the forest surroundings.

Summary ??? Portrait with Off-Camera Flash in the Forest
A successful forest portrait arises from the interplay of several factors. First you choose a suitable background and test the natural light before using the off-camera flash as fill light. You reduce the flash power manually until the result looks subtle. You determine aperture, ISO, and focal length deliberately, depending on whether the surroundings in the image should dominate or recede. Finally, pay attention to posture, clothing, and small details, because they make the portrait authentic. If you combine these steps, you gain control over light and image impact, even under difficult conditions.
FAQ
Why should I shoot without flash first?This way you see how the natural light falls on the face and body and where harsh contrasts occur. From this you deduce how strongly the flash needs to act as fill light.
How do I place the flash correctly?The flash stands slightly to the side of the camera at about helmet height. This way the light falls softly from the front and side onto the subject, and shadows stay minimal.
Why do I reduce the ISO when I open the aperture?A wider open aperture lets more light onto the sensor. To keep the exposure the same, you reduce the ISO accordingly, usually by one stop per aperture step.
When do I choose a long focal length, and when a short one?A long focal length such as 135 mm is suited to isolated portraits with a compressed background. A short focal length such as 35 mm includes more of the surroundings and additionally tells something about the location.
How do I prevent the flash from looking artificial?Set the flash power low in manual mode and increase it only when necessary. A subtle fill usually looks more natural than a flash that is too strong.
Why should I be careful with water on the face?Water shines and can strongly reflect the flash light. Therefore, spray sparingly and check the result so that no unattractive light spots appear.

