
A good portrait often looks strong even before editing, but small details like dark circles under the eyes or flat color rendering distract the eye. This is exactly where this tutorial comes in. You will learn how to change only the areas in Snapseed that really need it, instead of simply putting a filter over the entire image.
The video is only loaded from YouTube when you play it – data (including your IP address) is then transmitted to YouTube/Google. More in the privacy policy
Key Takeaways
Key Takeaways
- Before editing, plan which corrections you want to make, and then work on them in a targeted way.
- The Healing tool is not suitable for every subject. If the result looks unnatural, it's better to leave it out.
- The Selective tool allows you to adjust brightness and saturation in a freely placeable area, such as in the eye sockets.
- The "Face" tool offers eye clarity and skin smoothing. Apply both carefully so that the portrait stays natural.
- Fine-tuning with brightness, contrast, and warmth shapes the overall image before you add a look.
Step 1: Analyze the Original Image and Set Goals
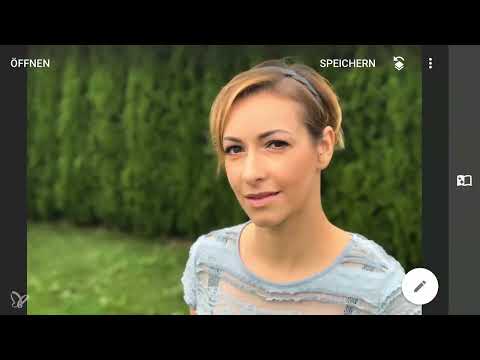
Before you touch anything in Snapseed, take a calm look at the image. The portrait shows a woman in a garden with a dark, blurred background that draws attention to the face. You should keep exactly this visual effect. Then note down three points you want to improve: the dark eye sockets, the lack of sparkle in the eyes, and the somewhat rough skin. After that comes a coherent overall look, which you add at the end. This order prevents you from getting lost in details.

Step 2: Test the Healing Tool and Deliberately Discard It
You could first try to remove the dark circles under the eyes with the Healing tool. To do this, open the tool, zoom in on the area, and run your finger over it. In the before-and-after view, however, it quickly becomes clear that Snapseed only fills this area automatically. You cannot select a source, as the Clone Stamp in Photoshop allows. In this case the result looks artificial. So it's best to undo the step if you experience the same thing. It is not a mistake to try out a method and discard it again.

Step 3: Brighten the Eye Sockets with the Selective Tool
The better way is through the Selective tool. Select it and use the plus icon to place a control point directly in the eye socket. With two fingers, you adjust the size of the marked area. The red-colored area shows you exactly where your correction takes effect. Make sure that this area does not extend beyond the eye socket. Then you activate the Brightness option and move the slider slightly to the right with your thumb. In this example, a value of about 15 to 17 is enough, because too much brightening would make the gaze look unnatural.

Step 4: Adjust Saturation in the Eye Sockets
In the same control point, you can now increase the saturation. To do this, swipe down until saturation is selected, and drag the value to about 30. The area then no longer looks gray and pale. The difference is subtle, but clearly visible when compared with the original image. Especially with portraits, the rule is: better small steps that you hardly notice in the end than big changes that stand out.

Step 5: Evenly Match the Left Eye
You repeat the correction on the other eye. Place a new control point, adjust the size with two fingers, and slightly increase the brightness as well as the saturation. The difference between the two eye sockets should not be noticeable. If you look at both sides directly in the before-and-after comparison, you will quickly see whether the areas match harmoniously. Then confirm the changes.

Step 6: Add Eye Clarity with the "Face" Tool
Now you turn to the face. In the tool menu, open the "Face" section and initially skip the default presets. Instead, select the settings so you can define the corrections yourself. There you will find the options Face Brightening, Skin Smoothing, and Eye Clarity. Zoom in on the eyes and activate Eye Clarity. Carefully move the slider to the right. A value around 35 looks coherent in this case, because the eyes gain liveliness without shining artificially.

Step 7: Check face brightening and dose the skin smoothing
It's best to try out face brightening before you decide on it. In this example it isn't necessary, because the face was already well lit when the photo was taken. Therefore, leave the option switched off. Skin smoothing, on the other hand, is a worthwhile step. First drag the slider too far to the right, and the skin quickly looks like porcelain. So go back to a moderate value of around 30. Small skin blemishes disappear, and the neck area also looks more even. With naturalness in mind, the skin thus stays pleasantly textured.

Step 8: Basic settings for a balanced overall image
Then you leave the face tool and switch to the basic settings, the fine-tuning. Here you check brightness, contrast, saturation, ambiance, highlights and warmth. In this example, the brightness of the overall image is already appropriate. The ambiance function would quickly make the image look like HDR, so you skip it. However, slightly darkening the background can help put the focus on the face. You increase the warmth subtly, to about plus 10. This gives the image a more pleasant, natural tone.

Step 9: Choose a vintage look
Now it's about the look. Open the presets and choose the Vintage category. Scroll through the different variants and feel free to compare them at your leisure. Some presets look too dark, others suit the mood of the garden better. In the end, decide on the preset that best supports the atmosphere of the image. In this example, variant number 3 is the most convincing. Leave the intensity as it is for now, and adjust it only in the next step.

Step 10: Remove the vignette and readjust the contrast
The chosen preset comes with a vignette, that is, a dark edge that frames the image. Since it is distracting here, you first remove it completely. You can, however, pull the effect strength of the look further up if the style still seems too timid. Afterwards, the image often lacks contrast. Open the fine-tuning and increase the contrast. A value of around 15 brings a lot of depth into the image without making it look harsh. You will be surprised how much the overall impression improves.

Step 11: Use the Glamour Glow effect in moderation
The Glamour Glow effect is added as the last style layer. It makes the image softer and gives it a golden shimmer. With some presets the strength of the glow looks very intense, so you should reduce it first and then gradually increase it again until the effect looks pleasant. In this example, you set a value of about 30. This makes the background a little softer still, which doesn't matter in this case, since the focus is on the person. The face gets a warm, golden glow.

Step 12: Check the contrast again and place the vignette deliberately
The Glamour Glow effect can weaken the contrast again somewhat. Therefore, check the fine-tuning again and increase the contrast slightly. The face may become a bit brighter in the process, which you can accept, as this also makes the dark circles under the eyes stand out visually a little less. Then apply a new vignette. Position it centrally on the person's head, scale it with two fingers and darken the background a little in a targeted way. Afterwards, confirm all adjustments with OK.

Step 13: Compare before and after and save
Finally, you compare the result with the original. To do so, tap the before-after icon and look at both versions side by side. Pay attention to the eyes, skin, colors and background. If everything looks coherent, you save the image. You can also export it in various sizes, for example for social media or printing. Your editing is now complete, and the portrait looks lively, warm and yet natural.

Summary ??? Selectively Editing a Portrait in the Garden with Snapseed: Step by Step
You have seen that a good portrait in Snapseed is not created by a single filter. The path leads through targeted corrections: First you check the original image and discard tools that look unnatural. Then you brighten the eye sockets with the Selective tool and apply eye sparkle as well as a measured amount of skin smoothing. The fine-tuning brings contrast, warmth, and balance into the image, before you set the final look with the Vintage preset, Glamour Glow, and vignette. Pay attention to naturalness at every step, and your portrait will look harmonious in the end.
FAQ
Question: Can I use the Healing tool in Snapseed for dark circles under the eyes?Answer: It's possible, but the tool fills areas automatically and cannot be controlled precisely. With fine structures, the result quickly looks unnatural, so it's worth testing with the Selective tool.
Question: What exactly does the Selective tool do?Answer: It changes brightness, saturation, contrast, or warmth only in an area that you define with a control point. The area marked in red shows you where the correction takes effect.
Question: How strongly should I set the skin smoothing?Answer: A moderate value around 30 is usually a good starting point. If the smoothing is too strong, the skin quickly looks artificial, so you should check the effect in the before-and-after comparison.
Question: Do I always have to use the face brightening?Answer: No. If the face was already well lit when photographing, you can leave it out. Decide based on how the image looks.
Question: Why should I remove or adjust the vignette?Answer: Presets often come with a vignette that doesn't suit every subject. You can remove it or apply it selectively to the face later so that the viewer's gaze is drawn to the person.
Question: How do I compare my edit with the original?Answer: Use the before-and-after view in Snapseed. This way you can quickly see whether your changes look natural or exaggerated.


