
A phone photo often only becomes convincing when you deliberately edit it after shooting. With street style subjects, the pixel count matters less than the right moment, the right brightness, and a clearly defined crop. In this tutorial, you will follow the editing process in Lightroom mobile step by step: from choosing the subject through the black-and-white look to cropping and transferring the settings to other images.
The video is only loaded from YouTube when you play it – data (including your IP address) is then transmitted to YouTube/Google. More in the privacy policy
Key Takeaways
- In moving scenes, choose the moment when the people are mid-stride, not the moment with awkward postures.
- Deliberately used blur, such as with a passing cyclist, can give a subject dynamism.
- Control brightness via exposure, highlights, and shadows before reaching for contrast or effects.
- The clarity slider and subtle sharpening give details more character.
- With "Copy Settings" and "Paste Settings," you transfer an edit to other images in a series.
- Flipping and cropping change the composition, so that visual flow and overall impact are deliberately controlled.
Step 1: Choosing the right moment for the subject
Before you even start editing, it is worth taking a look at the shots themselves. In the example, the photos were taken in burst mode, so many variants were produced. The choice fell on the image in which the people are seen mid-stride, because this moment conveys movement. Make sure the figures do not look stiff or indecisive, but tell a story, for example heading down a path.

Step 2: Recognizing blur as a creative tool
Not every blurry image belongs in the trash. In the example, a cyclist races through the frame while the asphalt and details remain razor sharp. It is precisely this combination that creates speed. You should therefore deliberately keep such shots and check whether the motion blur makes the subject stronger.

Step 3: Preparing the black-and-white look and brightness
The subject was already photographed in black and white. Color would have been rather distracting here, since the eye should focus on the brightness information. Open the image in Lightroom mobile and work exclusively with the brightness sliders. A later split toning is possible, but not strictly necessary for this look.

Step 4: Adjusting the exposure
If you do not like the overall brightness, you correct it first with the "Exposure" slider. If the image is too bright, you pull the slider to the left; if it is too dark, to the right. In the example, the basic brightness already fits well, so only a slight fine-tuning is necessary.

Step 5: Resetting a slider with a double tap
If you have moved a slider and want to bring it back to its original value, you do not have to laboriously search for the zero position. Simply tap twice on the slider's circle. The value immediately jumps back to zero. This saves a lot of time, especially on the small display.

Step 6: Brightening highlights selectively
Next, you work with the "Highlights" slider. In the example, the area where the people walk at the top is particularly interesting. If this area becomes a bit brighter, an effective contrast to the darker areas is created. Be careful not to raise the highlights too far, so that no details are lost.

Step 7: Darkening shadows
With the "Shadows" slider, you determine how much detail is retained in the dark areas. In the example, the shadows are reduced, so that a rich black appears on the right, a medium gray in the middle, and light tones on the left. This distribution of brightness levels gives the image structure. You can leave out the contrast slider in this case, since highlights and shadows already achieve the desired effect.

Step 8: Add a Subtle Touch with Sharpening
In the example, the image is already quite sharp. Still, you can use sharpening to add a subtle emphasis. A radius of about 0.5 to 1 is usually enough to slightly highlight contours without making the image look artificial. When zooming in, make sure that no distracting edges appear.

Step 9: Use Clarity for More Tension
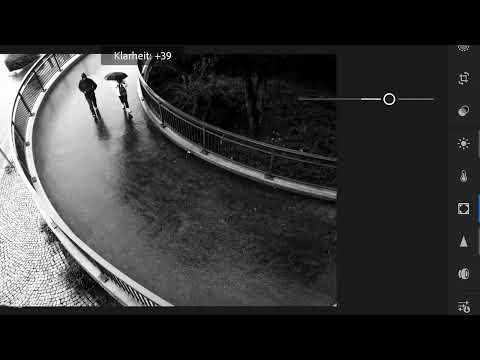
In the "Effects" section, you will find the "Clarity" slider. A slight pull to the right enhances the micro-contrast and makes surfaces and textures appear more three-dimensional. In the example, this makes the image look more exciting. Apply the effect carefully, because too much clarity can quickly look harsh.

Step 10: Skip the Vignette
A vignette is tempting, but it can quickly ruin the mood of an image. In the example, there is already a lot of black at the top right, a nice gray in the middle, and bright white elsewhere. Additional darkening at the edges would overlay these gradations. Therefore, leave the effect out if the brightness distribution is already harmonious.

Step 11: Copy Settings and Apply Them to Other Images
Once you are satisfied with the result, you don't have to make the corrections again for every image. Tap the three dots and choose "Copy Settings". Lightroom mobile then asks which areas should be applied, such as exposure, sharpness, or effects. Select the appropriate options, open the second image, and tap "Paste Settings". This gives the series a consistent edit.

Step 12: Fine-Tune the Exposure Individually
A copied edit is a good starting point, but not necessarily the final result. In the example, the second image looks slightly brighter, probably because the light or the camera settings changed slightly. Therefore, adjust the exposure in the "Brightness" section in a targeted way. Not every image in a series has to look exactly the same, unless you want to achieve strict uniformity.

Step 13: Flip the Image to Change the Visual Flow
In the example, the composition of the original image is not quite satisfying yet. Therefore, the image is flipped so that the walking direction of the people has a different effect. You can find the flip function in the crop tool. Try out both versions and decide which one tells the story of the subject best.

Step 14: Crop the Image Section
With the crop tool, you can change the image section without losing resolution, as long as you don't reduce the image size significantly. In the example, the lower left corner is chosen. Make sure that the railing begins at exactly the right spot and that the person is centered in the image. Then confirm the crop with the checkmark.

Step 15: Deliberately Evaluate the Composition
After cropping, it is worth taking a close look at the new composition. In our culture, the eye usually moves from left to right and follows a path from dark to light. In the example, the person walks upward, and this curve leads the eye to the right into the bright area. Check whether your composition follows this progression and gives the viewer a clear direction.

Step 16: Fine-Tune the Third Crop
The third subject also benefits from a small crop. In the example, the section is slightly reduced and the position changed so that the person is in the center of the image. In the end, a series of three subjects emerges that shows different perspectives and compositions but belongs together through a consistent edit.

Summary ??? Editing and Cropping Street Style Photos with Lightroom mobile
You have seen how a cohesive series of images emerges from a set of similar phone photos. First choose the right moment and accept blurriness as well if it brings the subject to life. Adjust the brightness using exposure, highlights, and shadows, add clarity and sharpening subtly, and avoid effects that disturb the mood. By copying and pasting settings, you save time, and with flipping and cropping you control the visual flow. This way you get the most out of every smartphone photo.
FAQ
How do I quickly reset a slider in Lightroom mobile?Double-tapping the circle of the slider immediately sets the value back to zero.
When is a blurry image worthwhile?Blur can emphasize movement if the rest of the subject stays sharp, such as with a passing cyclist.
How do I transfer an edit to other photos?Tap the three dots, select "Copy settings", open the target image, and tap "Paste settings".
Should I always use exactly the same settings for series photos?No, small differences in exposure are normal. Only if strict uniformity is desired should all values remain identical.
Why should I avoid a vignette?A vignette can overlay existing brightness gradations and quickly destroy the mood of an image.


