
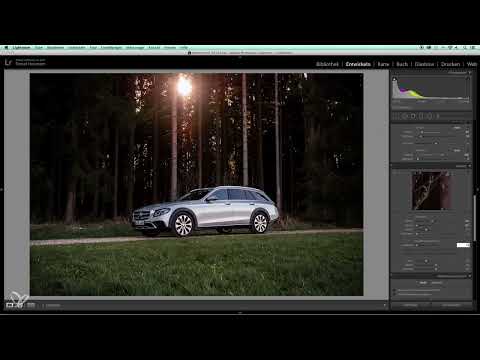
A car, a forest path and the low evening sun are often enough to get an atmospheric picture. You don't have to assemble a series of several shots for it. In this part 2.9 of your series on automotive photography, I'll show you how to develop a single raw file in Lightroom so that it looks natural and still looks like evening. The focus is on a warm color mood and cleanly applied contrasts. The video lasts just under four and a half minutes, and most of the steps can be done with a few clicks.
The video is only loaded from YouTube when you play it – data (including your IP address) is then transmitted to YouTube/Google. More in the privacy policy
Key Takeaways
- A single handheld shot can be enough for a strong image if the light is right.
- A color temperature of around 7000 Kelvin gives the image the desired warm, evening feel.
- With highlights and shadows, you control how dark the forest looks and how much shine remains on the paint.
- The tone curve with strong contrast and clarity create depth without overdoing the image.
- With color mixing and saturation, you specifically determine green and orange tones as well as the color mood in highlights and shadows.
- A development can be transferred to other images with synchronization, but afterwards you have to readjust locally.
Step-by-Step Guide
Step 1: Understanding the Starting Image
Before you move any sliders in Lightroom, you should know what your image can deliver. In the video, the shots were taken directly handheld. A single shot is enough here because you no longer have to calculate out reflections and differences in light across several exposures. What matters is that the subject is well lit and the sun appears in the image as a warm accent.

Step 2: Selecting the Right Shot
From several photos of the same location, you choose the one that best captures the evening light. In the example, these are a front three-quarter view and a view from behind. Make sure the sun is visible in the forest, because exactly this light shapes the look later on.

Step 3: Setting the Color Temperature to About 7000 Kelvin
With the color temperature slider, you bring the desired warmth into the image. In the video, the value is set to about 7000. This makes the light look like evening without the image looking yellow or artificial. Keep an eye on how the car's paint changes, because it also reacts to the color shift.

Step 4: Lowering Exposure and Increasing Contrast
First, you take the exposure back a little so that the mood appears darker and more focused. Then you increase the contrast slightly. This gives the image structure without losing details. You don't need to overdo it here; a moderate value is enough.

Step 5: Reducing the Highlights for the Paint
The car's paint is still too bright. That's why you lower the highlights slider. In the video, you end up at about minus 60. This tones down the specular highlights, and the bodywork loses its distracting glare without looking flat.

Step 6: Adjusting Shadows and Black Point for a Gloomy Forest
Now it's about the forest in the background. You only lower the shadows slightly so that the forest looks gloomy but remains recognizable. Then you pull the black point down. This makes the dark areas denser, and the car stands out as a brighter accent. Make sure you don't lose too much detail in the shadows.

Step 7: Using Clarity and Saturation Carefully
You should be restrained with clarity. With cars, too much clarity quickly looks harsh and unnatural. You reduce the saturation slightly so that the image doesn't become garish. A subtle reduction is enough to keep the look calm and high-quality.

Step 8: Create strong contrast with the tone curve
The tone curve is the right tool when you want to shape contrast in a targeted way. In the video, Florian uses a clearly pronounced S-curve. This makes bright areas brighter and dark areas darker. The forest now looks much gloomier, but you can still tell that they are trees. Look at the result before you apply the curve.

Step 9: Shift the greens toward yellow
With color mixing, you can edit individual color ranges. In the green range, you shift the hue slightly toward yellow. This way, the forest blends better with the warm evening light. Then you reduce the saturation of the greens a little so that the green doesn't look too intense.

Step 10: Selectively enhance the orange of the light
The light that falls into the forest from above should get more presence. To do this, you increase the saturation in the orange range of the color mixing. Pay attention to the balance: the effect should emphasize the light, but not bathe the entire image in orange.

Step 11: Tint highlights orange and add nuance to shadows with blue
An additional trick is the targeted coloring of image areas. In the highlights, you increase the orange component; in the shadows, you add a small touch of blue. The result is a contrast in color temperature that creates depth and makes the image look more three-dimensional. This step is very subtle, so you should adjust it in small increments.

Step 12: Balance sharpening and noise reduction
When sharpening, you reduce the radius a little so that fine edges stay crisp without textures being overdone. The shot was taken at ISO 400. Therefore, you slightly increase the luminance in the noise reduction. The image then looks softer and calmer without losing important details.

Step 13: Re-crop the image
With the crop tool, you correct the image framing. In the video, the image is cropped slightly at the top and also trimmed a little at the bottom. The car is placed in the lower right third and looks into the frame in the direction of travel. This composition looks dynamic and draws the eye to the vehicle.

Step 14: Transfer the edit to other images
If you like the look, you can synchronize the settings. To do this, you select the edit and transfer it to the second image. This takes just a few seconds and saves a lot of time. However, the look never fits exactly, because the light differs in other locations.

Step 15: Make local adjustments to the second image
On the second image, you need to make improvements. In the video, Florian selectively brightens the shadows so that the car is more recognizable. The crop is also adjusted once more. Local corrections give you control over individual areas of the image without having to change the global edit.

Step 16: Use the before-and-after comparison
Finally, you compare the original with the edited image. The before-and-after view immediately shows you how much those few clicks achieved. Then you decide whether the look is coherent. Remember that there are no fixed rules. Your own taste determines how warm, high-contrast, or dark the result ends up being.

Summary ??? Warm evening mood in Lightroom: step by step to a natural Raw edit
With a single handheld shot and a few targeted adjustments in Lightroom, you bring the evening mood into your automotive image. You set the color temperature to around 7000 Kelvin, deliberately lower exposure, highlights and shadows, and work on contrast with the tone curve, clarity and saturation. Through the color mixer you emphasize green and orange, and you refine the details with sharpening and noise reduction. Finally, you transfer the look via synchronization and make local corrections. Your personal taste has the final say.
FAQ
Do I always have to combine several shots for a good result?No, in the video Florian shows that a single handheld shot is completely sufficient if the light is right and you process it cleanly.
Which color temperature is suitable for an evening mood?In the video, around 7000 Kelvin serves as a guideline. However, you can adjust the value to your image at any time.
Why are the highlights reduced on the paintwork?The paintwork is often too bright in the original image. With a negative value for the highlights, you take away the overexposure from reflections and preserve the structure of the bodywork.
How strongly should I use clarity in car photos?Sparingly, because too much clarity quickly looks harsh and unnatural on vehicles.
Can I transfer my edit to other images?Yes, with synchronization you apply the settings in just a few clicks. Afterwards, however, you should readjust locally, because the light differs in other locations.
What do I do about image noise from ISO 400?You slightly increase the luminance in the noise reduction. This makes the image softer without losing too many details.
Do I have to adopt the look exactly like this?No, Florian explicitly emphasizes that there are no fixed rules and your own taste decides.


