
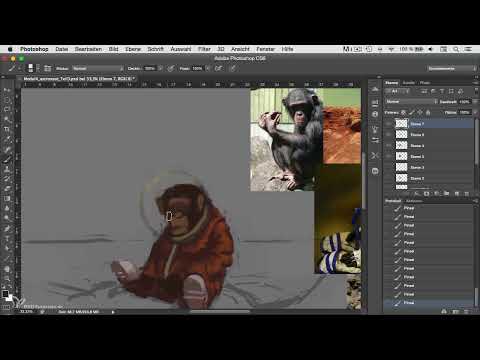
Your little astronaut has already passed the basic shape stage, and now the fine-tuning begins. In this section of character painting in Photoshop, you adjust the head posture, shoulders and arms, refine shapes and colors, and design a Mars landscape as the background. In doing so, you constantly switch between detail corrections and the overall impression. It is precisely this alternation that makes working on a character so exciting, because small changes often noticeably alter the effect of the entire image.
The video is only loaded from YouTube when you play it – data (including your IP address) is then transmitted to YouTube/Google. More in the privacy policy
Key Takeaways
- Reference photos help especially with hands, head and feet, because incorrect proportions quickly arise there.
- The suit is built up from dark to light. Several layers of decreasing size create a three-dimensional 3D effect.
- A more dynamic pose results from a slight head turn and relaxed shoulders, while you should keep the suit's realistic limits of movement in mind.
- A background looks coherent if you keep the colors desaturated and blend the horizon softly.
Loosening up the glass and black edges
Start with the hard black edges that you don't like in the image. Replace them with a lighter color and work in such a way that the glass of the helmet visor remains clearly recognizable. Make sure the glass is still visible in its shape, because you will have to keep painting behind it. Therefore, plan the layer structure here so that you can later return to the background behind the visor without any problems.


Adjusting the head posture with the reference
The head is the next point. Move the reference so that you can see it well, and use it as a guide. The astronaut should look slightly downward, as if he were watching the rover. This posture suits the situation much better than a straight line of sight.

With the pose, also keep in mind the limitations of the spacesuit. A stiff suit with a thick helmet does not allow extreme rotation. A 180-degree turn is therefore unrealistic. Deliberately keep the movement of the head small so that the figure looks believable.

Bringing dynamics into the pose
Now you bring movement into the image. Move the glass sphere slightly so that it doesn't collide unnaturally with the helmet. Turn the head far enough that it faces the viewer. The astronaut then doesn't just look in the direction in which he is sitting, but appears more alive. You adjust the dark area under the suit until the transition to the surroundings is coherent.

Next come the shoulders. Lower them a little so that the astronaut looks more relaxed. A small change is often enough to alter the entire body tension.

Building up the suit from dark to light
The suit is the largest area in the image and therefore needs special attention. Work your way from the dark areas to the light ones. Lay a layer of a slightly lighter color over the area and then place another, smaller layer on top of it. This build-up creates a three-dimensional impression without you having to work with extreme contrasts.


You should adapt the brightness to the light source. Since the sun shines directly on the astronaut, the suit must be quite bright overall.

Sleeves, shoes and hands
With the sleeve you can now refine the shape. It looks better if you make it a little wider in some places and narrower in others. Make sure the sleeve is clearly visible once you have made the shoe smaller.

For the hands, I clearly recommend taking a reference photo or looking for one. Hands are hard to draw and quickly turn out wrong. Taking your own photo only costs you a few minutes and improves the result enormously. You don't necessarily have to paint gloves. The hands can also be depicted bare if it fits the style. Decide here according to your taste.

Strap, Wrinkles and Shadows
The strap should be kept in a similar color to the ring. More important, however, is the shadow. A shadow has to be placed so that you can recognize a wrinkle and don't get the impression that the pattern is merely printed on. The shape should look like a real, three-dimensional body. So place the shadow deliberately in the recesses of the fabric.


Shaping the Belly and Transitions
At this point, the belly rests on the suit and has to look correspondingly curved, because the fabric encloses the body. A gentle gradient in the shadow ensures that the surface doesn't appear one-colored. Also make sure that the contours toward the arm don't blur. Otherwise it looks as if the belly belongs to the arm. Strengthen the contour and add a small shadow so that the shape stands out clearly.


Head, Ear and Face
The head requires a lot of sensitivity. If you make the face a little narrower and place the ear further back, the shape fits the helmet better. Depicting an ear directly on the glass is difficult. It is often enough to place it close to the pane and keep the contour clear. A slight parting on the helmet can also make the figure more believable.


Arm, Controller and Remote Control
The arm looks bent too sharply when the astronaut holds a controller. Stretch it out a little so that the hand position looks natural. This does create a somewhat round shape, but it fits well into the picture. Then you place the controller in the hand. It should shine silver and begin as a simple cuboid, to which you then add details such as the antenna and joysticks.


With the remote control, make sure that it is noticeably thick. A shadow on the suit helps to anchor the shape.
Designing the Martian Surface and Sky
Now it's time for the background. A greenish shimmering sky color works particularly well because it forms a nice contrast to the orange and red tones of the Martian surface. However, if you use a distinctly green color for the sand, it doesn't fit the mood. So approach the surface with somewhat more brownish tones and start with darker shades.


By the way, you can slide an additional layer under the surface so that the transitions remain uniform. Afterwards, remove any gray remnants that remained visible when painting over.


Blending the Horizon and Matching the Color Mood
A photo in the background quickly looks artificial, especially if no horizon is visible. Therefore, blend the horizon softly. For this, use an unsaturated yellow rather than a strong green, which would be too intrusive. A light tone makes the transition look calm and is reminiscent of the Martian atmosphere.


The head should stand out clearly against the sky so that it draws attention. Check whether a lower or higher horizon looks better. A lower position shows the figure more from below, which gives the astronaut more weight.


Placing Shadows in the Background
Draw the astronaut's shadow so that it depends on the light in the background. Since the sun shines on the figure from the front, the shadow falls mainly toward the back. This is not always visible in the image, but a believable shadow anchors the figure to the ground.


Matching Red and Orange
A strong red distracts from the suit and looks too bright. Instead, try a tone that leans more toward orange but is not as intense. It should look like earth or dust. The suit must always remain clearly set apart from the background.


Hills and Sand
The hills must look convincing. Add stones and small irregularities so that the sand or dust is easier to recognize. A beach photo or a similar reference helps you implement the grain and the color gradients more realistically.


In the next step, you brighten the entire image further and work on the final details. The rover remains an important reference point for the overall composition.

Summary ??? Painting an Astronaut in Photoshop: Refining Pose, Suit, and Mars Background
In this lesson, you refined the astronaut step by step. You adjusted the head position using a reference, made the pose more dynamic with a slight rotation, and built up the suit from dark to light. Hands, belt, and belly gain more depth through shadows and wrinkles. Finally, you completed the background with a Martian landscape, an unsaturated horizon, and matching shadows.
FAQ
How can I tell if the head rotation is realistic?You account for a realistic rotation by paying attention to the limitations of the spacesuit. A large helmet and a stiff suit allow only a slight rotation of the head.
Why should I paint the suit from dark to light?This way you can control the brightness layer by layer and create a plastic 3D effect without over-intensifying the colors.
Do I absolutely need a reference for the hands?A reference is very helpful because hands quickly look wrong. However, you can also work without a reference if you are satisfied with the result.
Which color is suitable for the Martian surface?A brownish or orange tint with darker starting colors works well. Strong colors, on the other hand, distract from the astronaut.
How do I blend a photo background without a visible edge?You blend the transition softly and choose an unsaturated color, for example a gentle yellow. This makes the horizon look more natural.


