

Before you create certificates for your OpenVPN server, you define in a single file who acts as the issuer. Country, city, organization, and email address will later appear in every certificate. If you enter this information properly once, you won't have to enter it again for every new certificate. This guide shows you how to adjust the variables with the nano editor.
The video is only loaded from YouTube when you play it – data (including your IP address) is then transmitted to YouTube/Google. More in the privacy policy
Key Takeaways
- The CA variables define the identity data that is carried over into all certificates.
- You change them in the
varsfile with the nano editor. Navigation with the arrow keys is easy. - Do not use umlauts or special characters, as they can cause problems during certificate creation.
- The default values for key size and validity period are sufficient for most installations.
- Save the file with Ctrl + O, confirm with Enter, and exit nano with Ctrl + X.
Step-by-Step Guide
Step 1: Why the CA Variables Matter in Advance
Every certificate you create for your VPN server or your clients contains information about the issuer. Without prepared values, you would have to answer the same questions for every certificate: which country you come from, which city, which organization is behind it, and which email address is responsible. The solution is to store this data once in the configuration file. This file is called vars and is typically located in the easy-rsa directory.

Step 2: Open the vars File with nano
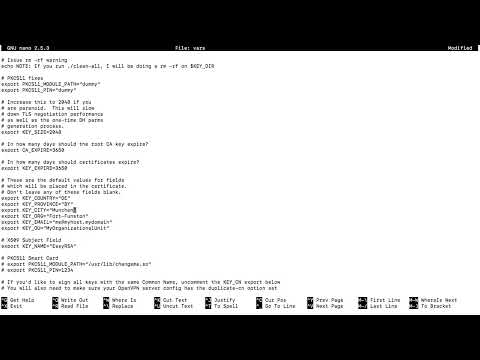
Nano is a simple text editor for Linux. If you are not yet familiar with Linux, don't let that put you off. You can also use vi or Vim, but nano is much more comfortable for beginners because you can see the commands directly at the bottom of the screen. Change to the directory containing the Easy-RSA files and then enter the command nano vars.
Step 3: Navigate to the Relevant Variables
After opening it, you will see a long file with many comments and settings. Move the cursor down with the arrow keys until you find the lines with KEY_COUNTRY and KEY_PROVINCE. These are the first places you adjust. Using the mouse doesn't work in nano, so the keyboard is the right way to go here.

Step 4: Enter Country and State
For KEY_COUNTRY, you enter the country code. For Germany, you use DE. For KEY_PROVINCE, you specify the federal state, for example Bayern. If you are unsure about the abbreviation, you can look up the country codes according to the ISO 3166 standard. For the federal state, you do not have to use an abbreviation; the full name is fine.
Step 5: Specify the City Without Umlauts
For KEY_CITY, you enter your city, for example München. Avoid umlauts such as ü, ö, or ä. They can cause errors when processed by scripts and programs. So write Muenchen instead of München. The same applies to all other text fields in this file.
Step 6: Define the Organization
In the KEY_ORG field, you enter the name of your organization. This can be a company, a club, or a private project. An entry like Musterfirma GmbH serves as an example here. Replace the placeholder with your own data so that the certificates can be clearly assigned.
Step 7: Store the Email Address
The KEY_EMAIL field holds the contact address for the certificate. Use an address here at which you can actually be reached. It is stored in the certificate and helps you later to trace the origin of a certificate.
Step 8: Adjust the Organizational Unit
The KEY_OU field stands for the organizational unit, such as a department or a project team. You can keep the value or change it individually. In the example, the designation Community is used. The only important thing is that you keep the entry consistent.
Step 9: Set the KEY_NAME
The variable KEY_NAME determines the name of the server key. In the example, you use Server. This name plays a central role, because it is reused in the following steps and in the server's configuration files. If you stick with a consistent name, you will only have to change little in the other files later.
Step 10: Check Additional Settings
In addition to the identity data, there are further parameters, such as KEY_SIZE for the key length and KEY_EXPIRE for the validity period. The file contains detailed comments on these. For a standard installation, the default settings are usually sufficient. The key length is already preset to 2048 bits, which is enough for most scenarios. If you want more security, you can increase the value, but note that this makes creating the certificates take somewhat longer.
Step 11: Save the File
Once you have entered all the information, press Ctrl + O to save the file. Nano will then ask you for the file name. Confirm the suggested name vars with Enter. A message then appears at the bottom of the window confirming that the lines have been written.
Step 12: Exit nano and Continue
With Ctrl + X you exit nano and return to the command line. This completes the configuration of the CA variables. The saved values will be used in the next step when you create the actual certificates.

Summary – Setting the OpenVPN CA Variables Correctly
You have opened the vars file and entered the details for country, state, city, organization, email address, organizational unit, and key name. You have also checked the key size and the other default settings. Do not use umlauts in the city or in any other fields, so that certificate creation runs smoothly. With Ctrl + O you save the file and with Ctrl + X you exit nano. In the next step, you will create the certificates on this basis.
FAQ
Do I have to change the values in the vars file?You can keep the default values, but then your certificates will contain placeholders. Your own entries are clearer and make later management easier.
Can I use umlauts in the city?This is not recommended. Umlauts can cause errors during processing. Instead, write for example Muenchen instead of München.
What happens if I change the KEY_NAME later?The key name is used in the server's other configuration files. Therefore, avoid changing it afterwards if possible, otherwise you will have to adjust the files.
Is nano the only editor for this task?No. You can also use vi or Vim. For beginners, however, nano is the easiest, since the most important commands are displayed at the bottom edge.
How do I exit nano without saving changes?Press Ctrl + X. When nano asks whether you want to save the changes, answer the question with N for No.
Which key size should I choose?The default value of 2048 bits is sufficient for most installations. A larger key size increases security, but lengthens the creation of the certificates.

