

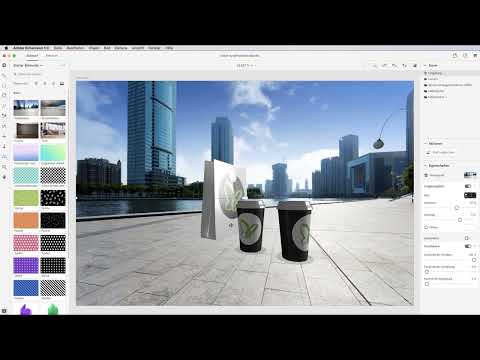
Imagine you are building a 3D scene with two coffee cups and a tote bag and then want to place it into a real street setting. Normally you would have to laboriously match light, shadows, and perspective by hand. This is exactly where this tutorial comes in. You will learn how to use gradients and photos as a background, how the "Match Image" tool automatically adapts light, sun, and camera perspective to a background image, and how to then refine the result in Photoshop.
The video is only loaded from YouTube when you play it – data (including your IP address) is then transmitted to YouTube/Google. More in the privacy policy
The guide is aimed at beginners who already know the basics of Adobe Dimension. You do not need any prior knowledge of Photoshop, but you should know how to move objects in the scene and import files.
Key Takeaways
- Backgrounds can come from gradients, your own images, PSD files, or Adobe Stock.
- Gradients can be edited directly in Photoshop and then updated in Dimension. This way you deliberately direct the focus to your product.
- The "Match Image" tool scales the canvas, transfers ambient light and sunlight from the image, and adjusts the camera perspective.
- With ambient light, sun intensity, cloud cover, and sun height, you can finely control the lighting mood afterward.
- In Photoshop, you can finish refining the look with smart filters, lens flares, and Camera Raw presets.
Step 1: Design the Background with Gradients
The easiest way into a scene is through the background. Open the Gradient panel. There you will find a classic horizontal gradient that can be applied to the scene right away. Often this is already enough if you want to direct attention entirely to a single object.

Step 2: Edit the Gradient in Photoshop
If you don't like the default gradient, click on the edit field. Dimension then opens the gradient directly in Photoshop. There you can freely set the color stops. One example is a soft gray at the top and a somewhat stronger gray at the bottom. This looks subtle and lets your product stand out cleanly.

Step 3: Save the Gradient and Apply It in Dimension
After you have created the gradient, save the file and close it. To do this, use the Command key on a Mac or Ctrl + W on Windows. Then switch back to Dimension. The gradient is automatically updated there and corresponds exactly to what you built in Photoshop.

Step 4: Import Your Own Images as a Background
Gradients are not the only option. Click on the background and select an image in the panel at the top. Via the Finder, you can also load a PSD file from Photoshop. The effect is much more realistic than with a simple color gradient. You can also drag and drop images onto the canvas or insert them via the Background panel.
Step 5: Use Backgrounds from Adobe Stock
If you don't have a suitable photo at hand, look in Adobe Stock. There you will find not only 3D models but also background images that fit your scene. The images can be integrated directly and combined with the materials from the starter kit.

Step 6: Open a Prebuilt Scene as a Foundation
To follow the technique, a prebuilt scene from the starter kit is a good choice. In the example, two coffee cups with a logo and a tote bag stand on a surface. Open the file and continue working with it. This way you don't have to take care of models and materials at the same time.

Step 7: Insert a City Backdrop
Now the scene should look more realistic. To do this, drag and drop a city backdrop onto the canvas. Make sure that the objects are no longer centered and frontal after insertion. A central perspective quickly looks garish and not very exciting.

Step 8: Realign Objects with the Horizon Tool
With the Horizon tool, you realign the entire scene. Click on the tool and move the scene sideways until the image composition looks harmonious. For the example, a slight shift to the side proved to be a good solution.

Step 9: Apply Match Image
Now comes the real core of the tutorial. Open the Actions panel and click the "Match Image" button. This tool performs several steps at once. First, the canvas is scaled to the background image. Then Dimension analyzes the light in the image and adjusts ambient light and sunlight accordingly. Finally, the camera perspective is also matched in relation to the image.

Step 10: Check Shadows and Light Direction
After the click, you can see how the scene changes. Dimension detects the position of the sun in the background image and uses it to calculate the shadows cast by the objects. Pay particular attention to the shadow lines and the bright areas of the photo. If ambient light and sunlight are transferred one to one, believable lighting is created. Dimension calls this process Match Sunlight.

Step 11: Adjust Ambient Light
In the panel, you will find numerous settings for the ambient light. By default, Dimension adopts the light of the backdrop. However, you can also choose a different lighting setup, such as a studio softbox. This makes sense if the logos are poorly lit in backlight. The softbox provides studio light that works in addition to the backdrop. This combination is common in the studio when you use a flash head to light the scene in a targeted way.

Step 12: Adjust Sunlight, Cloudiness and Sun Height
The sunlight can be controlled independently of the ambient light. You can additionally activate it and increase or reduce its intensity. Observe how the shadows become stronger or weaker. Slight cloudiness creates diffuse light without harsh shadows. With a very bright sky, it is advisable to set the cloudiness slider moderately, for example to around ten percent, so that the scene remains authentic.
With the sun height, you determine how high the light is. A low sun on the horizon creates long shadows. In the example, the sun is set to about 20 degrees. Via the rotation, the shadows change all around. For science fiction backdrops, you can also tint the sunlight.

Step 13: Render and Refine the Scene in Photoshop
When the scene is convincing, render it and open it in Photoshop. There, you copy the result onto a new layer and convert it into a Smart Object. This allows you to apply filters non-destructively. You can adjust the layer again at any time without losing quality.

Step 14: Add Lens Flare
With a lens flare, the scene looks even more lively. Add the filter and set the direction of the sun's incidence. Make sure that the flare matches the position of the sun in the image. Then confirm the setting.

Step 15: Use Camera Raw for the Final Look
In the Camera Raw filter, you can refine the look further. You can make your own settings or use one of the numerous presets. Note, however, that the colors of the logo can change due to the look. If the color fidelity of the logo is important, choose a preset carefully and check the result closely.

Step 16: Match Image for Other Objects
The function can be applied to any object in the scene. A table, for example, can also be treated with "Match Image". Dimension then detects the perspective anew and aligns it so that all objects stand neatly on the table. Just try it out. With a bit of playfulness, surprisingly coherent scenes often emerge.

Summary ??? Adobe Dimension: Designing Backgrounds and Scenes with Match Image
In this tutorial, you learned how to build backgrounds from gradients, your own images, and Adobe Stock. You saw how the "Match Image" tool automatically adapts light, sun, and camera perspective to a background image. You then adjusted ambient light, sun intensity, cloud cover, and sun height, and refined the scene in Photoshop with Smart Filters, Lens Flare, and Camera Raw. With this workflow, you can quickly place products in believable environments.
FAQ
Do I need Photoshop to use Dimension?No, Dimension also works without Photoshop. However, Photoshop is very helpful for editing gradients and fine-tuning the scene.
Can I also use my own photos as a background?Yes, you can insert JPEG files and PSD files via drag and drop or load them via the Background panel.
What happens when I click "Match Image"?Dimension scales the canvas to the background image, adopts ambient light and sunlight, and adjusts the camera perspective.
Can I still change the automatically detected lighting conditions?Yes, you can replace the ambient light with other settings, adjust sun intensity, cloud cover, and sun height, and even tint the sunlight.
How do I change a gradient afterwards?Click the edit field in the Gradient panel. The gradient opens in Photoshop. After saving and closing, it is updated in Dimension.
Why should I be careful with Camera Raw presets?Some presets change the colors significantly. If the color accuracy of a logo is important, you should check the result carefully.

